
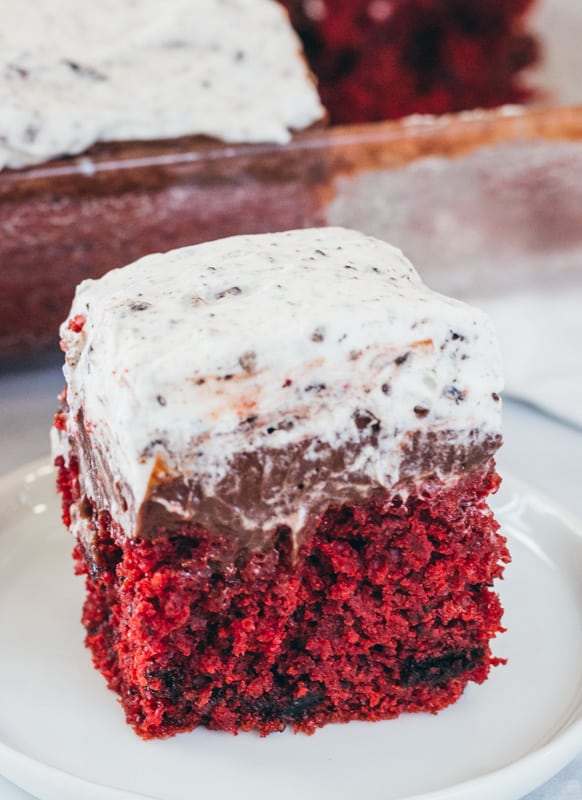
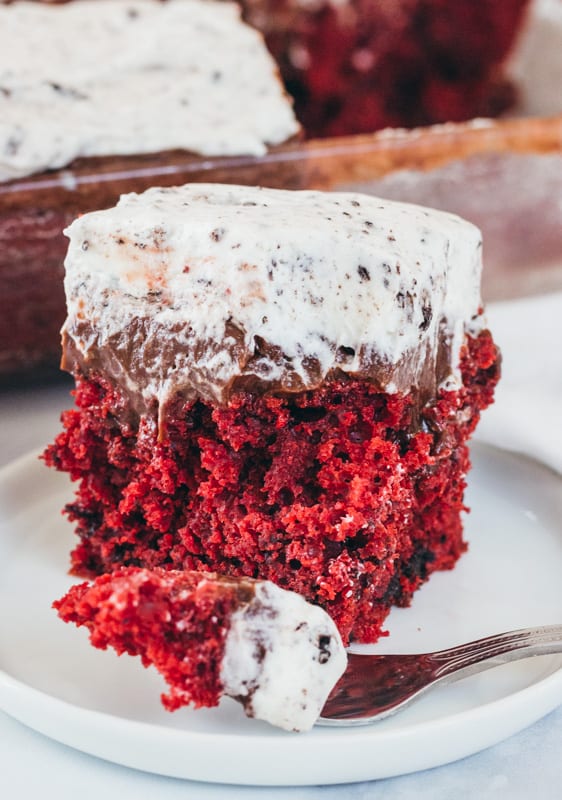
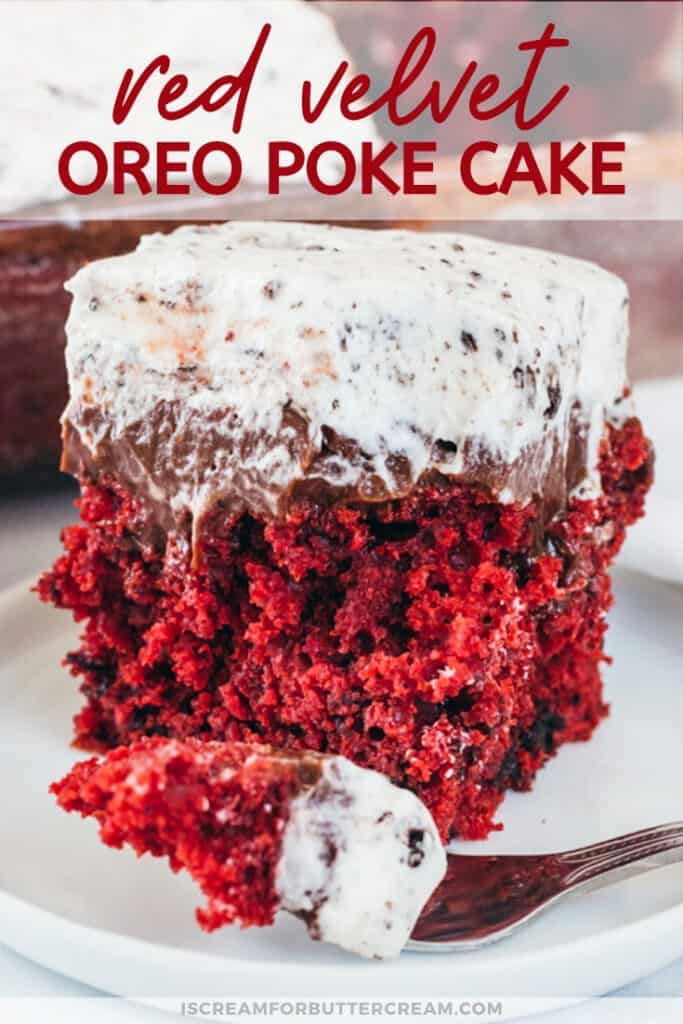
A moist red velvet cake with chopped oreos covered with a thick chocolate pudding soaked into the cake then topped off with a fluffy cream cheese and oreo whipped topping.

Hey there! Before you scroll, there’s lot’s of important stuff in the post!…including the FAQ section, which may answer any questions you might have about this recipe. Enjoy!
Have you ever had a poke cake? If not, you’re in for a treat. Essentially it’s just a cake that’s baked, but then when it’s still warm, you poke holes in it and pour in pudding.
The pudding then soaks down into the cake a bit and whoa…flavor overload. Then you top it all off with a whipped topping, which I cranked up a notch by adding in cream cheese and Oreos. ?
This cake is a chilled cake, so it’ll be kept in the fridge and what I’ve learned is that it’s even better after it’s been in the fridge overnight and the cake has had more time to soak up the pudding a bit more.
LET’S TALK ABOUT SOME OF THE INGREDIENTS IN THE RED VELVET OREO POKE CAKE:
Red Velvet Cake Mix: This cake is easy to do because the base of it is a cake mix. You’ll be adding more ingredients to it, so it’s not going to taste like a cake mix cake, but it assures you’ll get a nice moist cake in a shorter amount of time.
Oreos: This is the secret ingredient and you’ll used crushed Oreos for both the cake and the topping. I used a family size package of Oreos and had extra left over, so a regular sized package should be enough.
Chocolate pudding: This will be the pudding that’s soaked into the cake. If you don’t like the idea of using chocolate pudding, you could always use white chocolate pudding instead.
Cream Cheese: This is what takes the whipped topping up a notch. You won’t be using boring ol’ Cool whip on this cake. You’ll be making your own amazingly good whipped topping.
Heavy Cream: Ok, heavy cream is also called whipping cream (not whipped cream). You’ll use this to make the whipped topping. Using some type of lower fat milk won’t work here. You need the fat so that it will actually whip up and you want it cold.
TIPS & FAQs FOR THE RED VELVET OREO POKE CAKE:
This cake recipe makes a really thick cake and if your pan isn’t thick enough, it can bake over. If you have a thinner pan, then you may just want to make the cake recipe as directed on the cake mix box without adding all the additional ingredients for the cake part.
This helps the pudding soak in.
You want the pudding to just be thickening up, but not thick yet. It needs to be somewhat still liquid so that it can soak into the holes you made.
I didn’t and I really should have because the pudding thickens up quickly.
You want the cake to be fully chilled before you add the whipped topping to it.
Chilling it overnight will allow the pudding to really soak into the cake and it adds flavor and moisture to it. Its SO much better after sitting overnight in the fridge.
Using a chilled bowl and chilled cream will help it whip up better.

As an Amazon Associate, I earn from qualifying purchases.
SUPPLIES USED FOR THE RED VELVET POKE CAKE:
- Meat mallet or rolling pin for crushing Oreos
- White mixing bowl set
- KitchenAid hand mixer
- 13×9 inch pan
- Cooling rack
- Large glass mixing bowl
Ok let’s get to the recipe!
**By the way, this recipe was developed and tested using volume measurements (cups etc.). I do this because most people are used to measuring, instead of weighing. You may use the metric converter button to see the weight (gram) measurements. Those numbers are estimates on weight. Your results may vary a bit if you use the weight measurements.
Recipe

Red Velvet Oreo Poke Cake
Ingredients
For the cake:
- 1 box red velvet cake mix
- 1 cup all purpose flour
- 1 cup sugar
- ¾ teaspoon salt
- 1 ⅓ cup water
- 2 Tbls oil
- 2 teaspoon vanilla bean paste (or extract)
- 1 cup sour cream
- 3 large eggs
- 15 crushed Oreos
For the pudding mixture:
- 2 boxes instant chocolate pudding (small boxes) (you can use white chocolate pudding if you prefer)
- 3 cups milk
For the topping:
- 1 (8 oz) pkg cream cheese (softened, but not warm)
- 2 cups confectioner’s sugar
- 1 teaspoon vanilla
- 1 ½ cups cold heavy cream (sometimes called whipping cream)
- 10 crushed Oreos
Instructions
For the cake:
- Preheat oven to 325 degrees. Grease and flour or spray a deep 13×9 inch pan. (See notes if you do not have a deep 13×9 inch pan.)
- Add all of the ingredients into a large mixing bowl.
- Beat on medium speed for about one minute.
- Scrape down the sides of the bowl and beat again on medium for another minute.
- Stir in about 15 crushed Oreos.
- Pour batter into greased and floured 13×9 inch pan.
- Bake at 325 for about 45 – 50 minutes.
- Set onto a rack to cool slightly (only about 15 minutes), then prepare pudding mixture.
For the pudding mixture:
- Add the two boxes of chocolate pudding to a bowl with three cups of whole milk. Whisk until it just starts to thicken.
- Immediately poke holes in the warm cake with the handle of a wooden spoon and quickly pour the pudding mixture over. Work quickly so that they pudding doesn't over-thicken.
- Spread the pudding evenly over the cake with a rubber spatula and press the pudding down into the holes you made.
- Cover the cake with plastic wrap and chill in the refrigerator for at least one hour.
For the topping:
- Add the room temperature cream cheese, confectioners sugar and vanilla to a cold glass or metal bowl.
- Use a whisk attachment if you're using a stand mixer. If you don't have a stand mixer, just use a regular handheld mixer and mix it as well as you can. It may still be crumbly at this point or it may be creamy depending on how warm your cream cheese is.
- Now, you'll add in your cold heavy cream, but only a small amount at a time. You'll add it in four parts slowly as follows:
- Pour in a small amount of the cold heavy cream. (Only pour in about a ¼ cup at this point.) Mix well until creamy.
- Pour in a bit more of the heavy cream and mix that until very creamy. (You're slowly adding in the heavy cream, so that the mixture doesn't become lumpy.)
- Do this two more times (until the rest of the heavy cream is all added).
- Once all the liquid is incorporated, whip on high until stiff peaks form (about a couple minutes).
- Use a wooden spoon or a rubber spatula (not your mixer) to gently fold in about 10 crushed oreos.
- Spread the topping onto the chilled cake.
- Cover the cake again and chill overnight. It's best eaten after it's chilled overnight because the pudding has a chance to soak into the cake.
Video
Notes
Nutrition
How to Share
I’d love for you to share this recipe link or tag it, but please do not share screenshots or copy/paste the recipe to social media as the content and photographs are copyright protected and we (bloggers) work really hard on our content. Sharing the link, tagging us on socials and pinning it is super appreciated though!
OTHER POSTS YOU MIGHT LIKE:
Don’t Forget to Pin it for Below!

Patricia
hi Kara Jane,
I am definitely going to make this for my daughter’s 40 something Birthday in couple weeks, as this has everything she loves in one cake! 🙂 one question I have before I make it, could you please tell me how deep the 13 x9 pan should be to avoid overload? I know you warned against one that is too shallow. Thank you! I make your cream cheese pound cake last week, and it was so Delicious!!!! Really appreciating your cake mix base recipes!!
Kara Jane
Yes I sure can! The one I used was probably around 3 inches tall. My normal 13×9 inch glass pan is around two inches tall, but I was temporarily displaced when I made that video and post and was living in a rent house with rented housewares because of a fire. I used the glass pan they provided me and it was definitely deeper than my normal 13×9 inch pan. It filled it up quite a bit and rose up to the top. It makes a tall cake slice as you can tell in the pic. You could use a regular metal pan that’s 13×9 inch…usually you can find those in deeper sizes rather than glass pans.
Another thing you could do if you have two regular depth 13×9 inch pans is to just pour half the cake batter into one and the other half in the other pan and then split the topping between the two. You’d then have two 13×9 inch cakes. You might want to bake those for a little less time though since the cake layer would be a bit thinner, but that should work just fine.
One more option would be to use about 2/3 of the batter in a regular 13×9 inch pan and then make cupcakes out of the rest.
Hope this helps!
Judy Miller
Kara Jane,
This was so scrumptious and easy to make!!! I made this for our church gathering on Sunday and I got rave reviews! Thank you so much for this recipe. It was easy to make and everyone loved it!
Kara
Oh yeah, Judy! So glad everyone loved it! I could eat SO much of this one…WAY too much. lol