
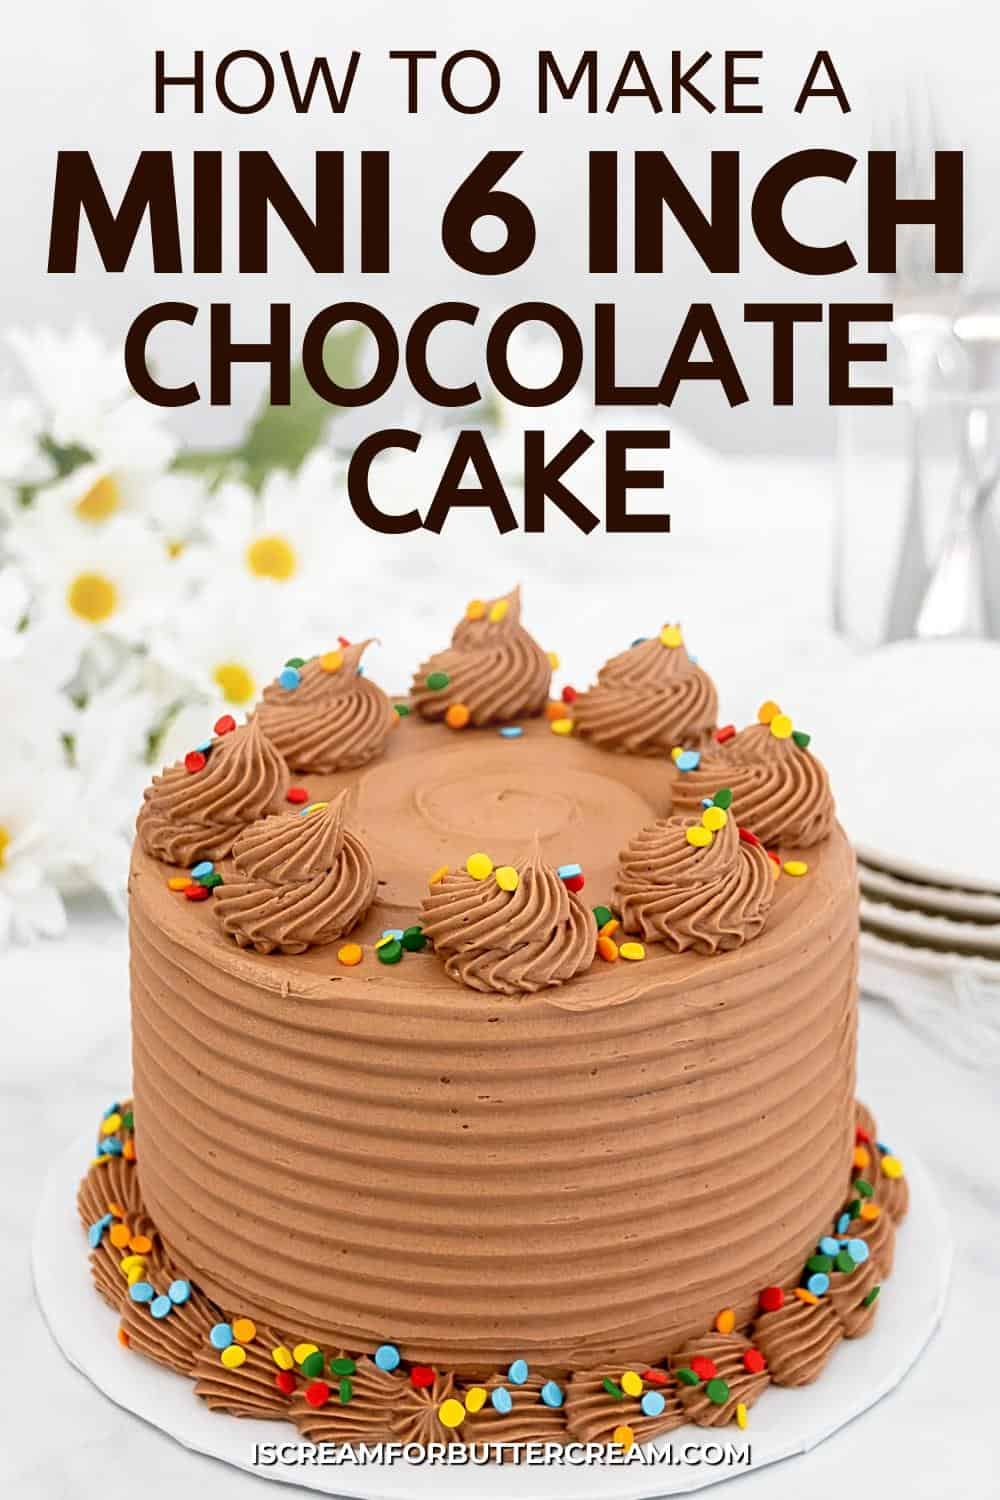
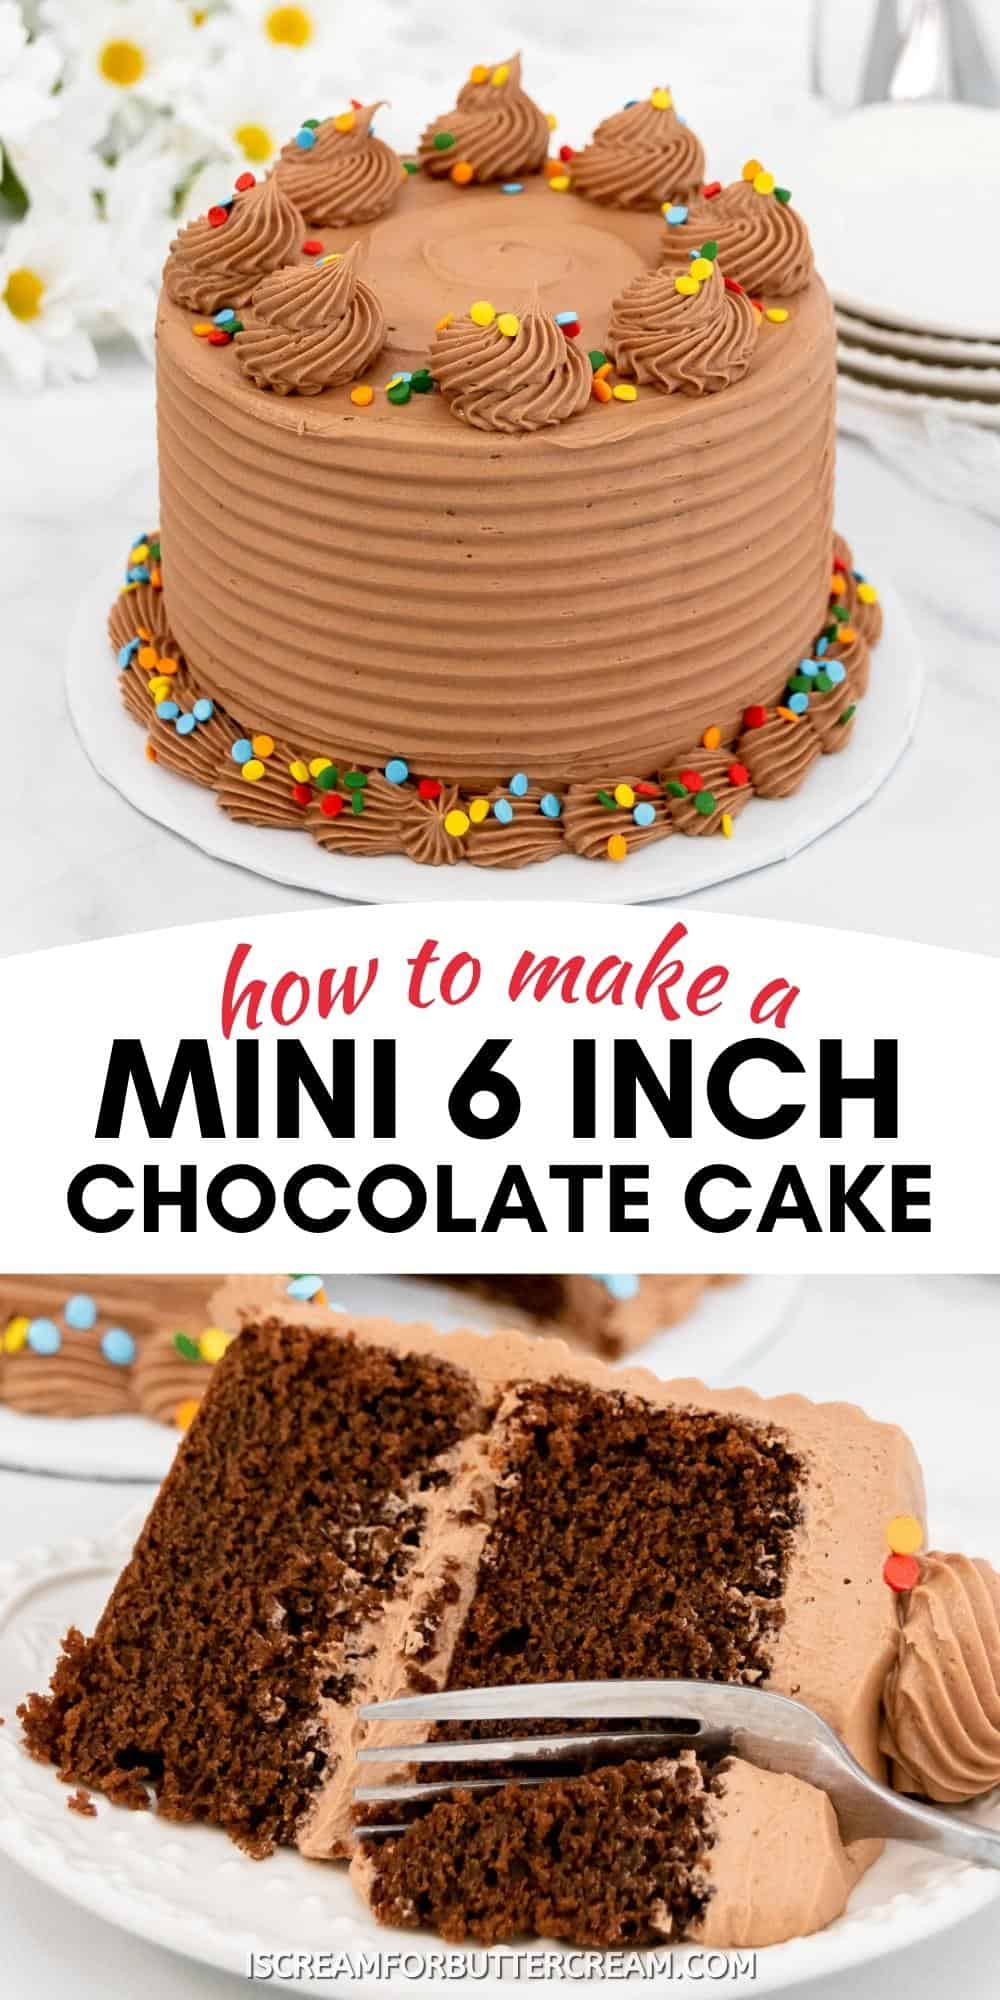
A moist scratch mini 6 inch chocolate cake recipe you can make as a small layer cake for yourself, a small birthday party, or dessert for two. Sometimes you just don’t need a large cake.
Maybe it’s a small party and you just need a small cake recipe, a smash cake or just a mini birthday cake. Maybe there are only a few people in your household, then this two-layer, 6 inch cake is the perfect size.
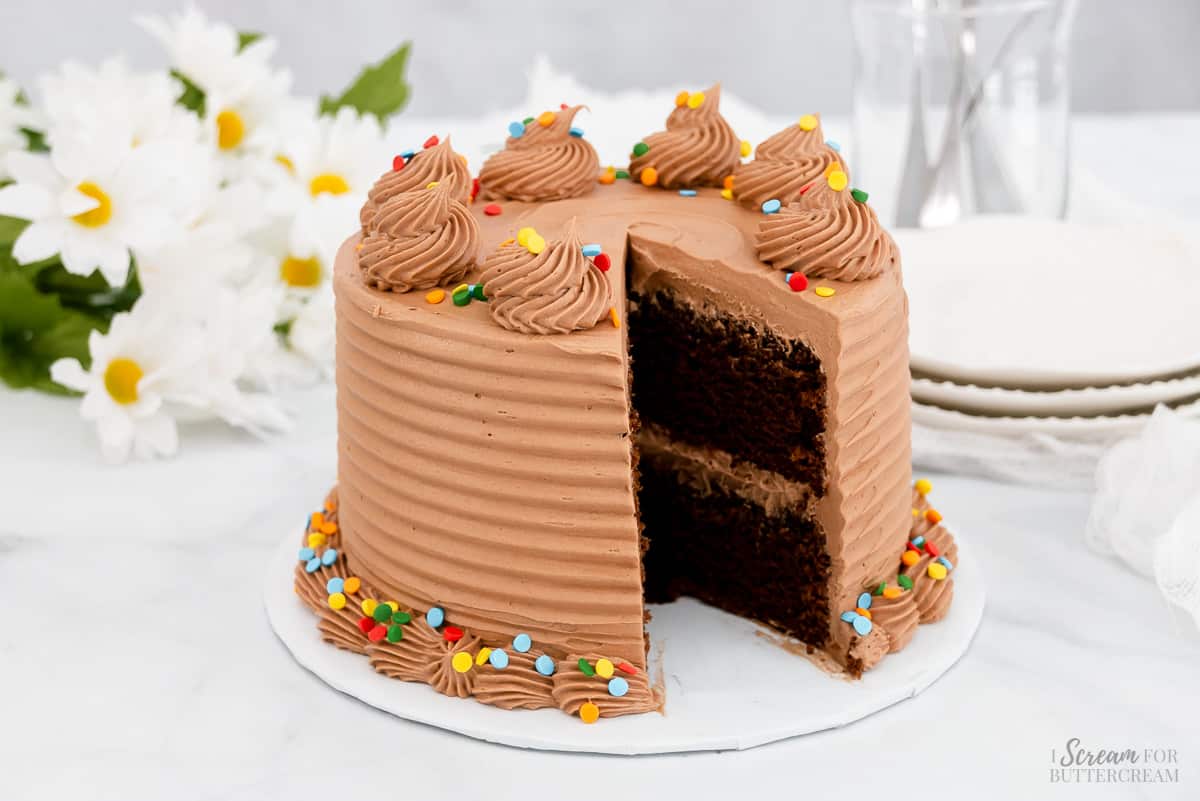
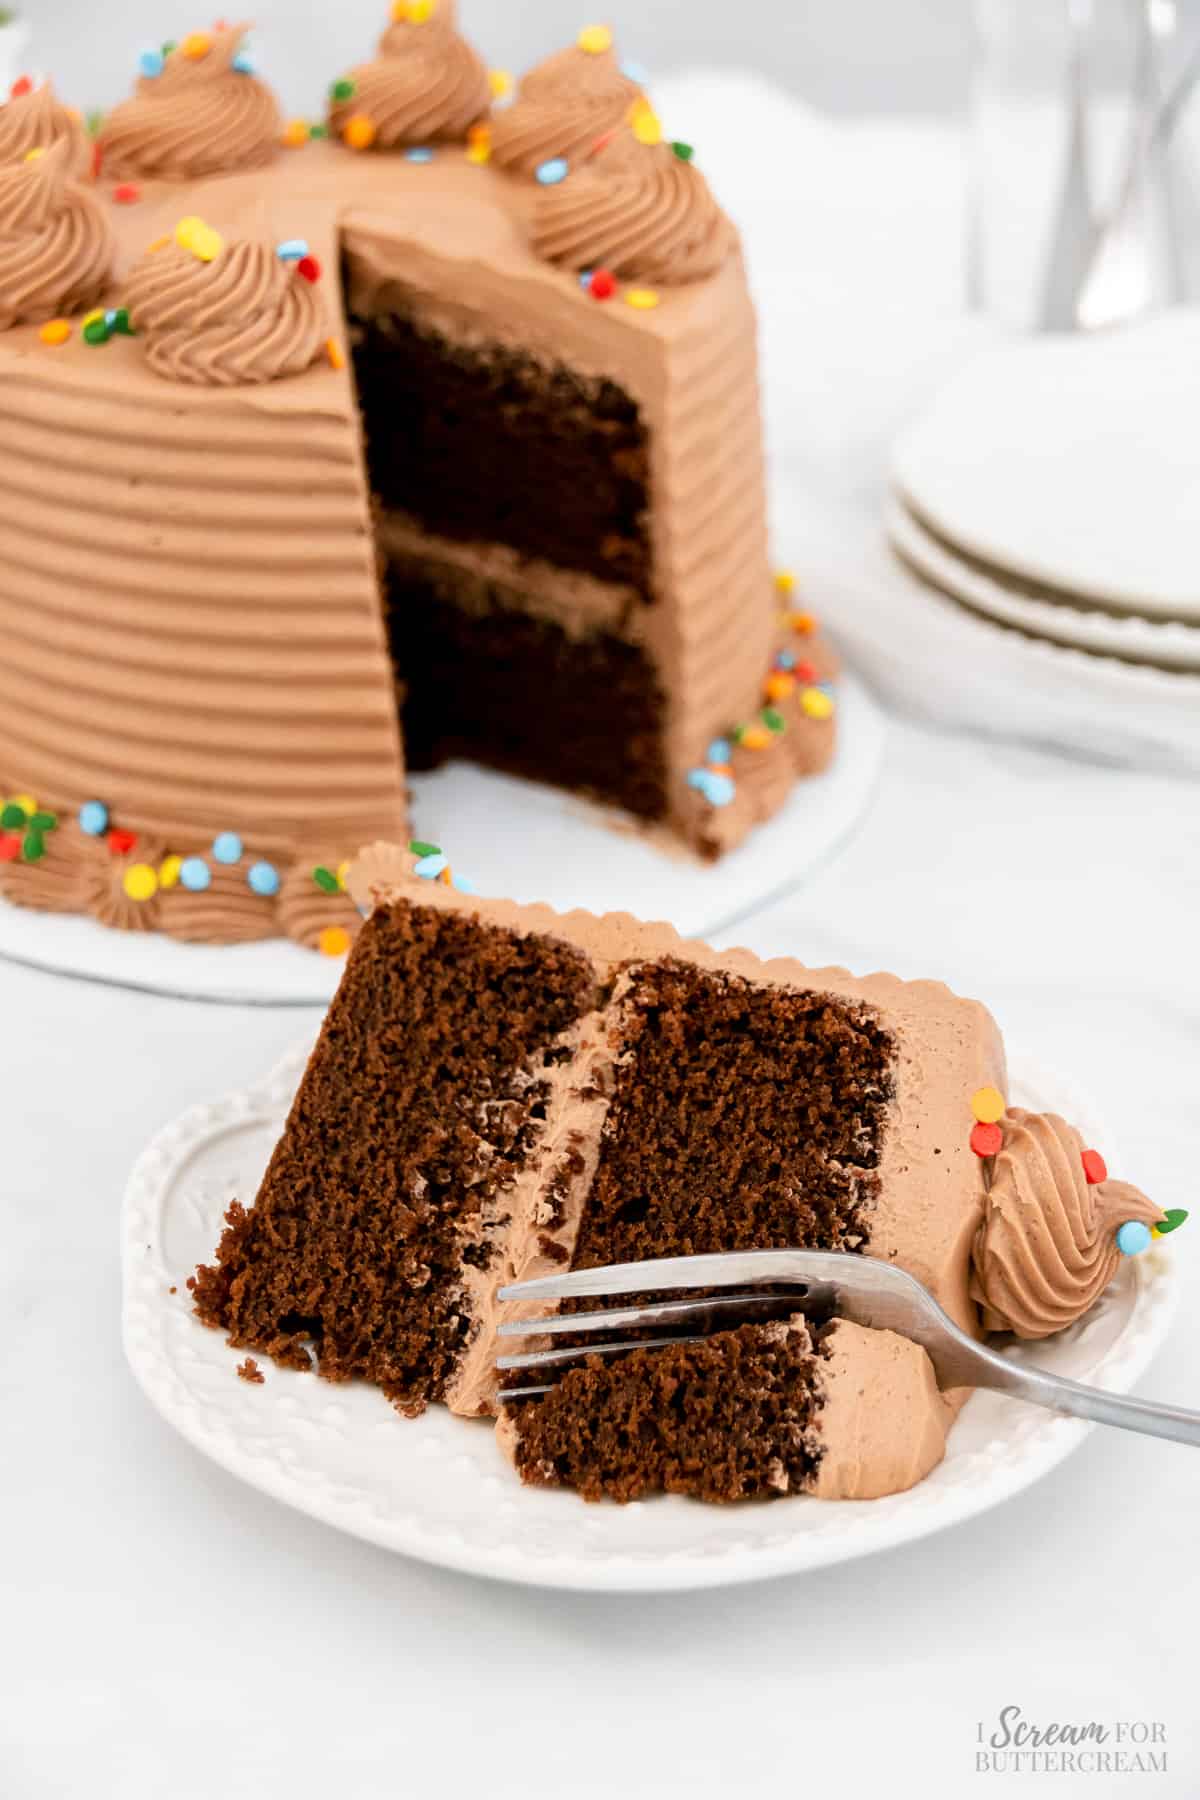
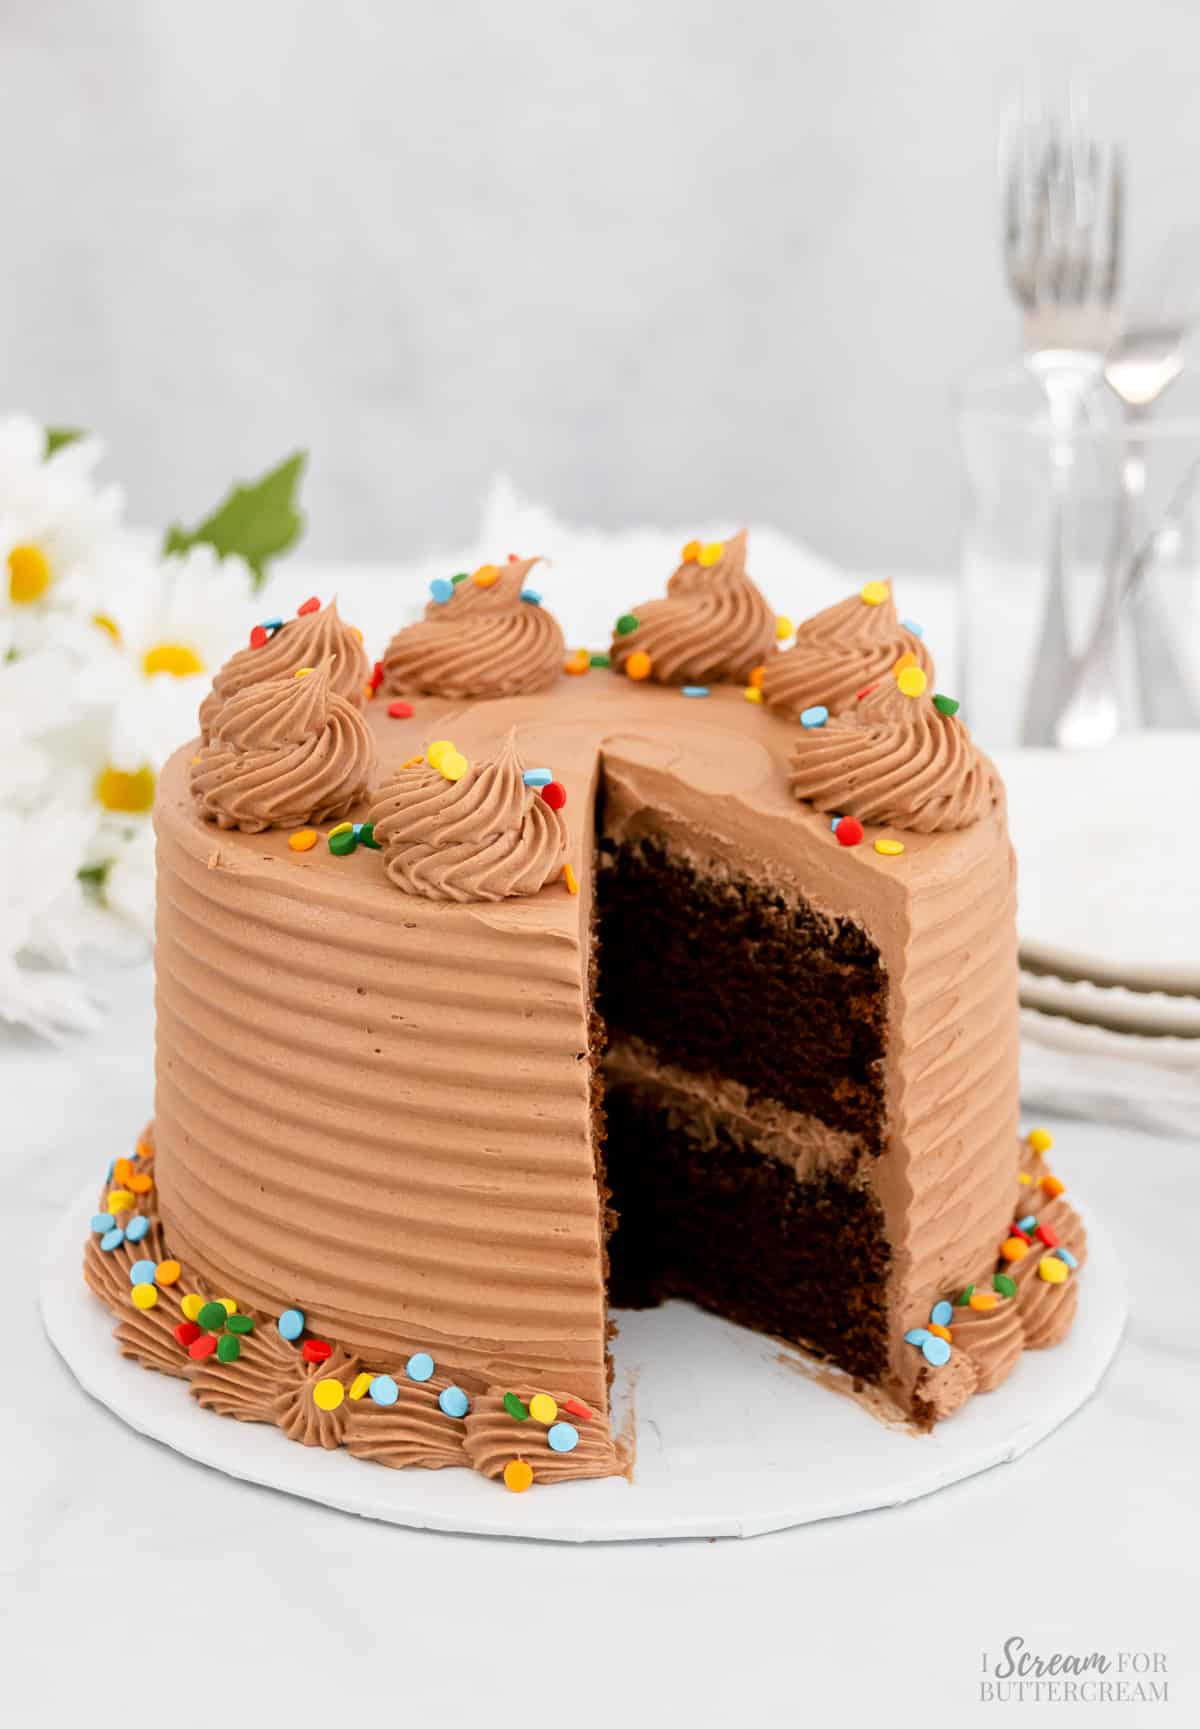
This chocolate mini cake is not only cute, but it’s deliciously moist and full of chocolate flavor. First, you’ve got two layers of rich chocolate cake, then everything is topped off with smooth chocolate buttercream frosting.
You can decorate this mini layer cake if you like, but it’s also ok to go the simple route and just cover it with buttercream and no designs.
Oh and a trick to decorating the sides of a layer cake, is to use an icing comb or make lines around it with an icing spatula. This way, you don’t have to worry about getting the buttercream perfectly smooth.
Hey there! Before you scroll, there’s lot’s of important stuff in the post!…including the FAQ section, which may answer any questions you might have about this recipe. Enjoy!
Jump to:
Ingredient Notes:
Now let's talk a little about just some of the ingredients that are in the cake and buttercream recipes. (The list of ALL ingredients are in the recipe card below.)
All-purpose flour: For this small chocolate cake recipe, you’ll use plain all-purpose flour, so there’s no fancy flour involved. Make sure when you measure the flour, that you spoon it into the measuring cup, so that it doesn’t get packed into it. (See more about this in the FAQ section below.)
Unsweetened natural cocoa powder: This is what will give the cake and buttercream a rich chocolate flavor. Make sure to use natural unsweetened cocoa powder and not Dutch-processed cocoa powder. (See more about this in the FAQ section below.)
Baking powder & Baking soda: You’ll use both of these in this recipe. They’ll both help the cake to rise, but the baking soda is also needed since cocoa powder is an acidic ingredient.
Unsalted butter: This will be used for both the cake and the buttercream. Adding a bit of melted butter to the cake will add a slight buttery taste and it just makes this cake a little more flavorful than a chocolate cake made with only oil.
As for the frosting, the butter is what gives it that yummy buttercream taste and its creaminess.
Buttermilk: Buttermilk in cakes really helps give the cake a soft texture and it enhances the taste as well. Don’t worry though, it won’t make the cake taste like buttermilk though. (Make sure to check out the FAQ section below for questions about substitutions.)
Hot coffee or water: The coffee just enhances the chocolate, but it is not enough to give the cake a coffee flavor. Don’t worry if you don’t have coffee though or just hate the thought of using it, hot water will do the trick as well.

How to make this cake:
Let's talk about how to make this 6 inch round chocolate mini cake. (The detailed instructions are also in the recipe card below.)
Step 1:
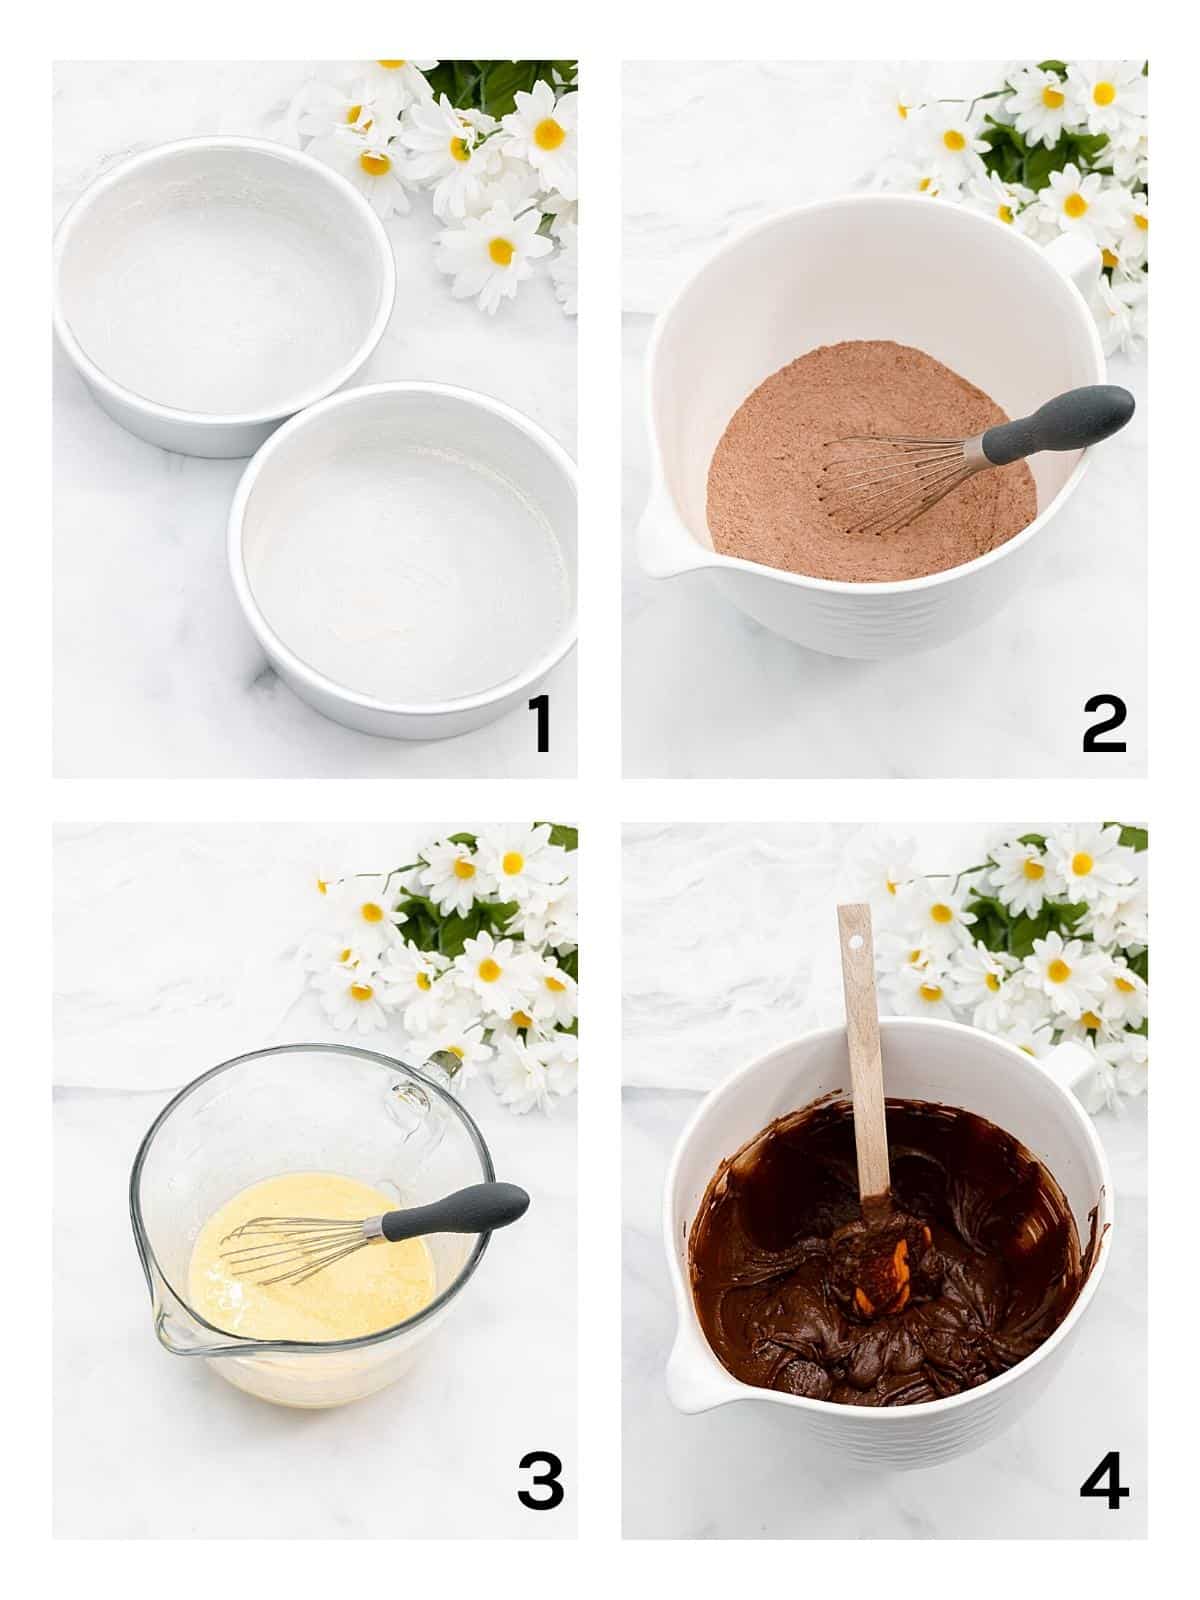
First, you’ll want to preheat the oven to 350 degrees F and make sure to grease and flour (or spray) two, 6 inch round cake pans that are 2 inches deep.
Step 2:
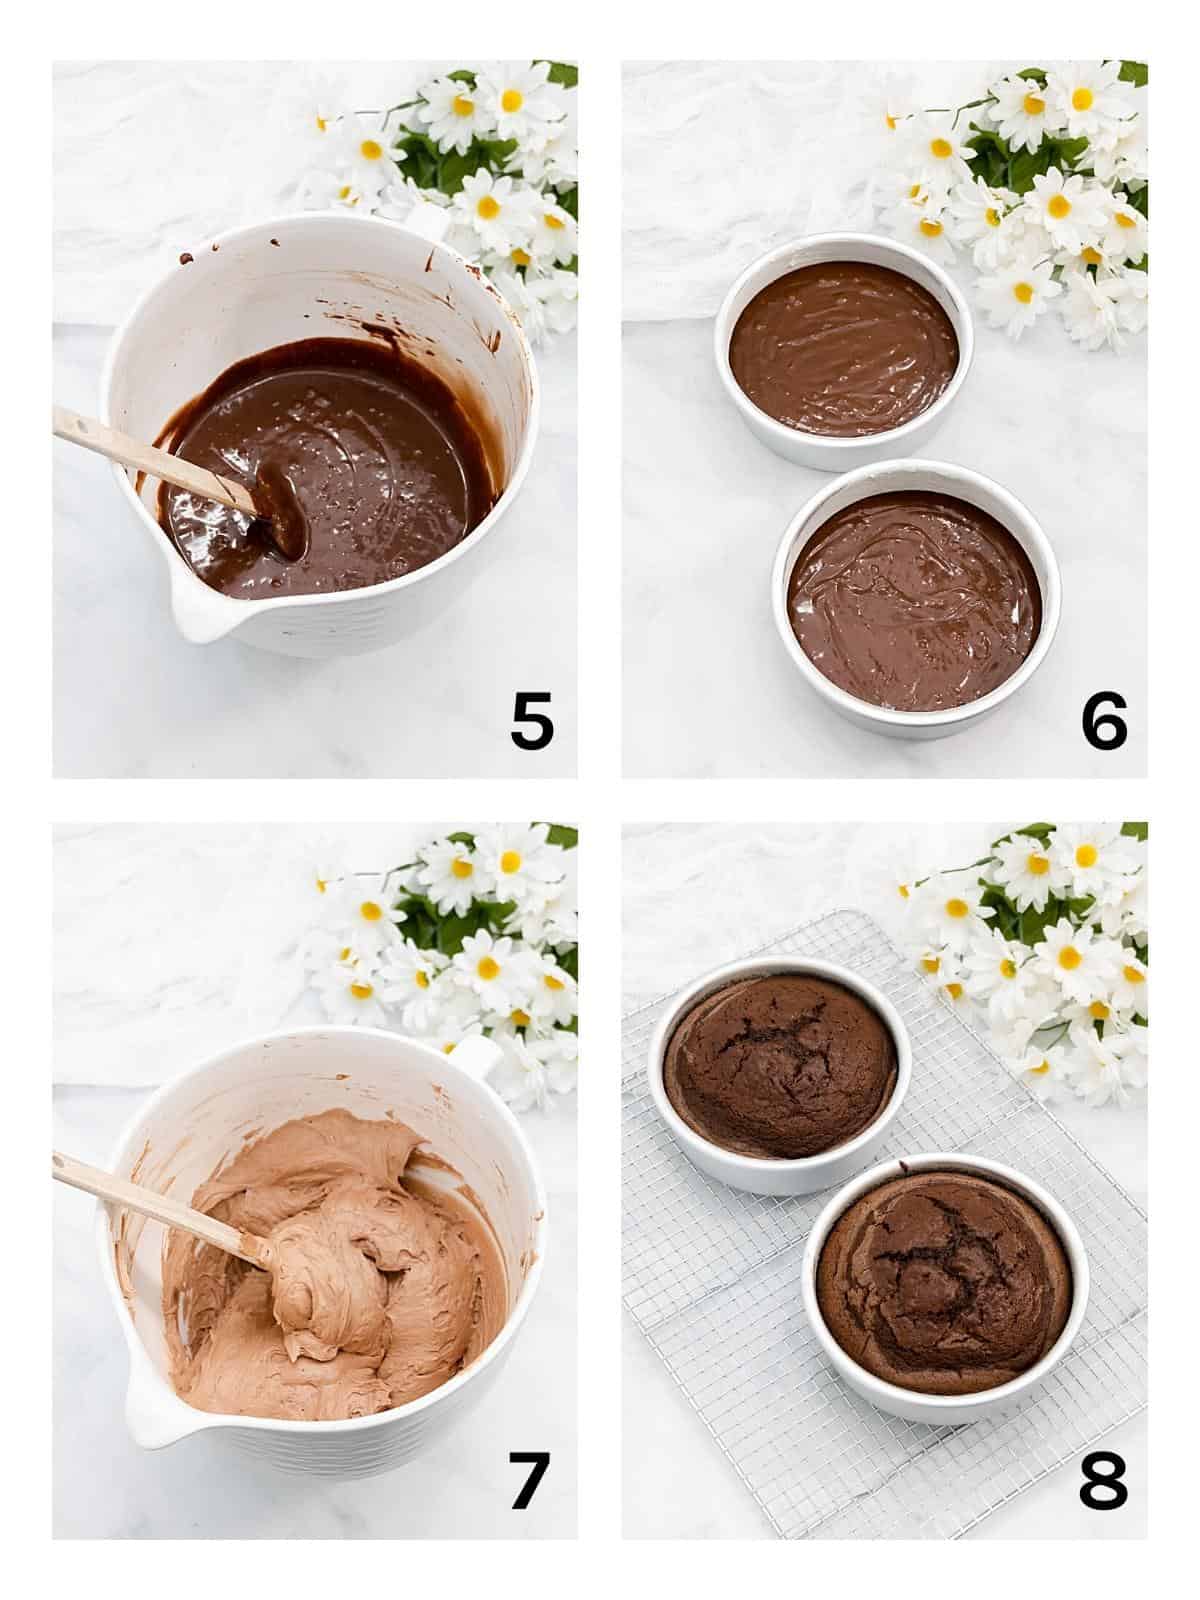
Grab a large mixing bowl and add all the dry ingredients (flour, cocoa powder, baking powder, baking soda, salt and sugar). Mix it well with a whisk and set it aside.
Step 3:
Now add all the liquid ingredients (except for the hot water or coffee) to another mixing bowl and whisk that mixture well.
Step 4:
Next, add the liquid mixture (except for the coffee or water) to the dry mixture. Mix with an electric mixer, but only until the ingredients are well combined. Then make sure to scrape down the sides of the bowl and mix again only for a few more seconds.
Step 5:
Now add in the hot coffee (or hot water) and mix until well combined, but be careful not to mix too long.
Step 6:
Pour the batter into two, 6 inch round cake pans and bake the cake layers at 350 degrees F for approximately 35-40 minutes.
Step 7:
While the cake layers are baking, mix up the buttercream, cover it and set it aside.
Step 8:
Once baked, set the cake layers on wire racks to cool for about ten minutes.
Step 9:
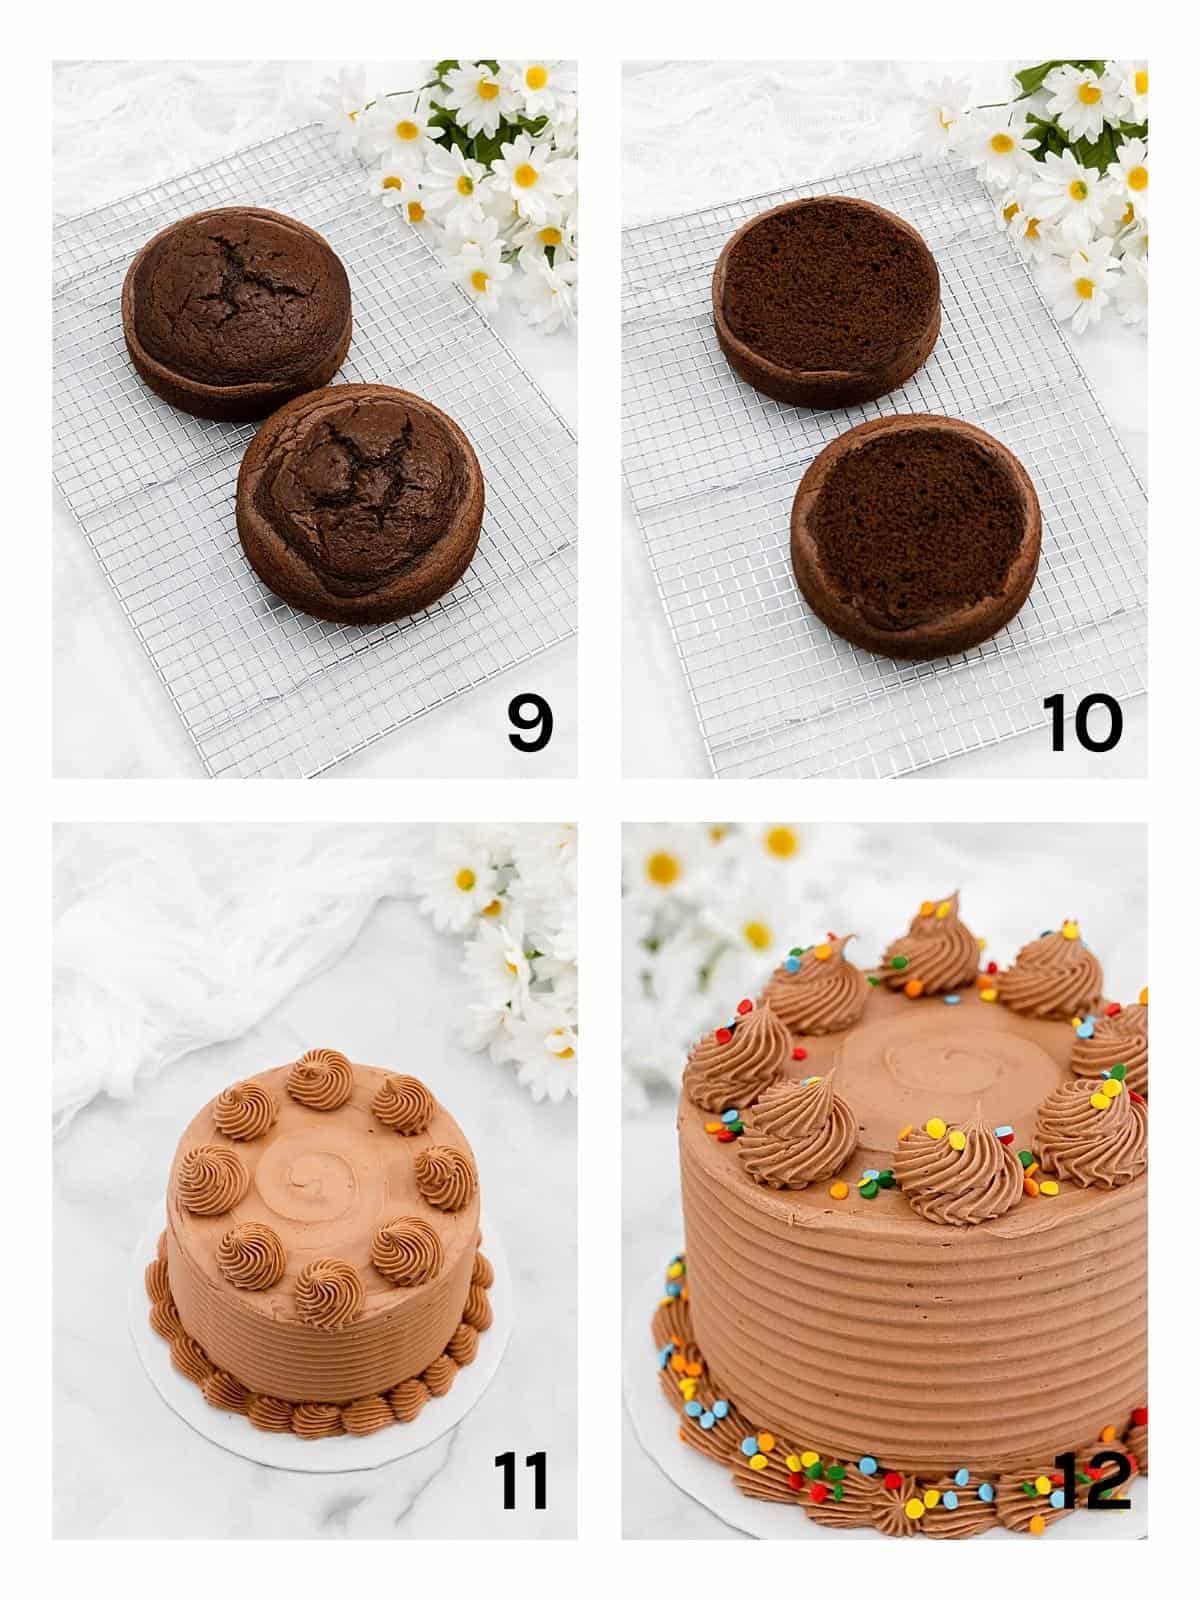
Next, take the cakes out of the pans and let them cool completely on the racks.
Step 10:
Once cool, level the cakes with a knife. (Cut off any domes that are on the cake.)
Step 11:
Add a layer to a cake plate or cake board and add buttercream, then the second layer of cake, then cover the entire cake with buttercream. You can then add a little piping to the cake if you like.
Step 12:
Add sprinkles or any other design you like and enjoy!
Tips & FAQs:
Generally, you could probably classify any cake that’s smaller than an 8-inch cake, as a mini cake. This mini cake recipe is for a 6 inch, two-layer cake.
This cake will serve about 8 people. If you cut larger sizes, it will serve less and if you cut thin slices, you will get more servings.
Make sure not to pack the flour down into the measuring cup. Spoon the flour into the cup and level it off, but don’t scoop the flour. Packing too much flour into the measuring cup will end up adding too much flour to the cake batter and will make the cake dry and tough.
Don’t use Dutch-processed cocoa for this cake as it isn’t acidic like natural cocoa powder and using it would cause the other ingredients to need to be adjusted.
If you want more information about the different types of cocoa powder, see this post: Which Cocoa Powder Should I Use?
No, you don’t want to do that. Those are different and cannot be substituted for each other. If you’d like more information on the difference, check out this blog post: Baking Powder vs Baking Soda
Unsalted is always best because you can estimate the proper amount of salt that will be added plus salted butter has a different water content than unsalted.
However, if you’re unable to get unsalted butter, you can use salted butter in the cake and the buttercream, but omit any additional salt that each recipe calls for.
Buttermilk is best here as it makes for a softer texture and really helps give the cake flavor. If you can’t get it, you can substitute with this sour milk recipe:
Fill a measuring cup to ¾ cup of regular milk, take out two teaspoons of it and replace those with two teaspoons of lemon juice or white vinegar and stir well. Let sit for 5 minutes, then use.
This will not work exactly the same as buttermilk but can work in a pinch.
You don’t, but just know that the cake will not have a coffee taste if you do use it. The coffee just brings out the chocolate flavor. If you don’t like the idea of using it though, you can just use water and it will turn out just as tasty. Just make sure not to completely omit the liquid.
Be very careful not to mix the batter too long. Scratch cakes should not be mixed for minutes at a time, or they will become dense. Stop mixing once the ingredients are well incorporated.
This cake is done baking when a toothpick inserted into the center of each layer comes out with a few moist crumbs on it or clean, but no raw batter.
This cake can be made ahead of time and frozen if desired. Let the baked cake layers cool completely, then wrap in plastic wrap and foil and place in the freezer for up to a month or two.
To thaw, place the wrapped cake layers on the counter at room temperature and let thaw completely, then remove the wrapping. Once defrosted add buttercream.
This cake can be stored, covered well, at room temperature for 2-3 days. After that, to prolong freshness, it can be stored in the refrigerator, well covered, for another 2-3 days.
That would take some calculating, but there is an 8-inch chocolate cake recipe already on the blog if you want to check that out here: Chocolate Butter Cake
This recipe should work ok for cupcakes, but since it’s a smaller batch, it won’t make a full two dozen. If you’d like a really good chocolate cupcake recipe, you’ll want to check out this post: Best Chocolate Cupcakes
This cake is best served at room temperature. If cold, pop a slice in the microwave for about 10 seconds.
If you want to add a little something extra to this cake, you could add 1 cup of mini chocolate chips to make it a double chocolate mini cake.
As an Amazon Associate, I earn from qualifying purchases.
Supplies used for this recipe:
Video:
Note About Recipe Measurements: I write recipes using volume (cups) measurements because here in the U.S., this is what people are more familiar with and I don’t want anyone to feel intimidated when baking. For metric/weight measurements, click the ‘metric’ button under the ingredients in the recipe card below. The weights are converted by a program, not me, and it’s just a best guess. I can’t guarantee that weighing the ingredients will produce the exact same results, since I test recipes using volume measurements.
Recipe
Mini 6 Inch Chocolate Cake Recipe
Ingredients
For the chocolate cake:
- 1 ½ cups all-purpose flour
- ½ cup (plus 2 teaspoons) unsweetened natural cocoa powder (not Dutch processed cocoa-see notes)
- 1 teaspoon baking powder
- ½ teaspoon baking soda
- ½ teaspoon salt
- 1 ½ cups granulated sugar
- 6 tablespoons unsalted butter, melted
- ¼ cup vegetable oil
- 1 teaspoon vanilla extract
- ¾ cup buttermilk (or regular milk mixed with 2 teaspoons lemon juice or vinegar)
- 2 large eggs
- ¼ cup (plus 2 tablespoons) hot coffee or hot water
For the chocolate buttercream:
- 1 ½ cups unsalted butter, room temperature (3 sticks)
- ⅓ cup cocoa powder
- 4 ½ cups confectioner's sugar
- 1 teaspoon vanilla extract
- 1 tablespoon milk (may add in another tablespoon if needed)
Instructions
For the cake:
- Preheat oven to 350 degrees F. Grease and flour (or spray) two, 6 inch round cake pans that are 2 inches deep.
- In a large mixing bowl, add the dry ingredients (flour, cocoa powder, baking powder, baking soda, salt and sugar). Mix well with a whisk and set aside.
- In another mixing bowl, add all the liquid ingredients (except for the hot water or coffee) and whisk well.
- Pour the liquid ingredients into the dry ingredients. Mix with an electric mixer on medium to medium-high only until the ingredients are well combined. Scrape down the sides of the bowl and mix again for only about 5-10 seconds.
- Add the hot coffee (or hot water) and mix until well combined. Be careful not to over mix. Once it's well combined, stop mixing. Don't mix for several minutes, as that is too long and could cause the cake to be dense and/or dry. Scrape down the sides of the bowl and mix again for only about 5-10 seconds.
- Divide the batter between the two, 6 inch round cake pans. Bake at 350 degrees F for approximately 35-40 minutes.
- Cake layers are baked when a toothpick inserted into the middle of each layer comes out with a few moist crumbs on it or clean.
- Set cake layers on wire racks to cool for about ten minutes, then take the cakes out of the pans and let cool completely on the racks.
- Once cool, level the cakes with a knife. (Cut off any domes that are on the cake.) Add a layer to a cake plate or cake board and add buttercream, then the second layer of cake, then cover the entire cake with buttercream. If desired, pipe borders and add sprinkles.
For the buttercream:
- In a large mixing bowl, cream the room temperature butter at medium speed until smooth.
- Add the cocoa powder and mix on low until combined, then on medium until well incorporated. Scrape down the sides of the bowl and mix again.
- Add the confectioner's sugar, vanilla and 1 tablespoon of milk and mix on low until combined, then on medium to medium-high until well mixed.
- Scrape down the sides of the bowl and mix again.
- Check the consistency. If it’s too thick add another tablespoon of milk and mix well.
- Spread buttercream onto completely cooled cake.
Notes
Nutrition
How to Share
I’d love for you to share this recipe link or tag it, but please do not share screenshots or copy/paste the recipe to social media as the content and photographs are copyright protected and we (bloggers) work really hard on our content. Sharing the link, tagging us on socials and pinning it is super appreciated though!
Other posts you might like:
Ronky
Hi Kara, looks really nice. Yet to try though. What is the height of each layer and what was the final height of the cake? Is it quite sturdy for stacking? I like tall cakes but yet to find a sturdy but moist chocolate cake recipe. Afraid of the cake toppling over. Might this be the one?
Kara
Hi there, this one felt pretty sturdy to me. Each layer was probably a little less than 2 inches. I used 6-inch round pans that are two inches deep, so when baked, the layers are probably a little shorter than 2 inches. I didn’t measure the height of the cake, but with the icing and filling it was probably around 5 inches tall.
Nimisha
Hello Kara,
Absolutely loved this recipe! The perfect decadent chocolate cake and I’d like to make a bigger cake next time. How would the ingredient proportions look like for an 8inch cake?
Kara
Yay! So glad you loved this one! I do have a couple of similar chocolate cake recipes on the site that I’ve written for two, 8 inch cake pans. They’re not exactly the same, but they’re very close. Here are the links for those:
https://iscreamforbuttercream.com/moist-chocolate-raspberry-cake/#recipe (just omit the raspberry)
https://iscreamforbuttercream.com/chocolate-butter-cake/#recipe
I think you could perhaps multiply this 6-inch cake recipe by 1.5 (essentially adding another half batch to it) and it would come out with the proper amount of ingredients, but I have not tested that out to say for sure if that would work or how it would turn out.
Let me know if you have any additional questions!
(edited for a typo in the links)
Maryann
Just made this cake it came out great butter cream was easy to make. But I wish you could do videos step by step it would be wonderful Iwill follow up after our party
Kara
Hi Maryann, so glad you liked this! There is a video on the post right before the recipe card if you’d like to check that out. It’s a pretty short video, but might be a little help. 🙂
Merlexa
I tried making this cake but I got an enclave cake. I followed each of the measurement correctly too. So I don’t know what went wrong. I just wasted my time.
Kara
So sorry about that. I’m not sure what could have happened. Sometimes if it’s pulled out of the oven a little too early, then it could cave in or if the cake batter was mixed a little too long, it could also sink. I do try to test my recipes multiple times, but it’s hard for me to say exactly what could have happened to yours.
Hailey
This recipe was great! I modified it slightly by adding salt to the buttercream and the cake was a little bit dry but that doesn’t really bother me. I would recommend a simple syrup for those who care, otherwise everything else was perfect! I will be using this recipe again
Kara
Hi Hailey, thanks for the great review. If you bake it again, try baking for a little less time (just a few minutes) and see if that addresses they dryness problem. Thanks again for the review. 🙂
Kristina
Decent cake recipe, frosting really needs salt to cut the sweetness or more cocoa to balance the sugar. Also, the icing was a little stiff and I had to add a lot more than 2 tablespoons to soften to spread on the cake.
Kara
Thanks for the review. The great thing about buttercream is that it’s so customizable and you can always adjust it. Glad you were able to fit it to your needs. 🙂
Akshay Maheshwari
Can you make this without an electric mixer? Also, do you have a ganache recipe I could use instead of the frosting? Finally, can you replace the vegetable oil for olive oil or more butter?
Kara
Hi there, yes I think it would be okay to try and make this without an electric mixer. Try just using a whisk if you don’t have one. I have a post on how to make ganache and it has several different options. Here’s the link for that: https://iscreamforbuttercream.com/how-to-make-ganache/
You could try olive oil, but it may leave an aftertaste…it’s not really the best option. It may work out to replace the oil with butter, but you’ll need to use more. So maybe use 1/4 cup butter instead of the 1/4 cup oil that the recipe calls for. The cake might not be quite as moist, but I think it would be fine.
Tracey
Hi this is the most moist and delicious cake I have ever made. Worth ever calorie thank you for such an easy recipe. I will be making this regularly.
Kara
Tracey, I’m so glad you loved it! I have to agree that it is worth every calorie! 😄 Thanks for the great review!
Jules
Husband and son claim this to be “the best cake ever.” Quite a claim since I bake constantly. I love the small size!
Kara
Oh wow…what a compliment! So glad they loved it and thanks so much for the great review!
Sandra Kay McCallum
I followed this exactly and had to scramble for additional pans. Way more than 2 6 inch layers. I also got 3 ramakins. Taste is good.
Kara
Oh goodness! It only fits two of my 6-inch pans, so I’m not sure what happened there. I wonder if you might have used extra large eggs? Either way, I’m glad it tasted good though!