
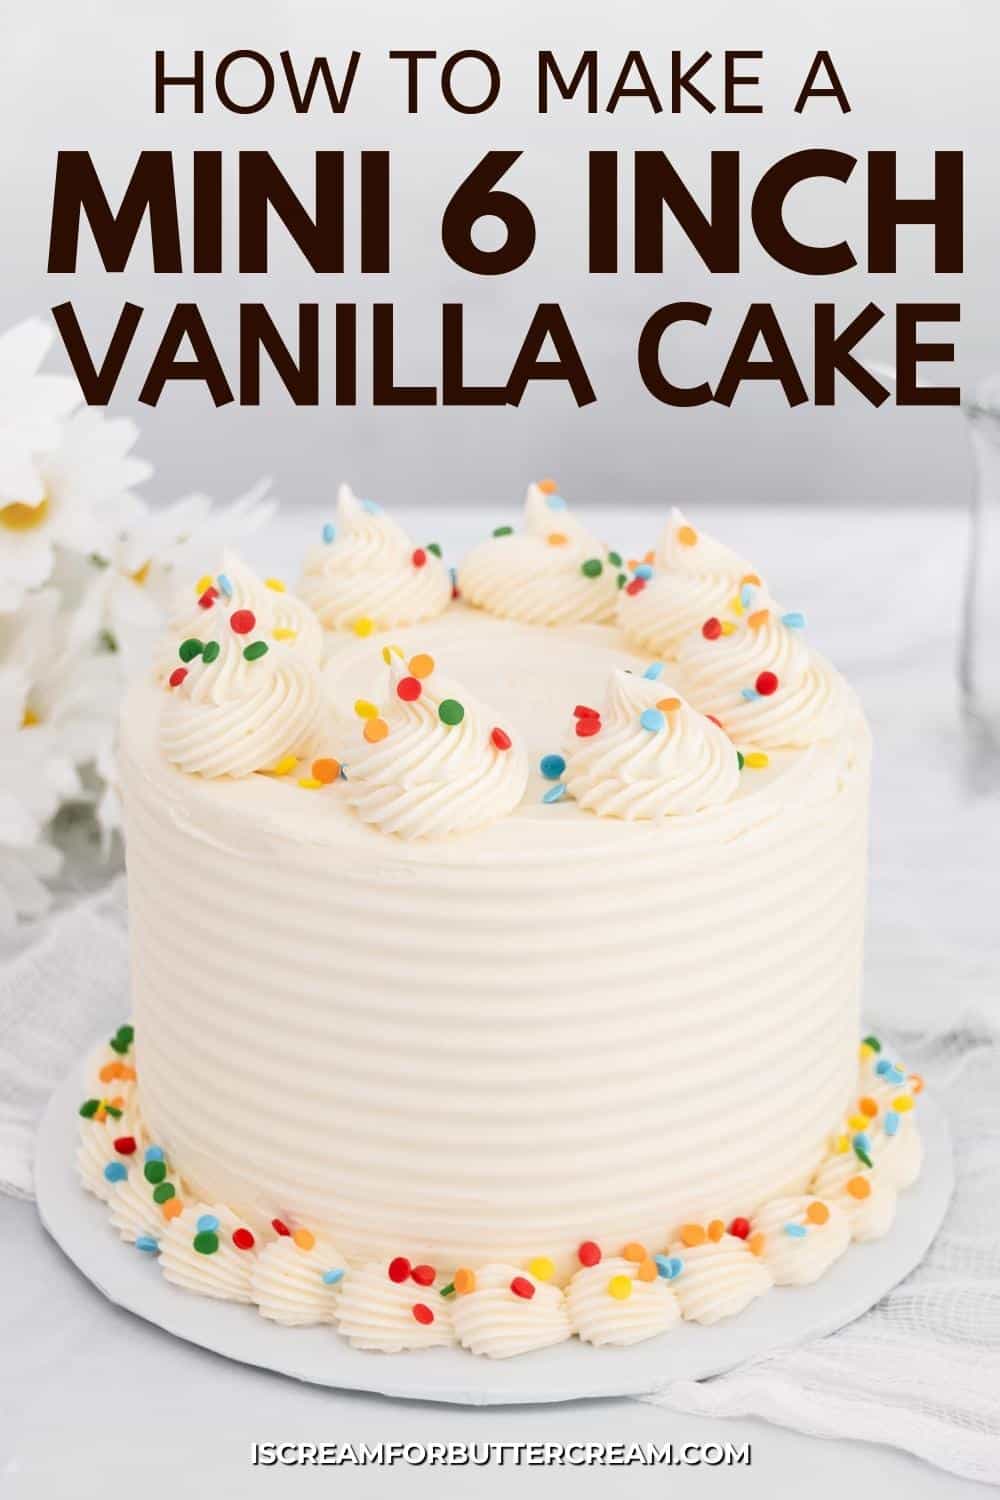
A moist scratch mini 6 inch vanilla cake recipe you can make as a small layer cake for yourself, a small birthday party, a smash cake or even a dessert just for two. Sometimes you just don’t need a large cake.
You might just need a small smash cake or maybe there are only a few people in your household, then this two-layer, 6-inch mini cake is the perfect size.
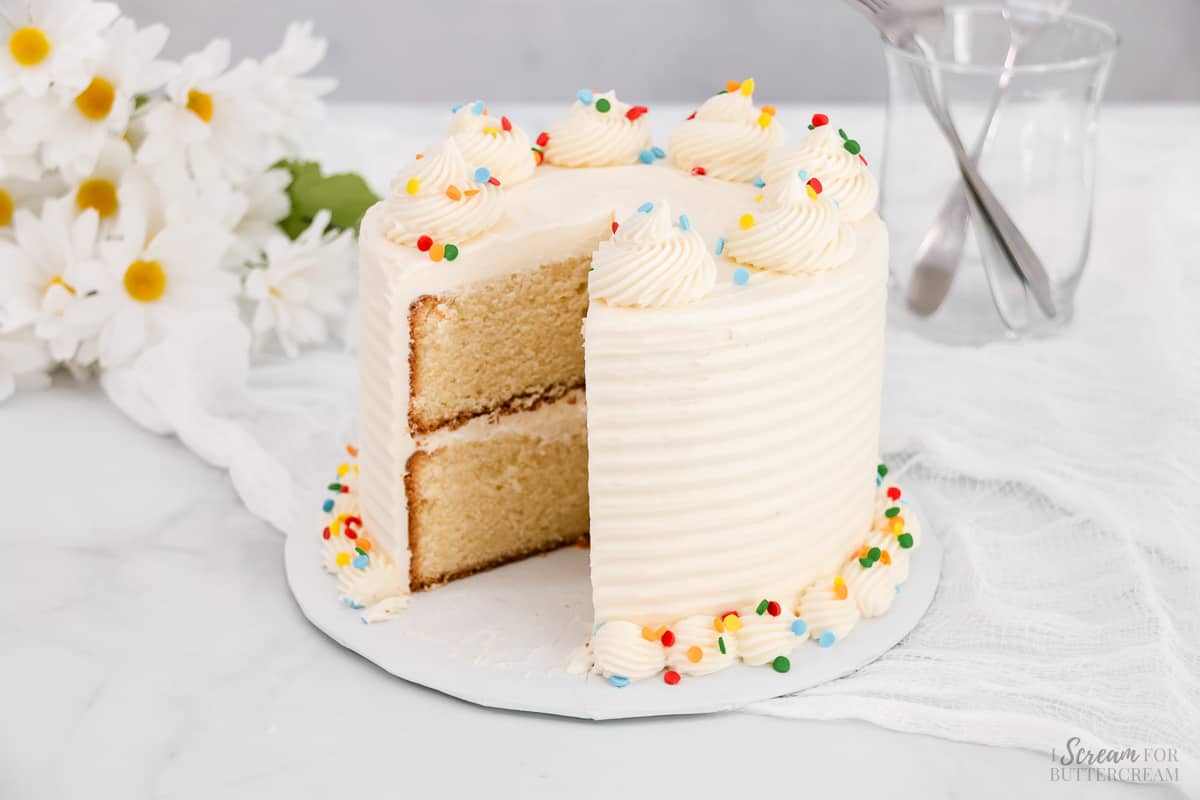
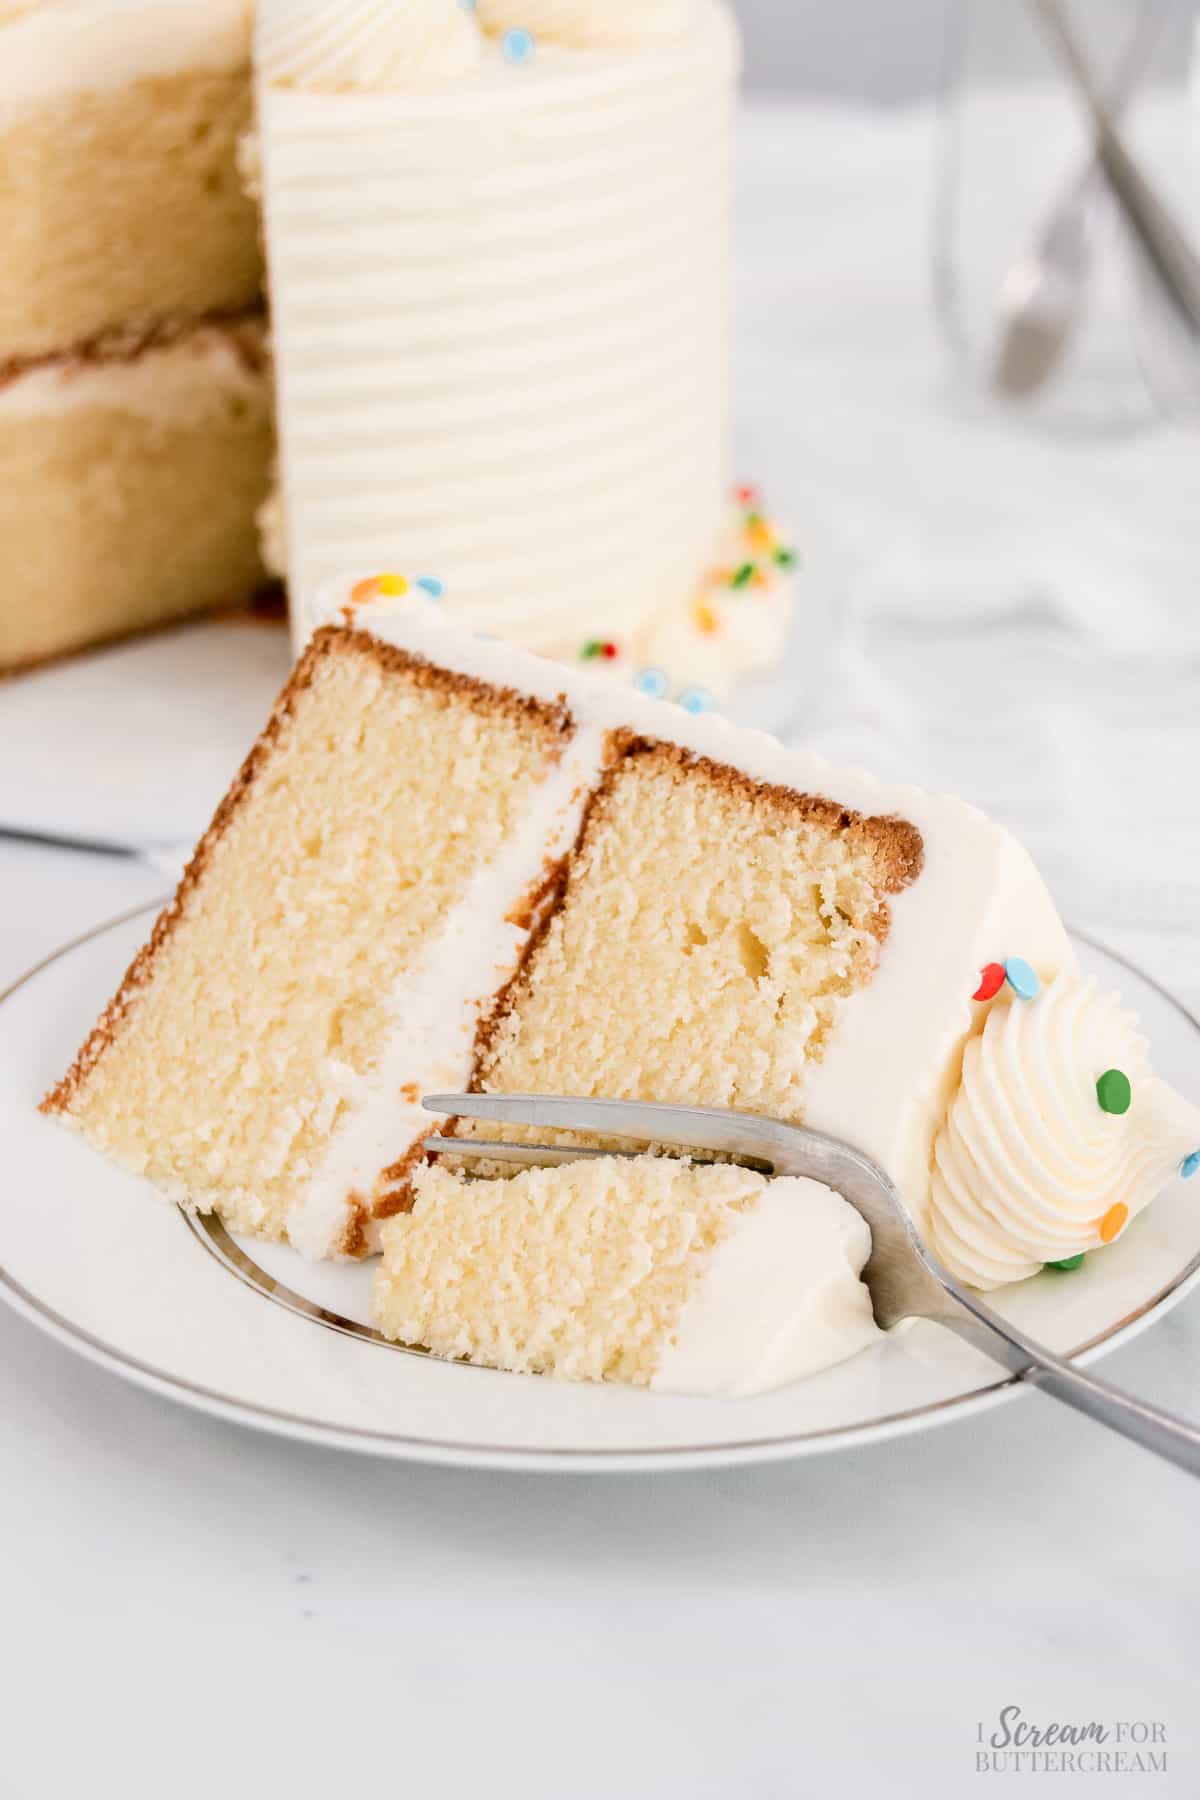
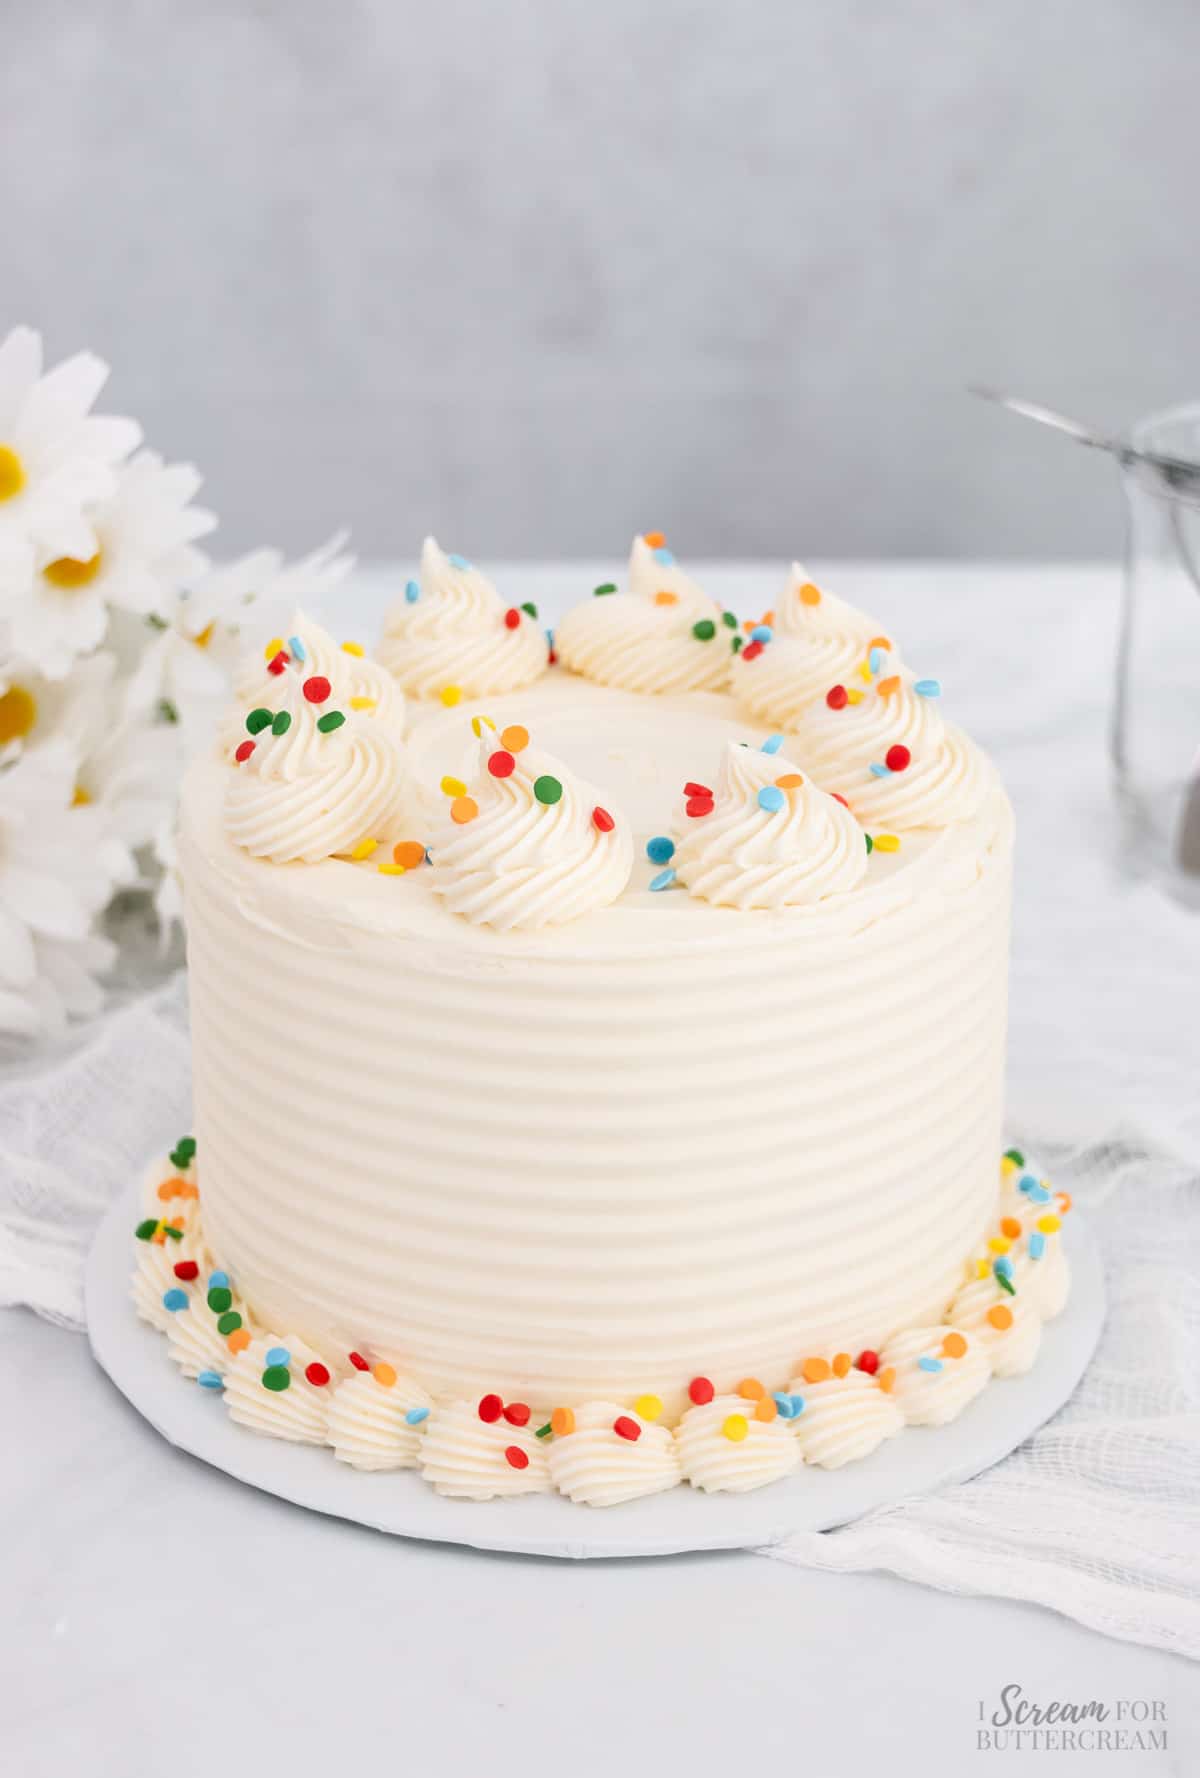
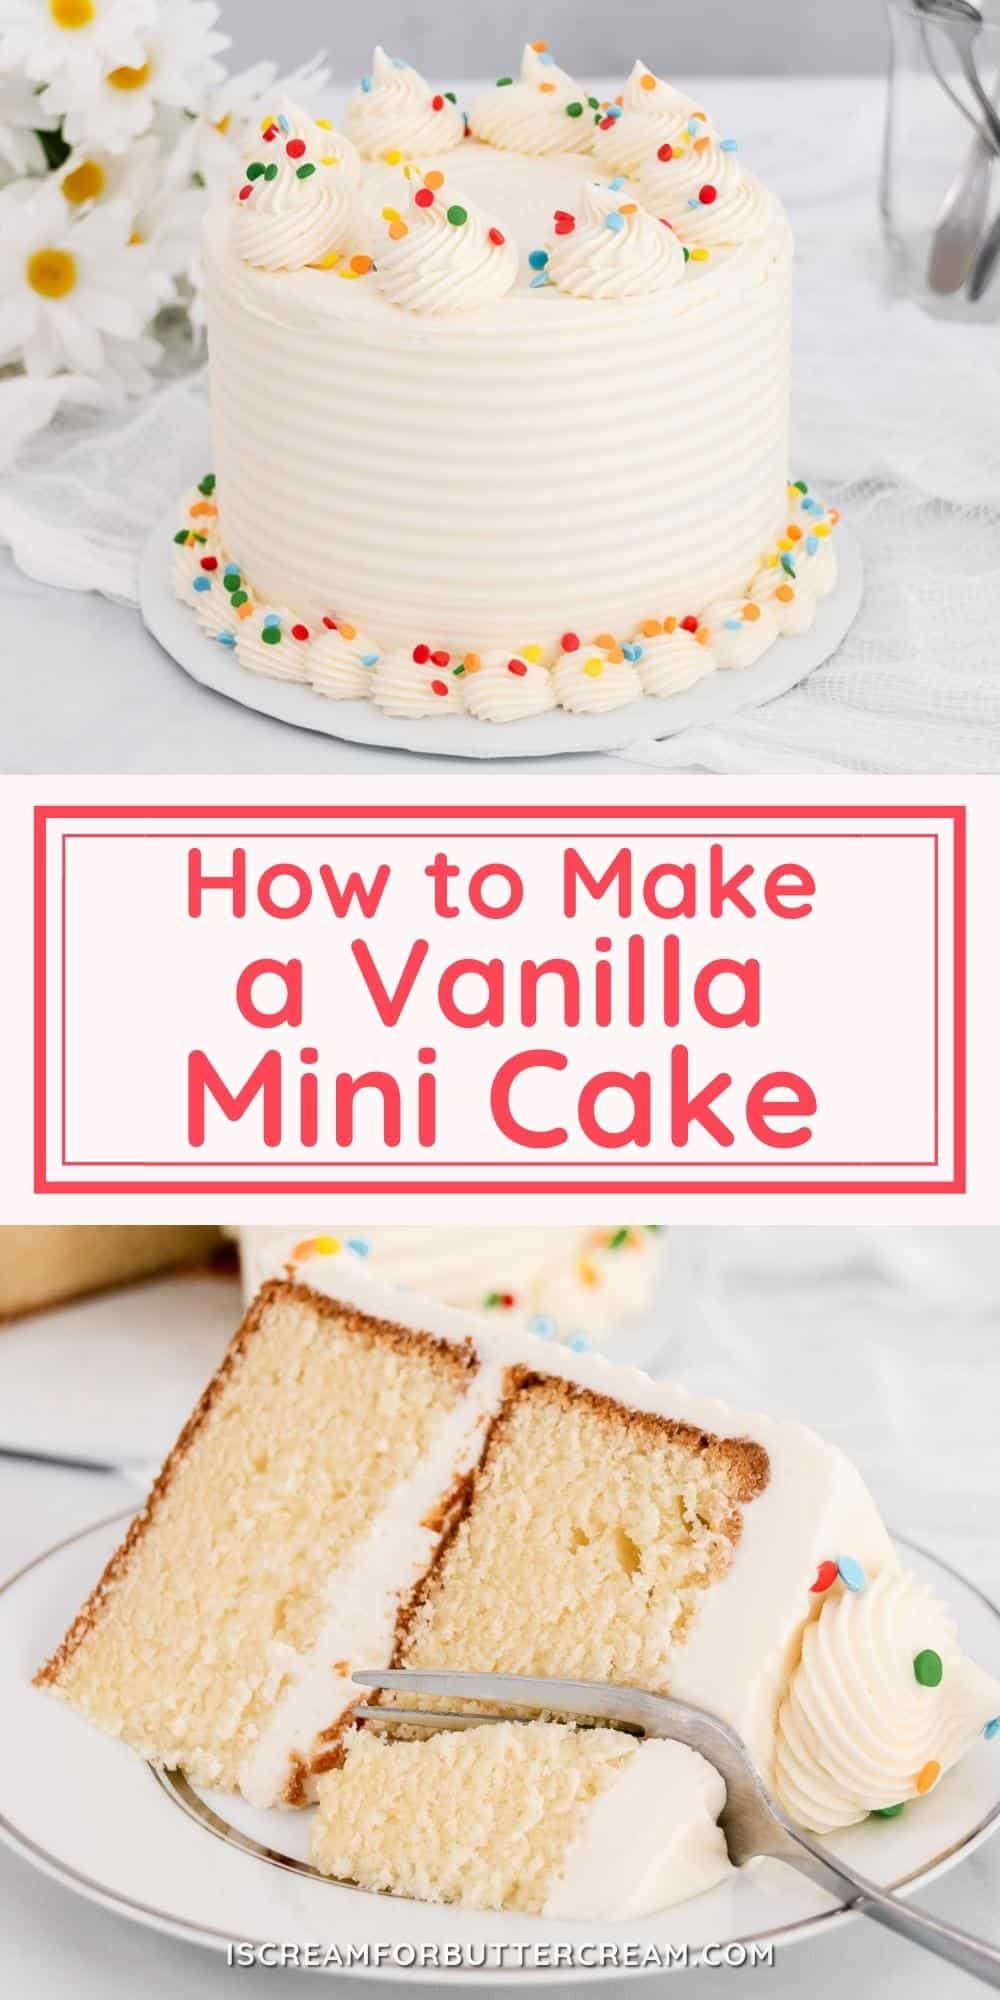
This vanilla mini cake is not only cute, but it’s from scratch, it’s moist and it’s full of vanilla flavor. There are two layers of vanilla cake, then it’s all covered with a rich vanilla buttercream frosting.
You can decorate this mini layer cake any way you like, or you can just leave it plain for an easy dessert.
Hey there! Before you scroll, there’s lot’s of important stuff in the post!…including the FAQ section, which may answer any questions you might have about this recipe. Enjoy!
Jump to:
Ingredient Notes:
Now let's talk about just some of the ingredients that are in the cake and buttercream recipes. (The list of ALL ingredients are in the recipe card below.)
All-purpose flour: This recipe calls for plain all-purpose flour…no worrying about having to get cake flour or any special ingredients. Just make sure when you measure flour, that you spoon it into the measuring cup so that it doesn’t get packed into it. (See more about this in the FAQ section below.)
Unsalted butter: This will be used for both the cake and the buttercream. You’ll want to make sure to let it come to room temperature (don’t microwave it though) before using it.
Sour Cream: This is the star in this vanilla cake. Sour cream in cakes really helps give them a soft texture, makes them super moist and it enhances the taste as well.
Vanilla Extract: Make sure not to skip this as it’s what will give the vanilla cake a nice vanilla flavor. If you have access to vanilla bean paste, that’s even better.

How to make this cake:
Let's talk about how to make this vanilla mini cake. (The detailed instructions are also in the recipe card below.)
Step 1:
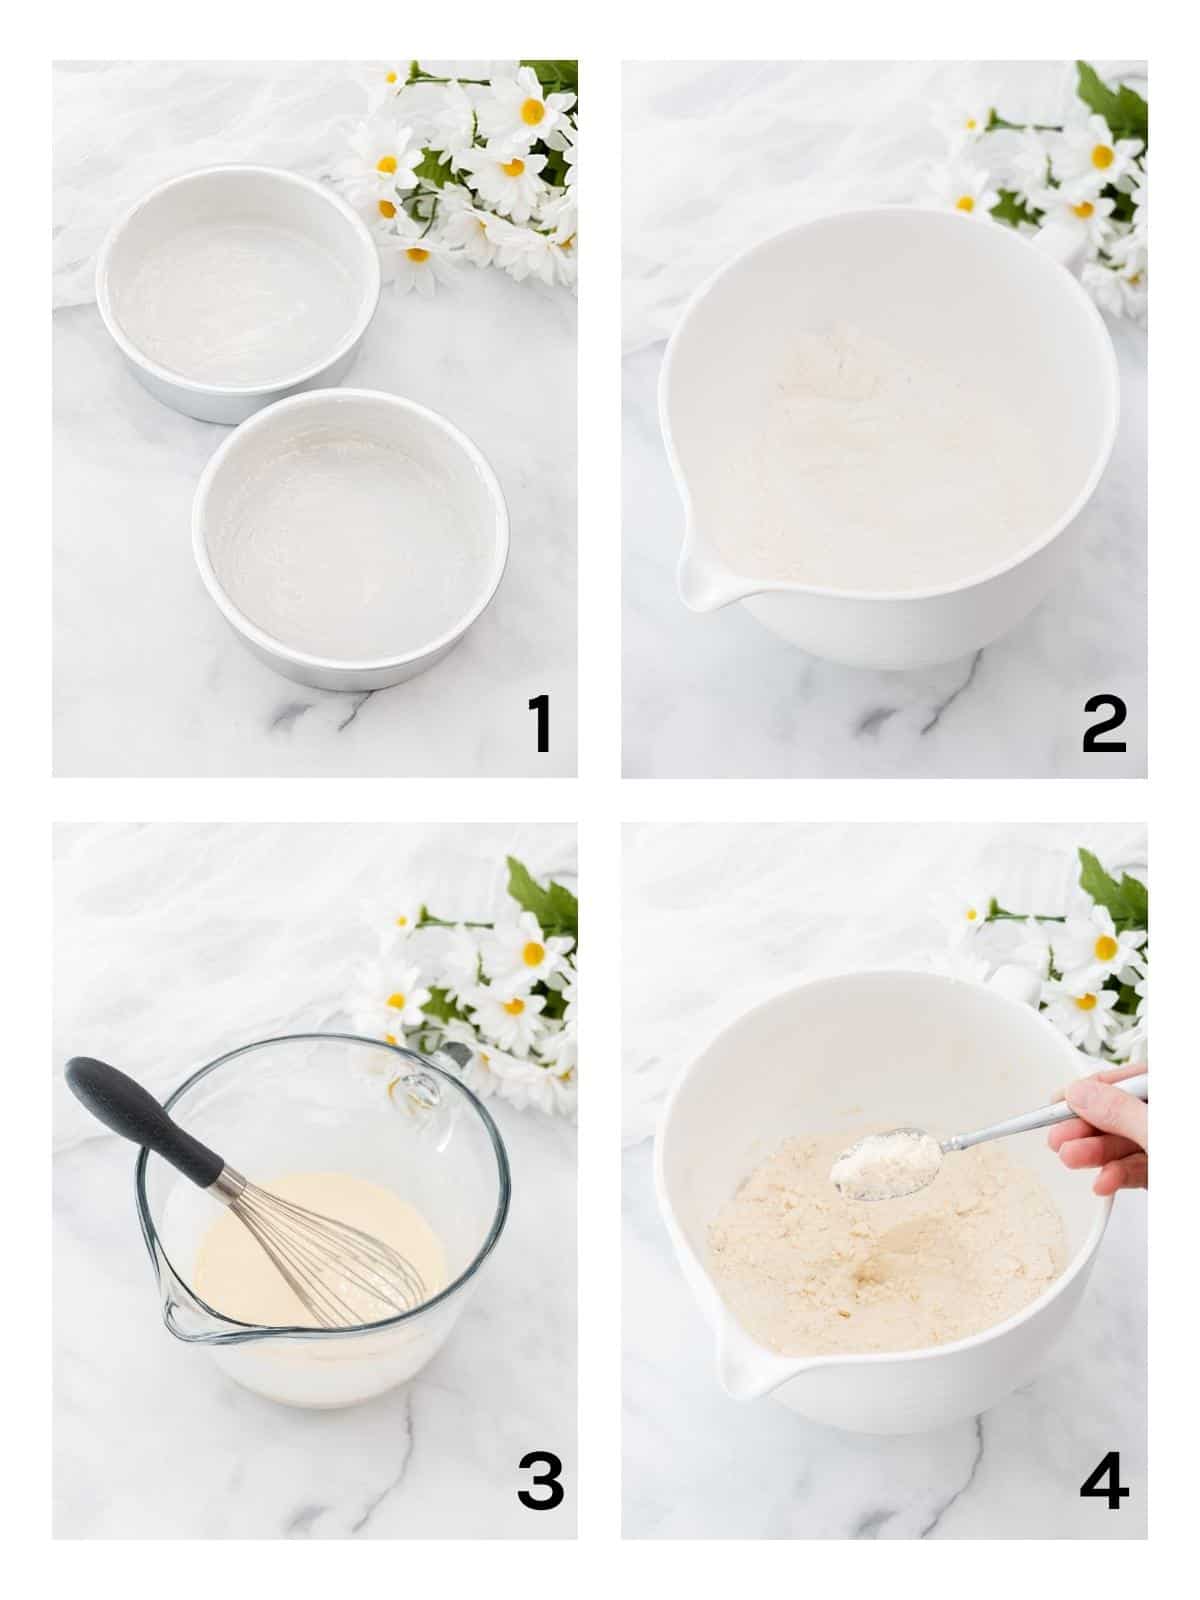
First, you need to preheat the oven to 350 degrees F. Then grease and flour (or spray) two, 6 inch round cake pans that are 2 inches deep.
Make sure that you also set the butter out to come to room temperature on its own. You can cut it into chunks and it will warm up faster.
Step 2:
Next, in a large mixing bowl, add the dry ingredients (flour, sugar, baking powder, and salt) and whisk together.
Step 3:
In another bowl, add the liquid ingredients (oil, eggs, sour cream, milk and vanilla) and whisk together until everything is smooth.
Step 4:
Now, the mixing method for this cake is called the reverse creaming method. You can get a really soft cake by using this and it’s used when there is a high ratio of sugar to flour. I actually find this method easier than the old creaming method.
So, to do this, you’ll add the chunks of butter to the dry mixture and mix with an electric mixer on medium speed while you add the butter in.
Mix until the mixture resembles a coarse, sand-like texture. You basically want the butter to coat the dry mixture.
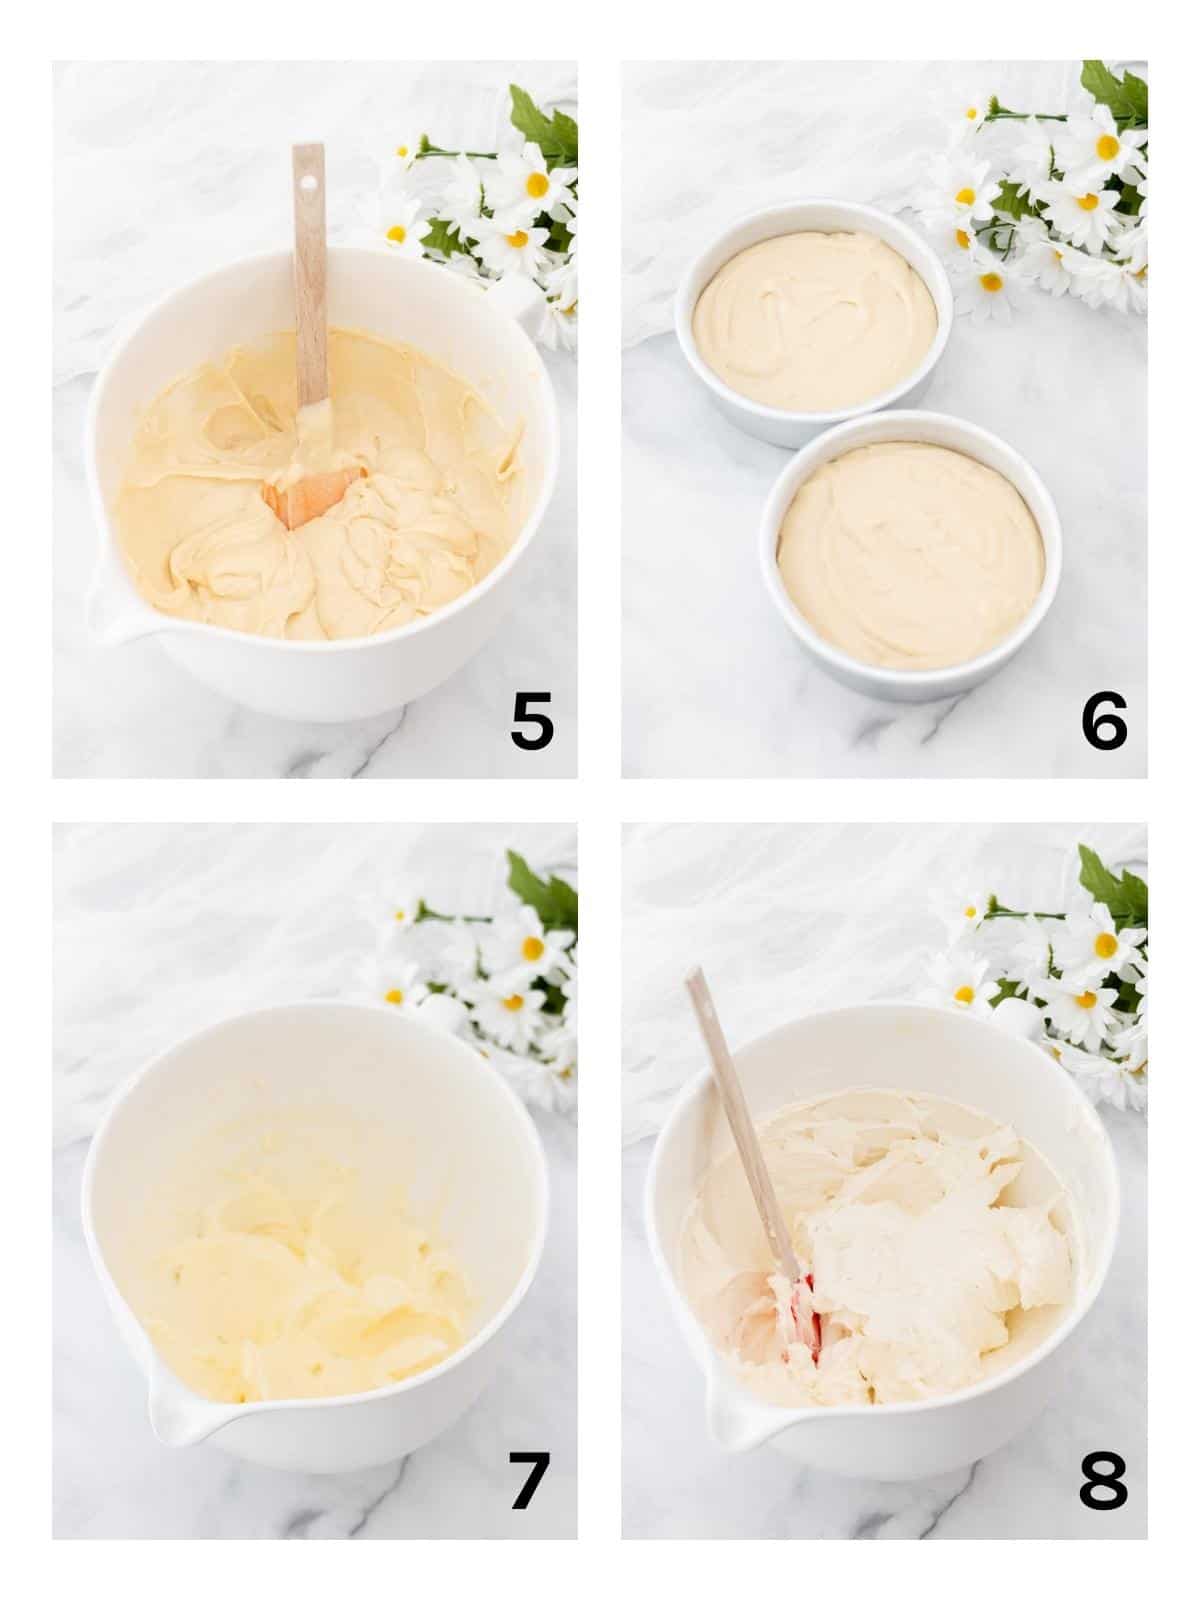
Step 5:
Now add half the liquid to the dry mixture and mix on medium until well combined.
Next, add the second half of the liquid mixture and mix on medium until well combined.
Make sure to scrape down the sides of the bowl and then mix again just until all the ingredients are well incorporated. Be very careful not to over-mix at this point.
Step 6:
Pour the batter into the prepared pans and make sure to smooth it level. Bake at 350 degrees F for approximately 40-45 minutes.
While the cake is baking, make the buttercream.
Step 7:
For the buttercream, cream the butter with an electric mixer on medium speed until it’s super smooth.
Step 8:
Add the confectioner’s, salt, vanilla and 2 tablespoons of milk and mix on low until combined, then on medium to medium-high until well mixed. Make sure to scrape down the sides of the bowl then mix again.
Check the consistency and if it’s too thick add another tablespoon of milk and mix well. Cover well and set aside while the cake cools.
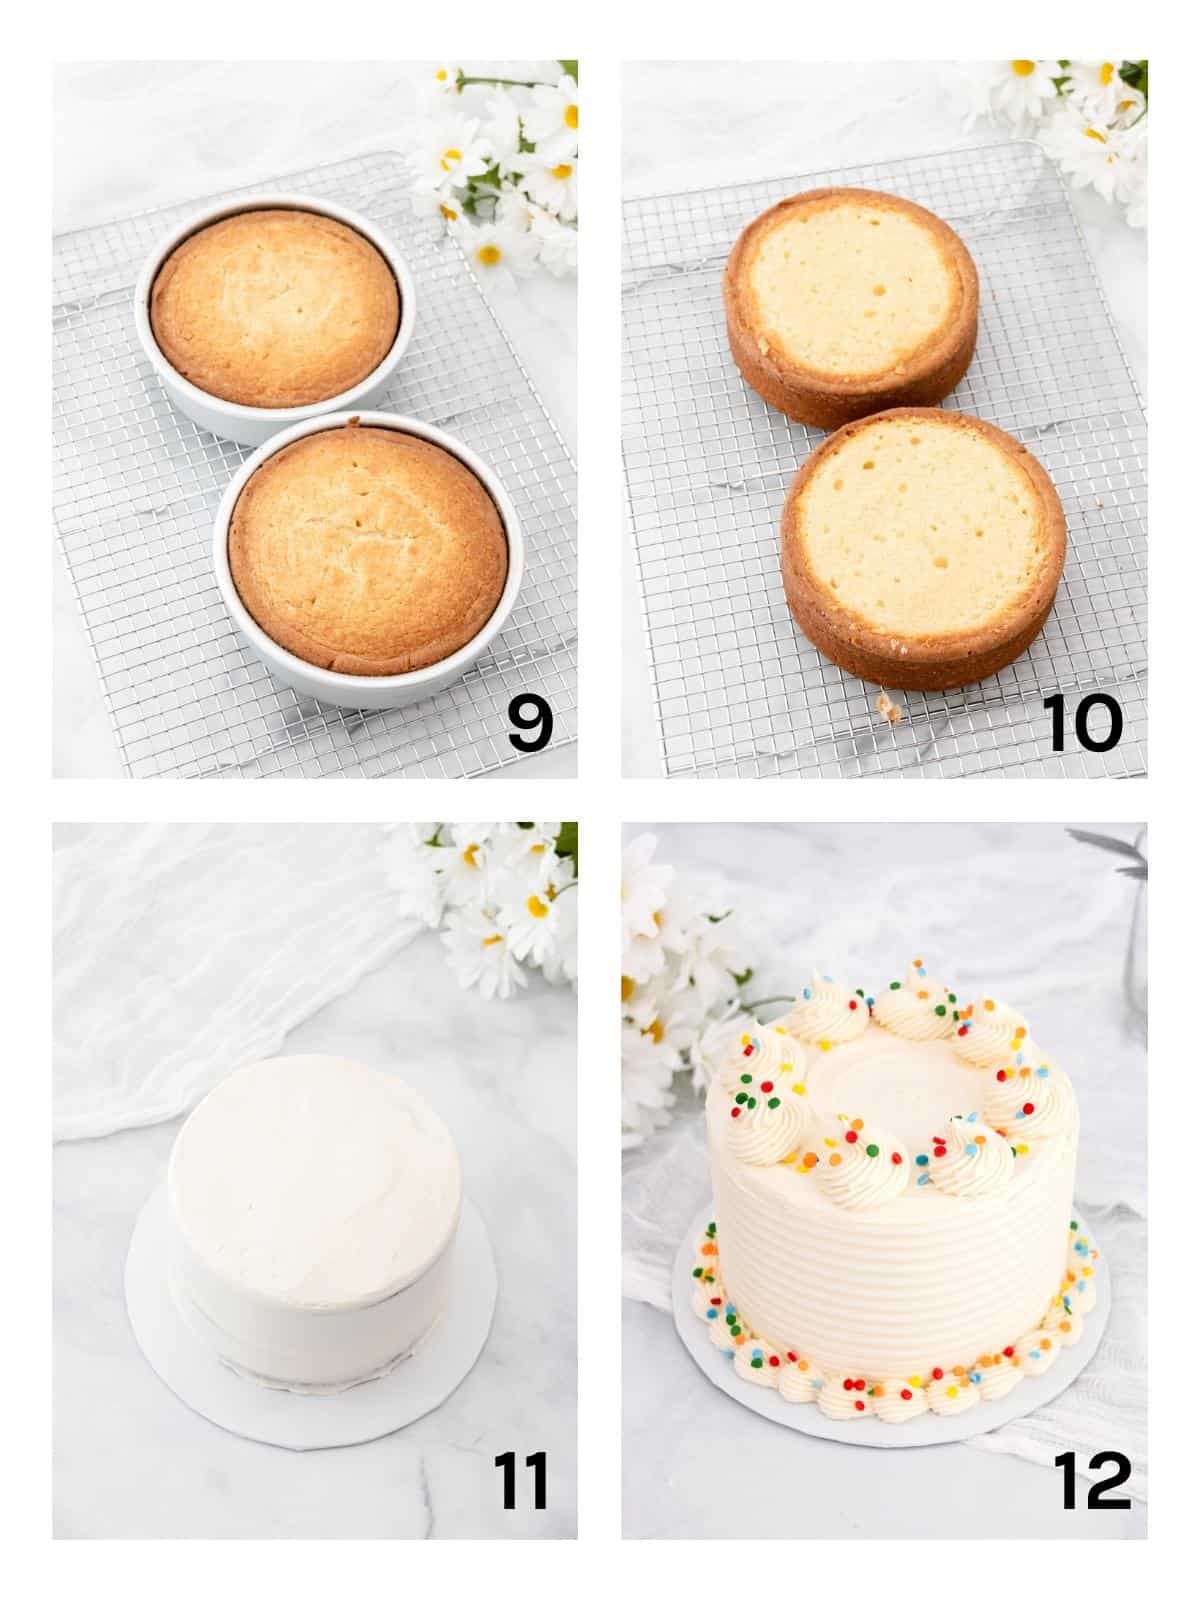
Step 9:
Once the cake layers have baked, cool on a wire rack, in the pans, for about 10-15 minutes.
Step 10:
Now turn the cakes out onto the racks and allow them to cool completely before covering them with buttercream.
The tops of these cake layers will flatten out a bit as they cool, but you can also level the tops with a knife to get them flat in order to decorate.
Step 11:
Add the buttercream to the cooled layered cake.
Step 12:
Pipe decorative borders and add sprinkles if desired.
Tips & FAQs:
Generally, you could probably classify any cake that’s smaller than an 8-inch cake, like a mini cake. This mini cake recipe is for a 6 inch, two-layer cake.
This cake will serve about 8 people. If you cut larger sizes, it will serve less and if you cut thin slices, you will get more servings.
Make sure not to pack the flour down into the measuring cup. Spoon the flour into the cup and level it off, but don’t scoop the flour. Packing too much flour into the measuring cup will end up adding too much flour to the cake batter and will make the cake dry and tough.
Unsalted is always best because you can estimate the proper amount of salt that will be added plus salted butter has a different water content than unsalted.
However, if you’re unable to get unsalted butter, you can use salted butter in the cake and the buttercream, but omit any additional salt that each recipe calls for.
It’s really important to make sure that the butter is at room temperature for both the cake and the buttercream.
Set it out an hour or two before you plan to make the cake. You don’t want to microwave the butter as that will heat it either too much or unevenly and can cause problems with the cake mixing method.
Sour cream is really best here as it makes for a softer texture and really helps give the cake moistness and a good flavor. If you can’t get it, you can substitute it with this plain yogurt.
Make sure and use full-fat yogurt though and not low fat. The fat helps make the cake moist.
Be very careful not to mix the batter for a long time. Scratch cakes should not be mixed for minutes at a time, or they will become dense. Stop mixing once the ingredients are well incorporated.
This cake is done baking when a toothpick inserted into the center of each layer comes out with a few moist crumbs on it or clean, but no raw batter.
This cake can be made ahead of time and frozen if desired. Let the baked cake layers cool completely, then wrap in plastic wrap and foil and place in the freezer for up to a month or two.
To thaw, place the wrapped cake layers on the counter at room temperature and let thaw completely, then remove the wrapping. Once defrosted add buttercream.
This cake can be stored, covered well, at room temperature for 2-3 days. After that, to prolong freshness, it can be stored in the refrigerator, well covered, for another 2-3 days.
That would take some calculating, but there is an 8-inch vanilla layer cake recipe already on the blog if you want to check that out here: Favorite Vanilla Bean Cake
This recipe should work ok for cupcakes, but since it’s a smaller batch, it won’t make a full two dozen. If you’d like a recipe that will make a full batch of vanilla cupcakes, you’ll want to check out this post: Favorite Vanilla Bean Cake (The instructions for making it into cupcakes are in the recipe card on that post.)
This cake is best served at room temperature. If cold, pop a slice in the microwave for about 10-15 seconds.
As an Amazon Associate, I earn from qualifying purchases.
Supplies used for this recipe:
Note About Recipe Measurements: I write recipes using volume (cups) measurements because here in the U.S., this is what people are more familiar with and I don’t want anyone to feel intimidated when baking. For metric/weight measurements, click the ‘metric’ button under the ingredients in the recipe card below. The weights are converted by a program, not me, and it’s just a best guess. I can’t guarantee that weighing the ingredients will produce the exact same results, since I test recipes using volume measurements.
Video:
Recipe

Mini 6 Inch Vanilla Cake Recipe
Ingredients
For the vanilla cake:
- 2 cups all-purpose flour (measured correctly and not packed down into the measuring cup)
- 1 ½ cups granulated sugar
- 2 teaspoons baking powder (make sure your baking powder is in date and not opened more than 6 months ago)
- ½ teaspoon salt
- ¾ cup unsalted butter, room temperature (1 ½ sticks)
- 1 tablespoon vegetable oil (or canola oil)
- 2 large eggs
- ¾ cup sour cream (or plain yogurt)
- ⅓ cup milk
- 2 teaspoons vanilla extract (or vanilla bean paste)
For the vanilla buttercream:
- 1 ½ cups unsalted butter, room temperature (3 sticks)
- 4 ½ cups confectioner's sugar
- pinch of salt
- 2 teaspoons vanilla extract
- 2 tablespoons milk (may add in another tablespoon if needed)
Instructions
For the cake:
- Preheat the oven to 350 degrees F. Grease and flour (or spray) two, 6 inch round cake pans that are 2 inches deep. (Make sure you are using the correct sized pans as this is important. See the notes section below.)
- Set the butter out, cut it into chunks and allow it to come to room temperature. Do not microwave it, it needs to come to room temperature on its own.
- In a large mixing bowl, add the dry ingredients (flour, sugar, baking powder and salt) and whisk together.
- In another bowl, add the liquid ingredients (oil, eggs, sour cream, milk and vanilla) and whisk together until smooth.
- Add the chunks of butter to the dry mixture slowly and mix with an electric mixer on medium speed as you add the butter. Mix until the mixture resembles a coarse, sand-like texture. (To see the texture, watch the video within this post.)
- Add half the liquid mixture to the dry mixture and mix on medium until well combined, only about 30-45 seconds.
- Add the second half of the liquid mixture and mix on medium until well combined, only about 20-30 seconds.
- Scrape down the sides of the bowl and then mix again just until all the ingredients are well incorporated. Be very careful not to over-mix. Do not mix over 20 seconds here. If scratch cake batter is mixed for too long it will cause a dense cake or one that falls in the middle.
- Add the batter to the prepared pans and smooth level. Bake at 350 degrees F for approximately 40-45 minutes (ovens vary). The batter will rise all the way to the top. Make sure you're using the proper sized pans. The cake layers are baked when they are golden brown and a toothpick inserted into the center of each layer comes out with a few moist crumbs on it, or clean, but not raw batter.
- Cool on a wire rack, in the pans, for about 10-15 minutes, then turn the cakes out onto the racks and allow them to cool completely before covering with buttercream.The tops of these cake layers will flatten out as they cool, but the tops can be leveled with a knife if needed in order to decorate.
For the buttercream:
- In a large mixing bowl, cream the butter with an electric mixer on medium speed until smooth.
- Scrape down the sides of the bowl and add the confectioner’s, salt, vanilla and 2 tablespoons of milk and mix on low until combined, then on medium to medium-high until well mixed.
- Scrape down the sides of the bowl and mix again.
- Check the consistency. If it’s too thick add another tablespoon of milk and mix well.
- Spread buttercream onto completely cooled cake and decorate as desired.
Notes
- This is a mini cake made in two, 6 inch round cake pans that are two inches deep. If your pans are smaller than 6 inch round pans or are more shallow than 2 inches deep, the batter will overflow. This recipe is specifically for two, 6 inch round pans that are 2 inches deep as stated in the instructions. The batter will rise all the way to the top of the pans, so if the pans are smaller or more shallow, there will be too much batter. Make sure that you’re not using 4 inch pans for this recipe. If you want a vanilla cake recipe for 8 or 9 inch round pans, you can find that recipe at this link: Vanilla Bean Cake Recipe
- Do not mix scratch cake batter for very long. That will cause a dense cake and one that may fall in the center. Once you add the liquid ingredients, only mix until everything is well combined. That’s usually around 20-30 seconds or even less.
- Make sure not to pack the flour down into the measuring cup as that will inadvertently add too much flour and the cake will turn out dry and dense. Spoon the flour into the measuring cup and level it off.
- Make sure that your baking powder is still in date. If it’s older than 6 months, it may not work properly and the cake won’t rise.
- If you’re baking at a high altitude, you will need to make temperature and ingredient adjustments. This isn’t something I can do for you though as I do not live at a high altitude and have no way to test recipes at high altitude.
- Do not open and close the oven door multiple times when a cake is baking…and definitely don’t slam the oven door shut. The cake will fall and come out dense.
- If you need more tips or help, make sure to watch the video and read the FAQ section within this post.
Nutrition
How to Share
I’d love for you to share this recipe link or tag it, but please do not share screenshots or copy/paste the recipe to social media as the content and photographs are copyright protected and we (bloggers) work really hard on our content. Sharing the link, tagging us on socials and pinning it is super appreciated though!
Other posts you might like:
Don’t forget to pin it below!
Connie D
I made this cake for my mom’s 90th birthday. I have a crummy mixer so I ended up over mixing the cake. So my cake was a little dry and dense but the flavor was so good and the icing turned out great. I will definitely make this cake again and be more careful to not over mix the cake batter! Mom loved the cake! It was just the right size for the two of us!
Kara
I’m so glad you liked it! I’m bummed it came out a little dense. It’s easy to overmix and I’ve done it loads of times too. I hope you try it again. If you do, let me know what you think! 🙂
Abby
I love this recipe, but how do I adjust it to make it with 3 cake pans instead of two? I don’t see an adjustment tool, please help!!
Kara
If you want enough batter to fill three pans, then mix up a recipe batch plus a half. If one recipe makes two layers, then to get three you just add on another half recipe…just divide the recipe in half as best you can. You can mix up the recipe and a half at the same time. You don’t have to mix them seperately.
Bev
Hello- I’m making a smash cake for my grandsons first birthday. Can the cake layer be frozen ahead of time?
Kara
Oh yes, you can freeze the cake layers. Let the baked cake layers cool completely, then wrap in plastic wrap and foil and place in the freezer for up to a month or two. To thaw, place the wrapped cake layers on the counter at room temperature and let thaw completely, then remove the wrapping. Once defrosted add buttercream.
Marilyn 🇨🇦
I’m getting married on August 27 and I’m making my own cake.Well, I’m making three of them actually…But, I haven’t been very happy with the white cake recipe that I have been using so I made the 6 inch cake you have on your site just to sample the taste. No icing to throw off the flavour. Just cake.
Absolutely delicious!
I did not think I had any vanilla bean paste so I added regular vanilla, Only to find some vanilla bean paste in my cupboard so I added a teaspoon of that as well as the 2 teaspoons of vanilla.I am lactose intolerant so I substituted it for Silk brand original almond milk. I can’t even begin to tell you how wonderful the flavour and the texture is on this cake. If anybody is thinking you’ve gotten some great recipes in the past that have turned out to be duds… I’m telling you…..do not worry about this recipe. You will not be disappointed! It’s fantastic!!!
Kara
Hey Marilyn, what a wonderful review! I’m so glad you loved this one. Frankly, vanilla cake is my favorite. 🙂 Thanks again for the great review and I hope the wedding baking comes out great with zero stress and that your wedding day is everything you hope for. 🙂
Marilyn
Got the right cake and the right man…what could be more perfect?
Stephanie
How long will the the frosting hold up in room temperature conditions? I’m trying to make a smash cake and wondering how I should time making the cake!
Kara
Hi Stephanie, the buttercream for this cake should be fine at room-temp (70s and below) for several days. I’ve kept it out for up to 4 days and it’s been fine as long as it’s not warm.
Marsha P
If I want to add lime juice for a citrus flavor how much juice can be used before the texture is affected? Do I need to cut down on the other liquids in the recipe?
Kara
I really would not add anymore than a couple tablespoons of lime juice. That would not be enough to get much of a lime taste though. I wouldn’t replace the milk with the lime juice either as the milk has some fat in it and helps with the moisture and creaminess. You could replace about 2 tablespoons of the milk with it, but I wouldn’t try for more than that. Now, another option would be to add lime zest. That will give more flavor than the juice will. Another option would be adding in lime or lemon extract as that’s more concentrated and it won’t mess with the texture. One more option would be to use lime yogurt instead of the sour cream. You could use a combination of all of these things to try to bump up the lime flavor. Now, another caveat though is that depending on how much acid (like a citrus juice, lime yogurt etc) is added to the batter, that might necessitate the need for some of the baking powder to be replaced with baking soda, however those don’t substitute equally for each other. If you end up adding two tablespoons of lime juice plus lime yogurt, you might use 1 1/2 teaspoons baking powder and about 1/4 teaspoon of baking soda (instead of the 2 teaspoons of baking powder that the recipe calls for). Hope that makes sense.
Brook
The cake is so good! I made it for my sons smash cake this weekend and of course we had what was left over. Can I also use this for cupcakes?
Kara
Hi Brook, so glad you loved it! This recipe should work fine for cupcakes, but since it’s a smaller batch, it won’t make a full two dozen. If you’d like a recipe that will make a full batch of vanilla cupcakes, you’ll want to check out this post: Favorite Vanilla Bean Cake (The instructions for making it into cupcakes are in the recipe card on that post.) Otherwise, as long as you’re okay making about 16 or so cupcakes instead of 24, then this recipe should work fine. You don’t need to change the temperature or mixing method, but you’ll want to bake them for less time. I’d start checking them at around 15 minutes or so, but you might need to bake them a little longer.
CHRISTINE
great tasting and super easy
Susan
Can this cake hold fondant onto instead of just butter cream? I know fondant can be heavy so I wanted to be sure before I tried it.
Kara
Yes, I think it would be just fine under fondant. I have a similar recipe for an 8 inch round cake size and I’ve used that under fondant before and it held up just fine.
Kaycee
I’ve never made a cake like this before and was so nervous. It turned out so good and tasted even better!!!! Thank you thank you thank you for the recipe! If I wanted to make a 4 inch cake, do you know how I could adjust measurements/cooking?
Kara
Hi Kaycee, so glad you liked this cake! Yay! So to adjust the measurements, I think you’d have to lower the amounts by about a third. That’s just ‘eyeballing’ it though. Anyway lowering it by that amount would be a little difficult because the measurements may end up in weird amounts and the cake may or may not turn out exactly the same since scratch cakes can be a little picky with ingredient ratios.
So, if it were me, I’d just mix up the entire recipe and pour it into the two 4-inch round cake pans about 2/3 of the way up (you know, as high as you would normally fill up the pan) and you’ll have a bit of batter left over. I’d take that leftover batter and make a few cupcakes out of it. You can cover the leftover batter and chill it until the cake layers bake, then you can make yourself some snack cupcakes. 🙂
I think that’s the easier solution. Hope this helps.
Kaycee
Perfect!! Going to try it out today. Thanks for getting back so quickly! I’m so glad I found your website!
Calli
Hi – I only have one 6inch cake pan. Do I need to adjust the name time to make one layer at a time?
Thank you!
Kara
No, if you’re just baking one layer at a time, it should take about the same amount of time to bake. Just chill the leftover batter and once the first one bakes, then bake the second. The second one might take a little longer to bake though since the batter will be a little chilled.
June
can i simply divide the recipe if i just want 1 layer of it ? cos am not gonna ice and layer the cake anyway
Kara
Yes, you can make only half the recipe. The measurements may be a little weird to measure, but it can be done.
Mackenzie Vander Eyken
followed the recipe exactly and used x2 6 inch cake pans, 2 inch deep, i cooked it for over double to amount of time, and I finally got a clean tooth pick, took it out of the pans and it still wasn’t fully cooked through..! had the oven set to the correct temperature, and I know it wasn’t my oven cuz I’ve been baking things all week and they are coming out fine. plus there was so much batter that the cakes rose out of the pan.. I think you need 3 cake pans for this and idk what to tell you but it’s ridiculous that it still wasn’t cooked after almost and an hour and a half..
Kara
Hi there, I wonder if you maybe used extra large eggs or something? I’ve made this recipe a bunch of times and have never had this happen. I wrote it specifically to fill two 6-inch pans. I really don’t know why this cake would have taken an hour and a half to bake. I’m sorry that happened to you. I just have not experienced that with this cake. There should not have been that much batter though. It shouldn’t have risen out of the pans. I’m just not sure what could have happened other than maybe some ingredients where perhaps measured wrong or too many eggs or the eggs were extra large. So sorry about that.
Stacey
Delicious cake and buttercream! Will be making again. Thank you!
Kara
Wonderful Stacey! So glad you loved it!
Brookley
I made this recipe and it is one of my new favorites! I ended up hand mixing when folding in the wet ingredients and it was great for a small cake. Do you happen to know if the individual cake without the frosting needs to stay in the fridge overnight?
Kara
Oh yay! So glad you liked this one. And hand mixing in the wet ingredients is totally fine and is actually a good way to keep from over-mixing the batter which can easily happen with an electric mixer. So to answer your question, the cake itself, without any frosting does not need to stay refrigerated. Just make sure to cover it with plastic wrap well so it doesn’t dry out. If you use American buttercream on it, you still don’t need to keep it chilled for several days. After that, I usually chill cakes to keep them fresh a little longer. This cake is better eaten closer to room temp anyway since it’s a butter cake and those tend to firm up in the fridge, so if you do chill it, just let it sit out for a bit before serving. Thanks for the wonderful review!
Kelley
Can confetti sprinkles be added to the batter?
Kara
Hi Kelley, use the type that are jimmies. They’re the colorful ones that are longer instead of completely round. The round ones (especially those tiny round ones) seem to bleed color and smear in the batter, but the jimmies work great. I’ve used them lots of times. You can add about 2/3 cup or so to the batter (more or less depending on how you want it to look).
Karen M
Can I use a 6 inch with 3 inch high pans!
Kara
I think that would be fine, but watch it closely as you may not need to bake it quite as long. The higher sides of the pan may reflect back more heat than the 2-inch deep pans. I’m not sure it will make a huge difference, but you might start checking it earlier though.
Trystan
This recipe is sh!t there’s a whole hole in the middle of my cake . I followed the instructions to the T bs terrible recipe. I wish I could give negative 5 stars.
Kara
Well good grief! I’ve made this recipe a number of times and never had a hole in my cake. I’m not sure what happened for you though, but sometimes mixing too long will cause a cake to fall in the middle. I wonder if that happened.
Susan
I made this cake today in the hope.to make 2 batches for a tall unicorn cake for my small one’s fourth birthday. I was so paranoid that I was going to over mix that I thought I had under-mixed. I was so ready for it to be a failure. On the contrary, it turned out so good!! Thank you!
Kara
Oh yay, Susan! I’m so glad you liked it and thanks for the great review!
Samuel
So so so goooooooood
Kara
So glad you liked it!
Karen
I made this cake yesterday for my daughter’s birthday. I was sceptical about the steps to make this and using sour cream. But….this cake is absolutely delicious! Love it!
Kara
Hi Karen, I’m so glad it turned out and that you loved it! Thanks for your wonderful comment. 🙂