
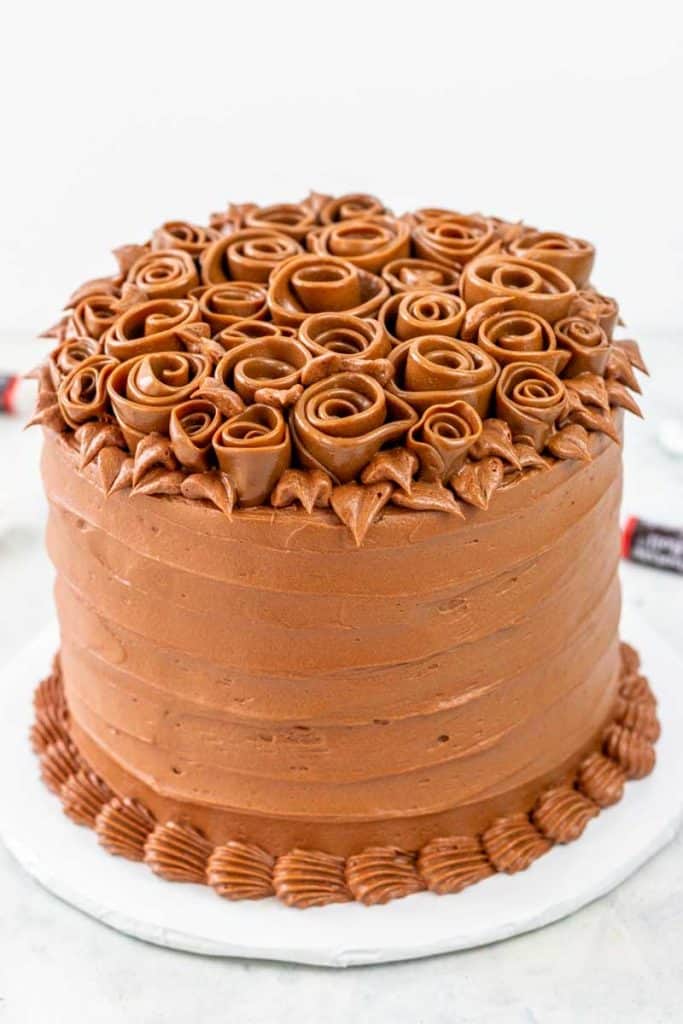
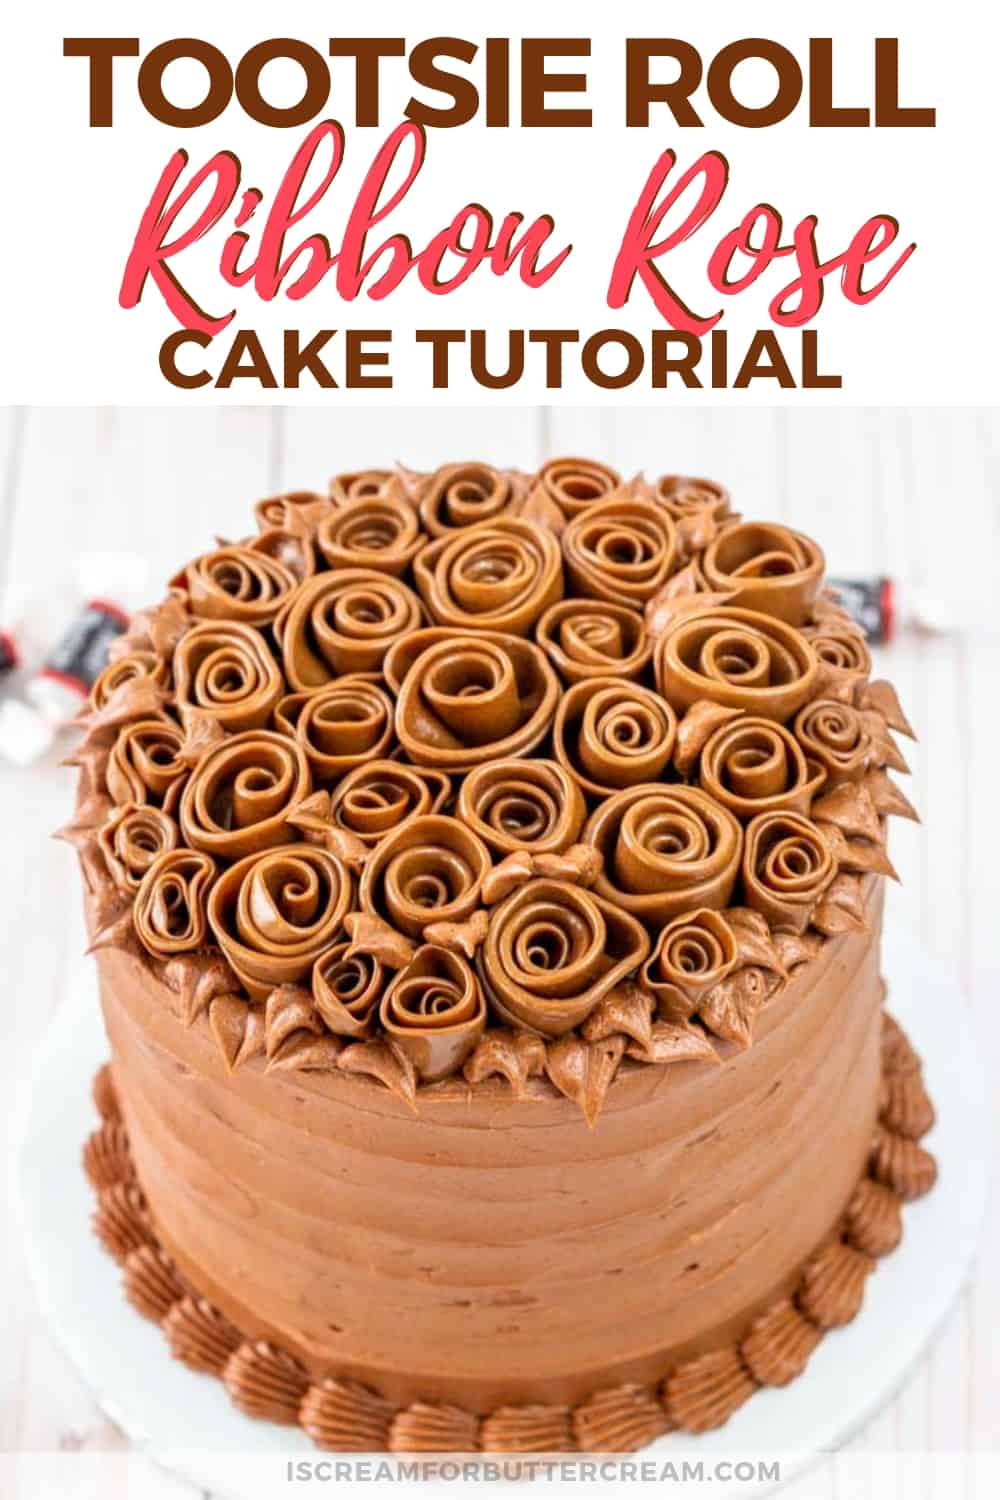
If you’re a lover of tootsie rolls, then this Tootsie Roll Ribbon Rose Cake is definitely for you. I wanted a way to make a super easy rose that looked like it was fondant, but actually wasn’t. I had the idea of using tootsie rolls and forming them into easy ribbon roses. These roses are not hard to create, but they really make your cake pop AND they taste good too!
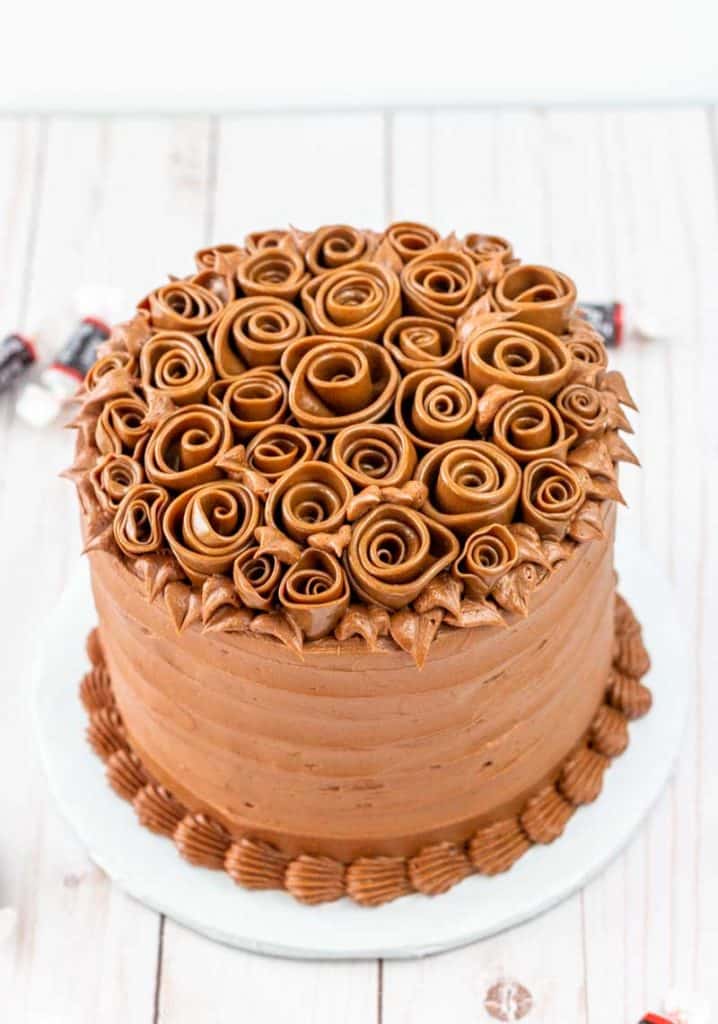
I went with chocolate cake and chocolate buttercream for this one, because why not go all out with chocolate, right?
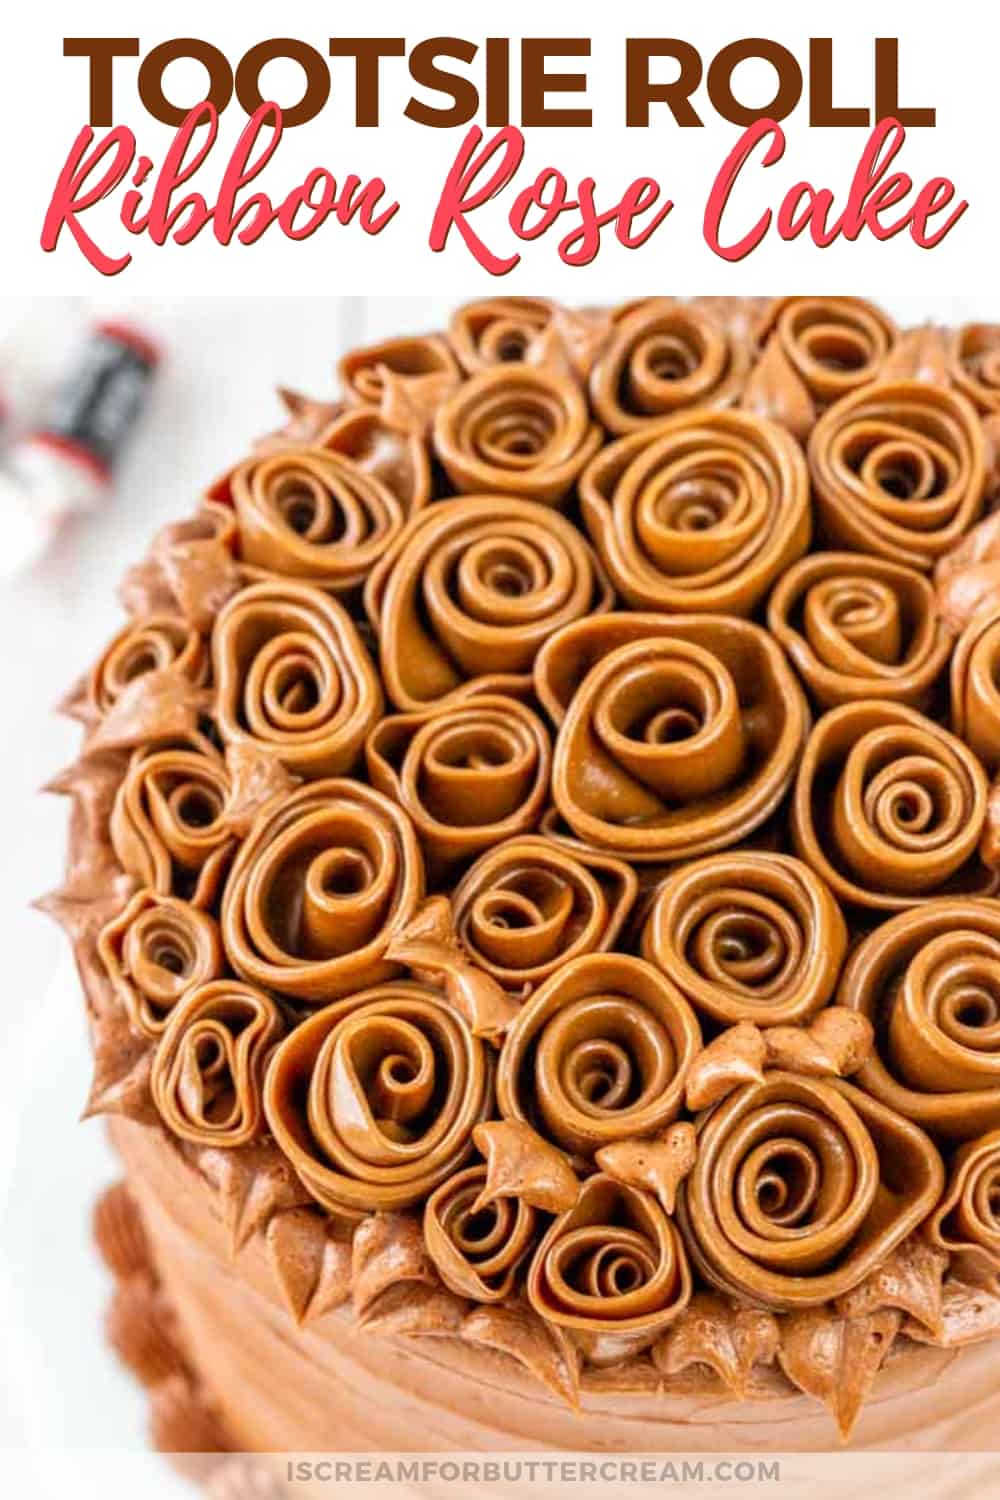
The tootsie roll roses aren’t hard to make, but you’ll need to do a couple to get your bearings, but once you do, you’ll have it down.
You’ll need to make a bunch of them though, so know that going in.

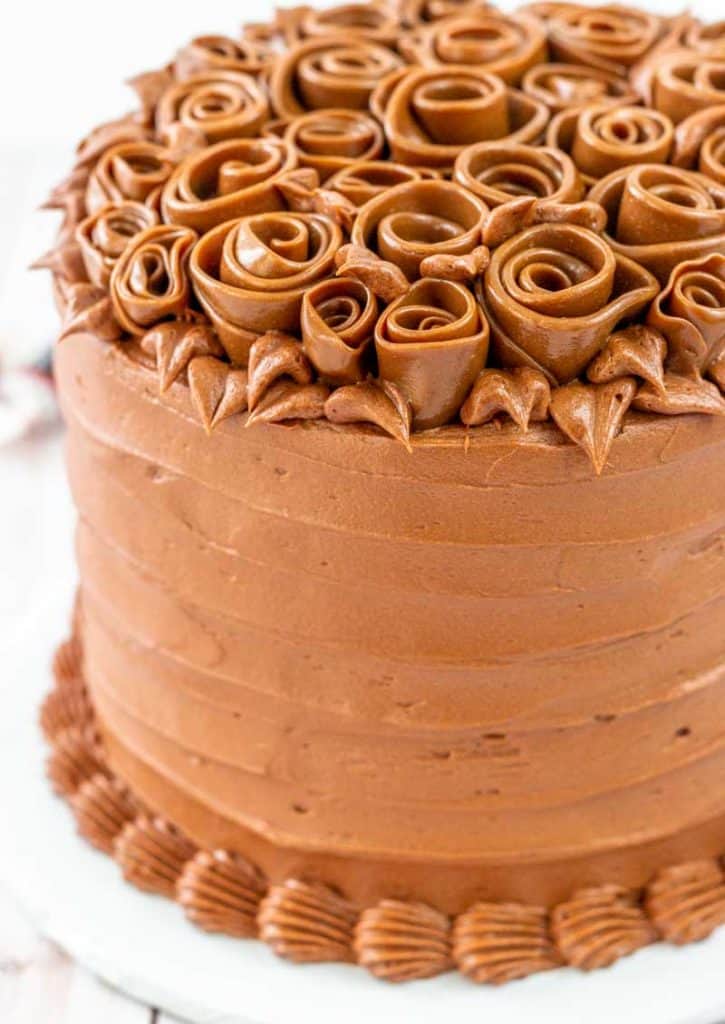
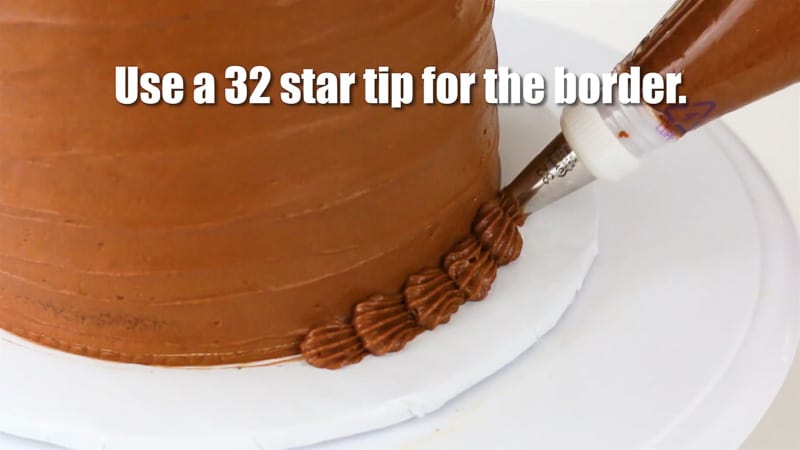
I did do some buttercream piping on this cake. I used a star tip to pipe the bottom border.

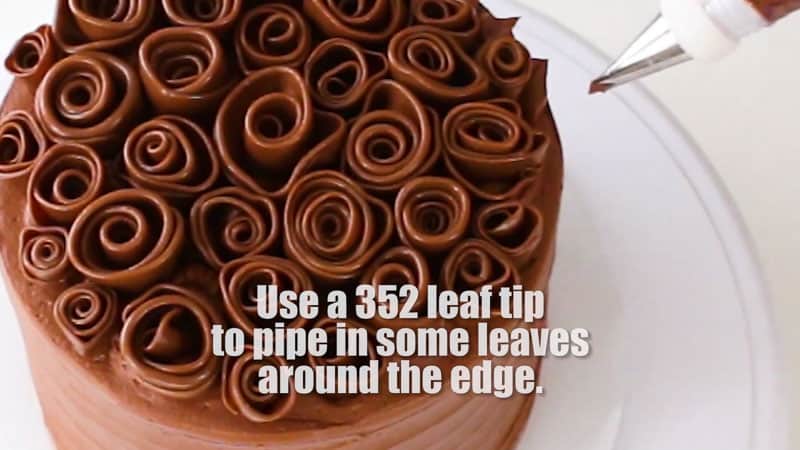
And I used a leaf tip to pipe in some leaves around the outside ribbon roses.
You don’t have to do this, but I think it really finishes off the cake.
Ok, enough suspense. Let’s get to the tutorial. I’ve got some screenshots below with detailed instructions, but I’ve also got a video toward the bottom of this post, so don’t forget to check that out as it really shows how to roll up your roses.
As an Amazon Associate, I earn from qualifying purchases.
Supplies for the Tootsie Roll Ribbon Rose Cake:
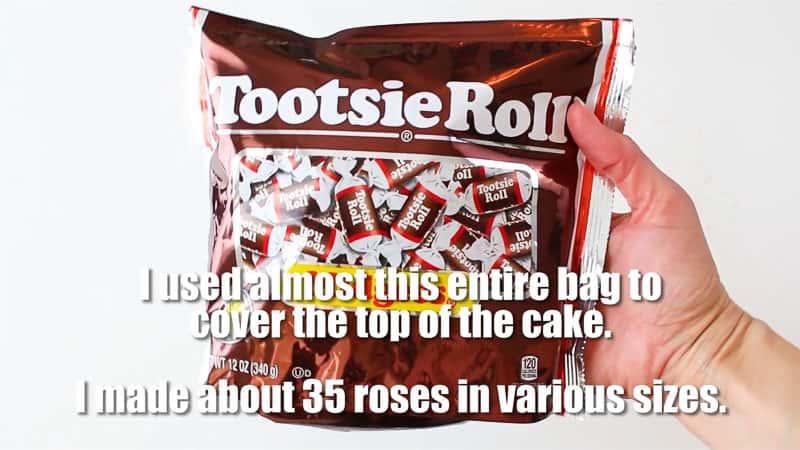
- Bag of Tootsie Rolls (I used the entire 12 oz bag)
- Small fondant roller or you can just use a wooden dowel if you don’t have one. You basically just need something to roll out your warmed tootsie rolls.
- Scissors
- Baked cake layers (I used three layers of 6 inch round cakes.) Here’s my chocolate cake recipe: Chocolate Butter Cake
- Buttercream (Enough to fill and cover three layers of cake.) Here’s my chocolate buttercream recipe: Double Chocolate Buttercream
- Icing Spatula
- Cake Turntable (This is of course optional, but it makes your life so much easier.)
- Piping bags
- 32 Star tip
- 352 Leaf tip
- Icing coupler (This is optional as well, but it makes it really easy to switch out icing tips on your bags.)
Making the Tootsie Roll Ribbon Rose Cake:
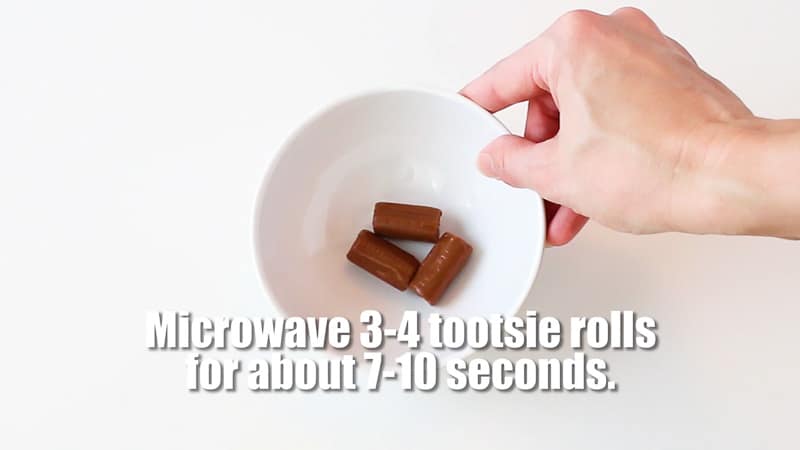
The first thing you want to do is unwrap several tootsie rolls. The amount will depend on how big you want your rose. I used 3-4 for the medium sized and larger roses and around 2 for the smaller ones. You’ll also be cutting off the excess on the bottom of the rose, so that portion of tootsie roll can be reheated and used again.
So take your tootsie rolls (just a small amount at a time) and microwave them for about 7-10 seconds only. They heat up really fast.
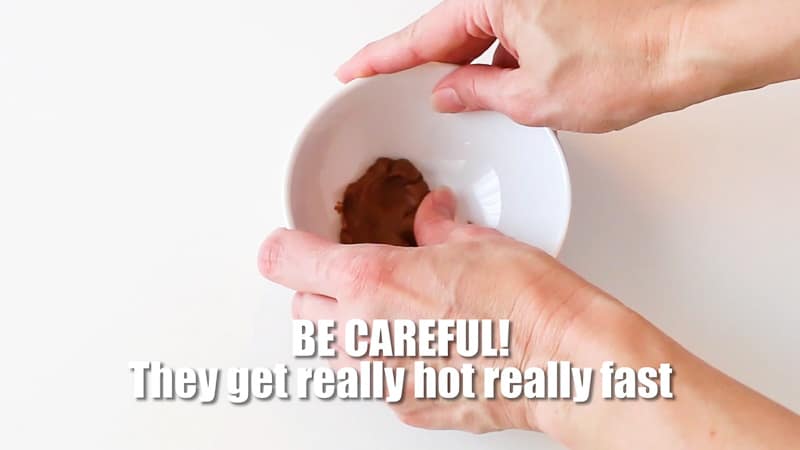
Now you’ll want to squish them all together, but be really careful because certain parts can get really hot.
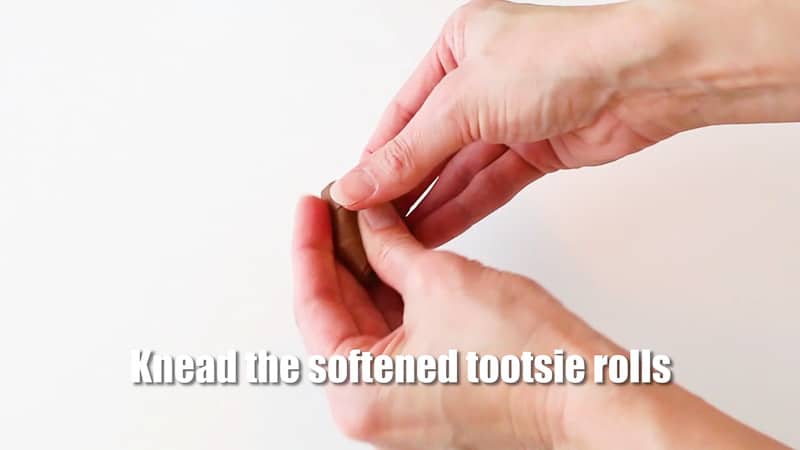
Once you’ve got them all squished together, take them in your hand and knead them a bit with your fingers.
Then you’ll want to roll it up into a log shape and flatten just a bit on your rolling surface. You may also need to grease your work surface, so the tootsie rolls don’t stick.
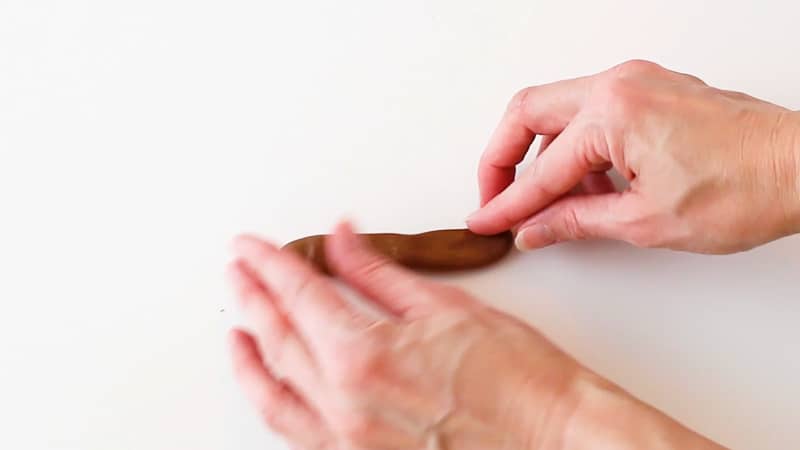
Take your fondant roller, or your dowel and just roll it into a flattened out log.
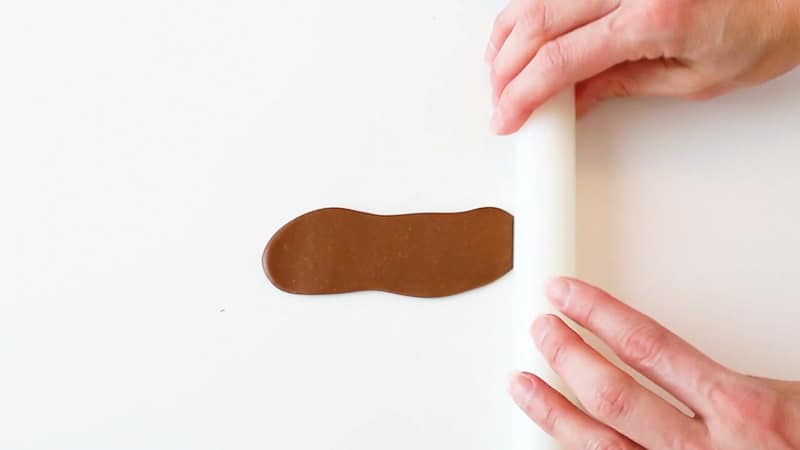
Now peel the tootsie roll off your work space and start at one end curling it up lengthwise.
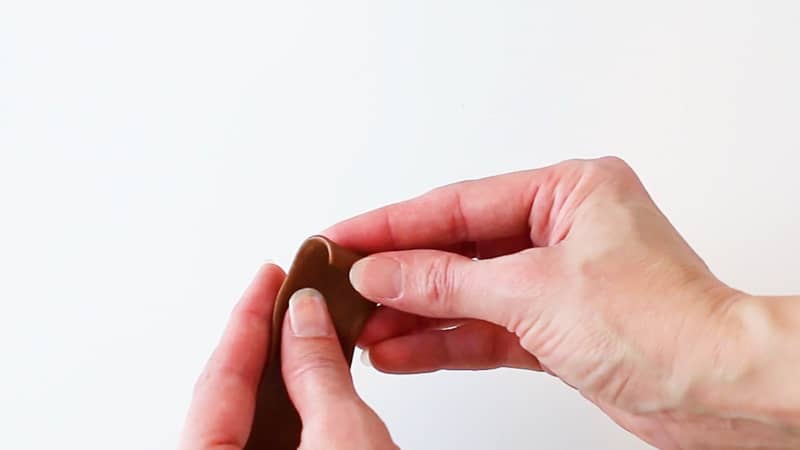
Keep rolling. You’ll want to slightly pinch around the bottom of it as you roll it up and you’ll also want to roll it loosely.
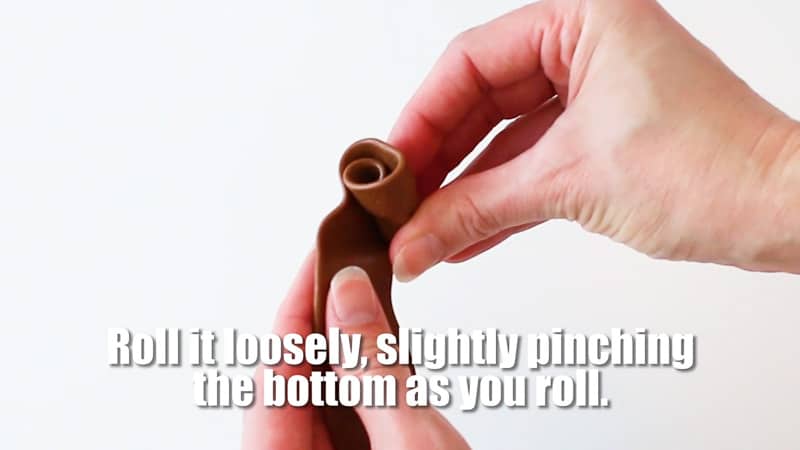
Keep rolling until you get to the end of the strip.
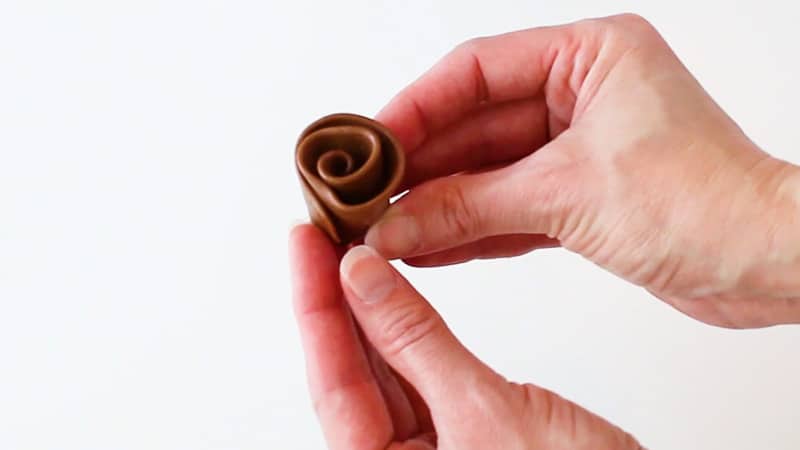
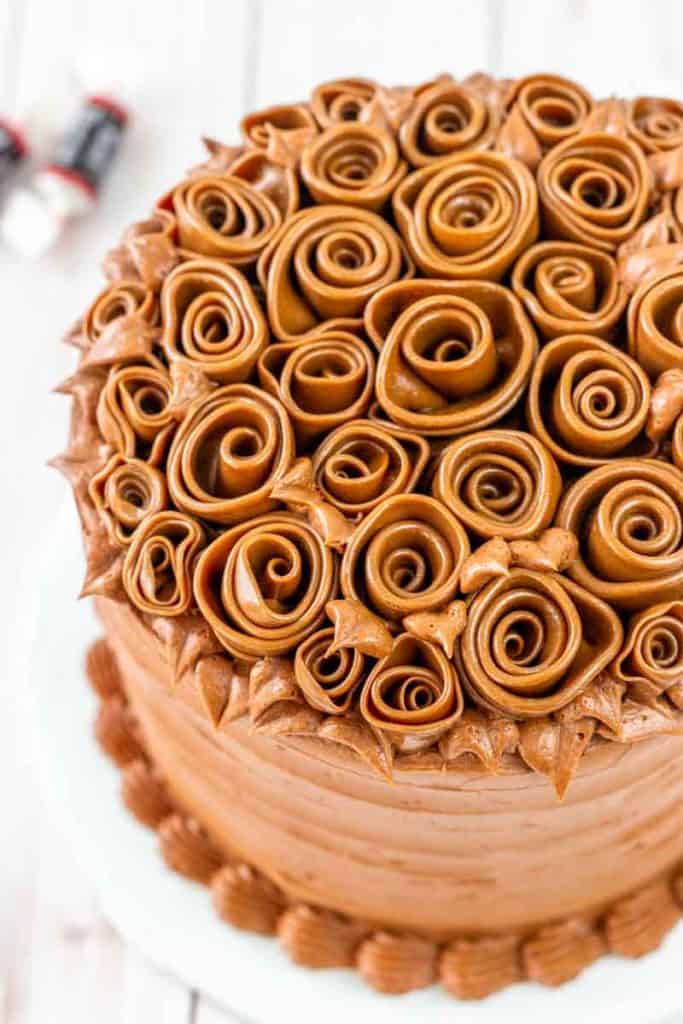
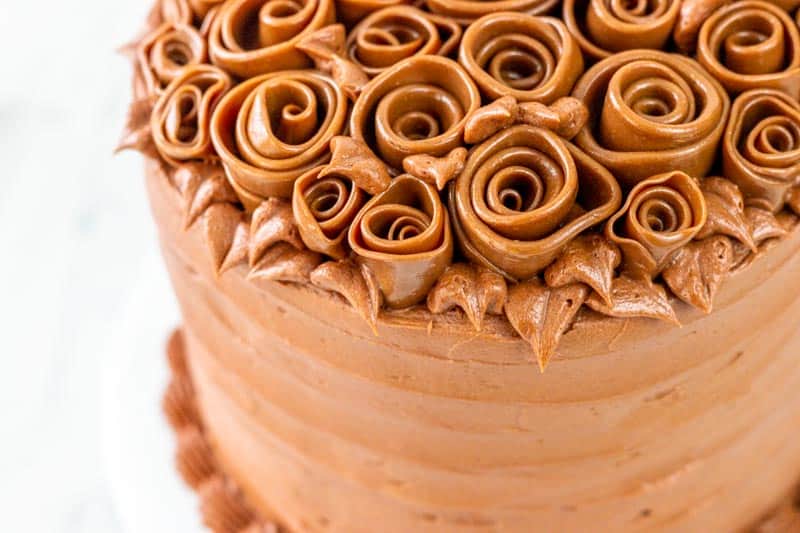
Each rose is going to look a little different. You’re not striving for perfection here. They’ll each have their own personality.
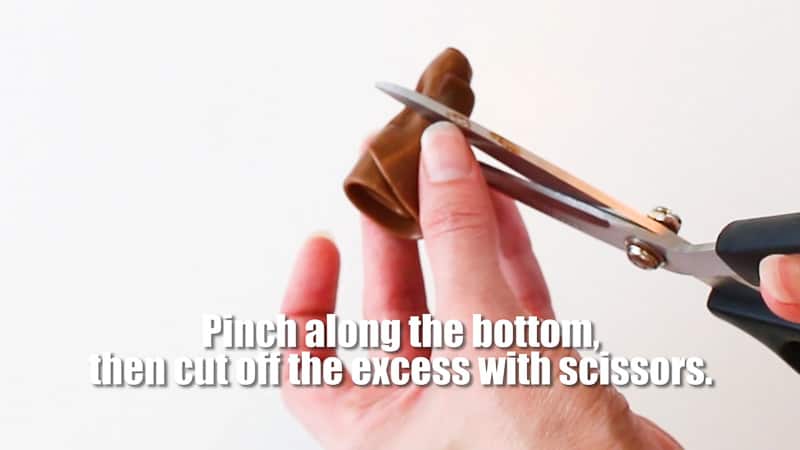
Once you get it all rolled up, pinch around the base of the rose a little more. Now the bottom will be a little bulky and long, so you’ll just snip off the bottom with a pair of scissors. When you snip off the excess tootsie roll, just add that to your bowl and reheat it again.
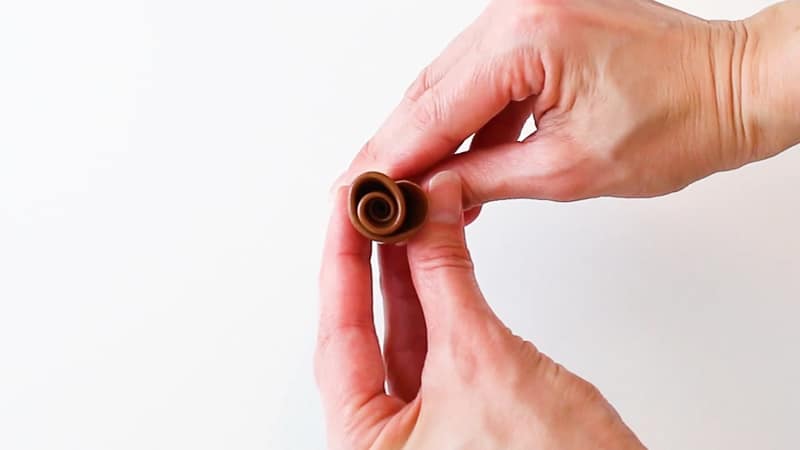
Set that rose to the side and work on your other ones. Try to fidget with the rose so that it sits up though because if it falls over, it’ll smoosh that one side.
Now that you have the technique down, you’ll want to make them in large, medium and small ones. You want some really small ones to take up the empty areas and to add around the outside of the cake.
Now you’ll just do a million more. Just kidding. It IS a lot more, but not quite a million. Just keep making them until you’ve finished the bag. That was enough for me to top a 6″ round cake.
Once you’ve got all your roses made, you’ll need to ‘build’ your cake. I used three 6″ layers of chocolate cake and I used chocolate buttercream for the filling and on the outside.
I did do a little texturing around the cake. I just used my small icing spatula and drug it along until I reached the top to make some icing ridge lines.

I used a piping bag and added a bit to the bottom of my largest rose.
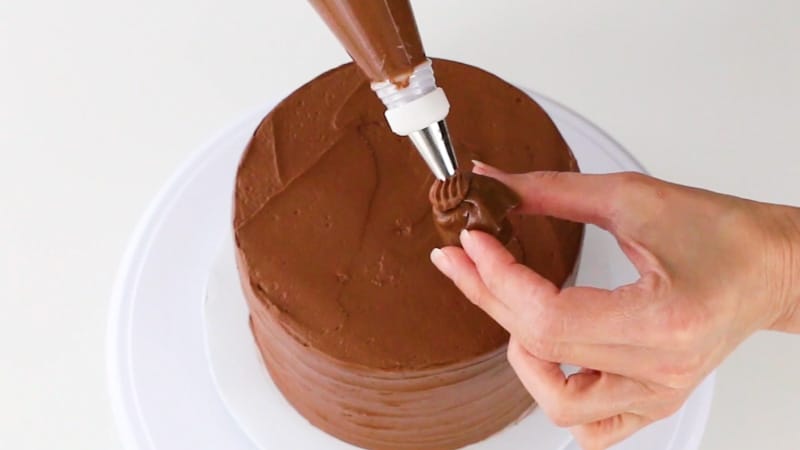
Then popped that puppy right in the center of my cake.
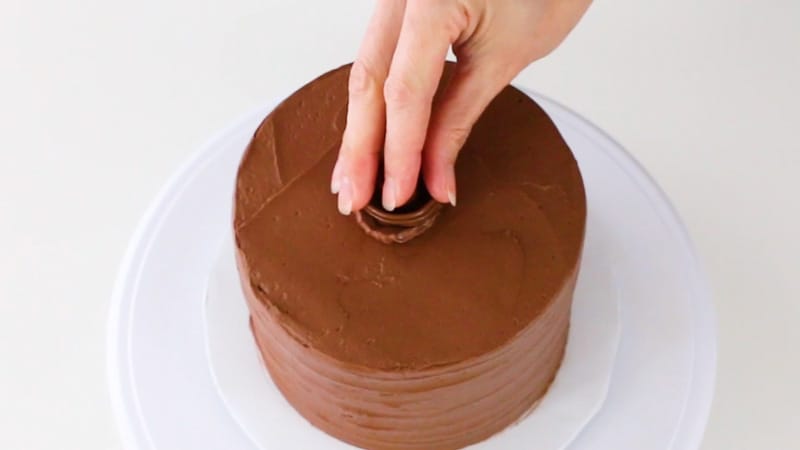
Then add on your other roses. I just used random sizes for this…no particular pattern. Just add a little buttercream to the bottom of the rose and them pop it on. Make sure to save the little tiny ones for the outside of the cake.
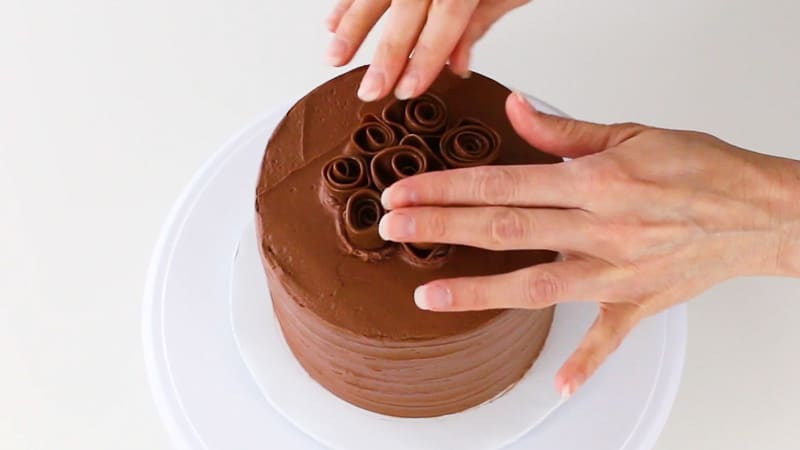
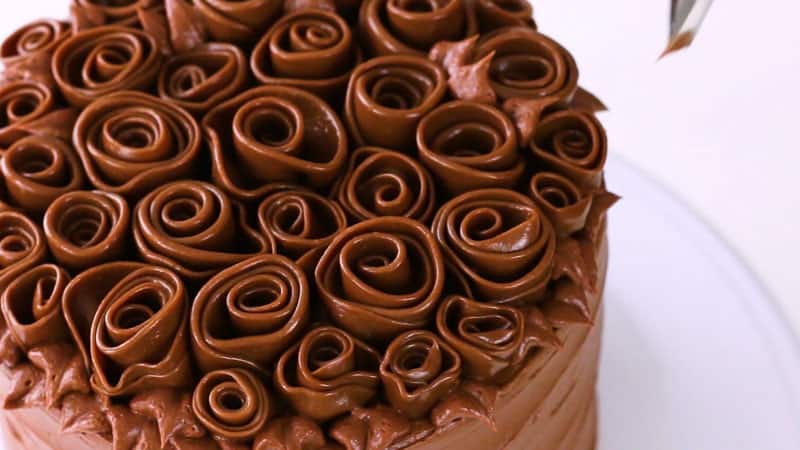
Once you get all your tootsie roll ribbon roses on the cake, take your tiny ones you made and place them in any spaces and around the outside of the cake.
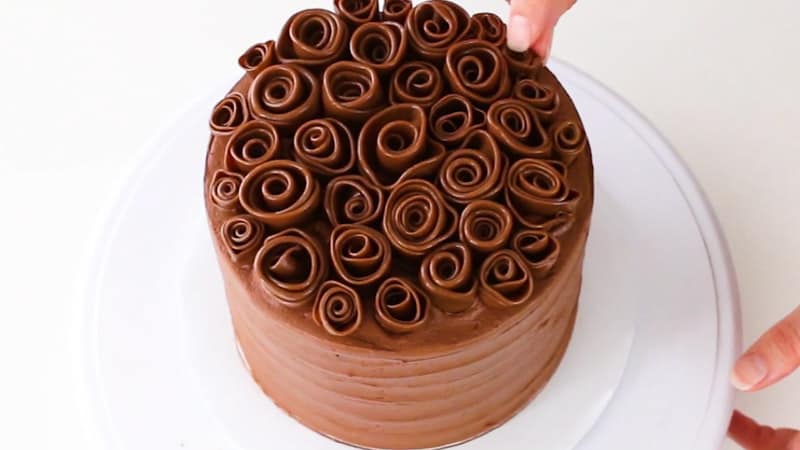
You’re still going to have a few spaces that need something, so that’s where piped leaves come in handy. Use your leaf tip (link in the supply list above) and just pipe in some leaves all around the outside and a few here and there on the outer roses. I didn’t do this all over the top though…just around the outside.
Ok once you’ve got the top done, go ahead and pipe a simple shell border around the bottom of your cake to finish it off.
You’ve done it! It’s a bit time consuming, but I just LOVE how it looks!
And here’s the video to see exactly how it’s all done:
So, what do you think? Will you try it out?
Don’t Forget to Pin it for Later!
Bernadette Degonzague
Love it.would be pretty with the coloured fruit flavoured tootsie rolls too! Might also work w starburst candies? Thanks!
Kara Jane
Yes I was thinking that too! You could do like a lemon or orange cake and then do the fruit flavored tootsie rolls…I bet that would be really good. And yeah, I think starbursts would work as well 🙂
Debbie
Love this idea and yes I will for sure make this. Love the idea wish, there was a way to use the tootsie rolls in the cake or buttercream they do taste great. And the fruit flavors or starburst wonderful idea for something colorful. Just bought a big bag of tootsie rolls for Halloween. Guess the children will get a different candy for Halloween lol.
Kara Jane
I’m so glad you like it! And yeah some kind of tootsie roll extract to add to the cake would be awesome. I wonder if there is such a thing…I may have to check that out!
Joan - My Cookie Clinic
Kara Jane, The creativity in this cake is amazing. I bet it took a bit of time to roll the tootsie rolls into roses. Thanks for sharing this decorating technique.
Kara Jane
Thanks so much! Yes it did take a lot of time, but was kind of relaxing though once I got going. 🙂
Joan
Kara Jane, I love your cakes. I would like to make this tootsie roll ribbon rose cake ahead of time. I am having a large gathering with lots of desserts, do you think this will freeze well? I’m trying to make as much as I can before hand.
Kara Jane
Hi Joan, hmmm that’s a good question. I’m really not sure if it would…I mean the cake itself would be fine frozen (I freeze cakes all the time). I’m not sure about the tootsie rolls being frozen on top. I think it MIGHT work though…that’s my best guess. I think the tootsie rolls will get pretty hard when cold, but should be fine once everything is defrosted. You could decorate the whole thing and then flash freeze it, so it gets firm, then cover it well in plastic wrap and foil. To defrost it, I’d probably defrost it in the fridge first, so it’s not going from frozen to room temp. I’d probably take the wrappings off while it defrosts as well, so nothing sticks to the plastic wrap. Maybe add it to a cake box or cake dome to keep it covered. Hope it works!