
Sometimes, you want to make decorations ahead of time to use on a cake later. It really lowers the stress of doing things last minute.
There are a few ways to keep premade fondant decorations soft and pliable for weeks, so they’re ready to use when you go to decorate your cake.
In this post, I talk about why you’d want to keep fondant decorations soft and why you might not want to. I’ll also go through how to do that and my answer some FAQs when working with fondant decorations.
Through trial and error, I’ve figured out ways to make cake decorating easier. For example, awhile back, I was asked to make this cake that included tons of fondant scroll-work on it.
Jump to:
The problem:
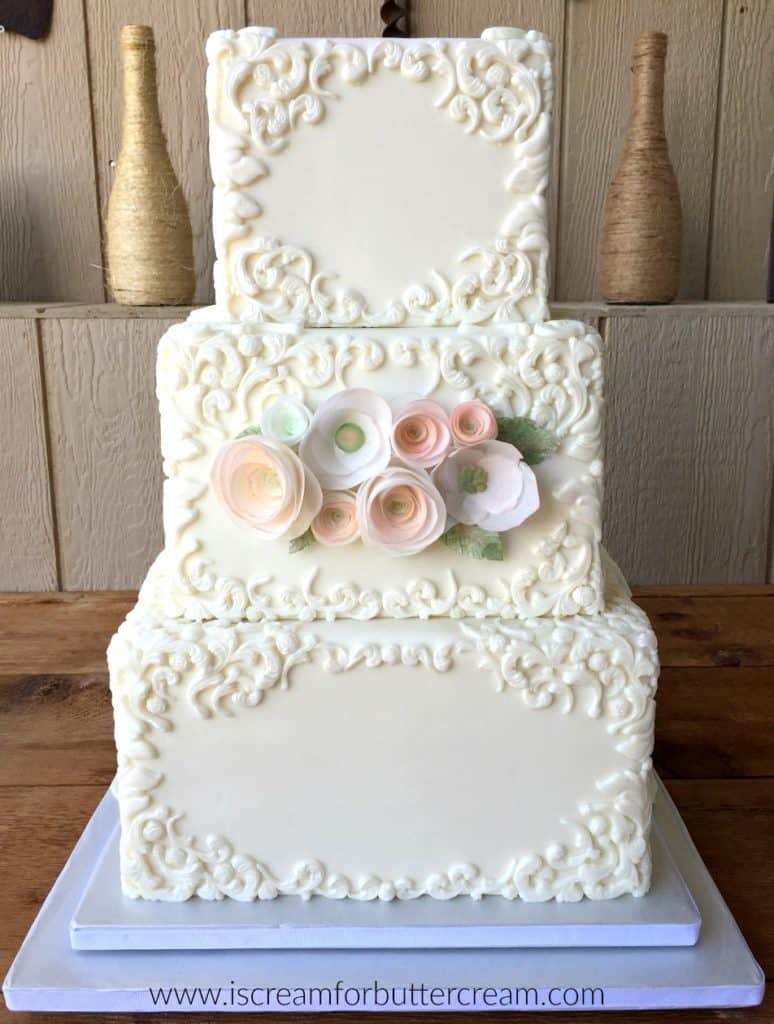
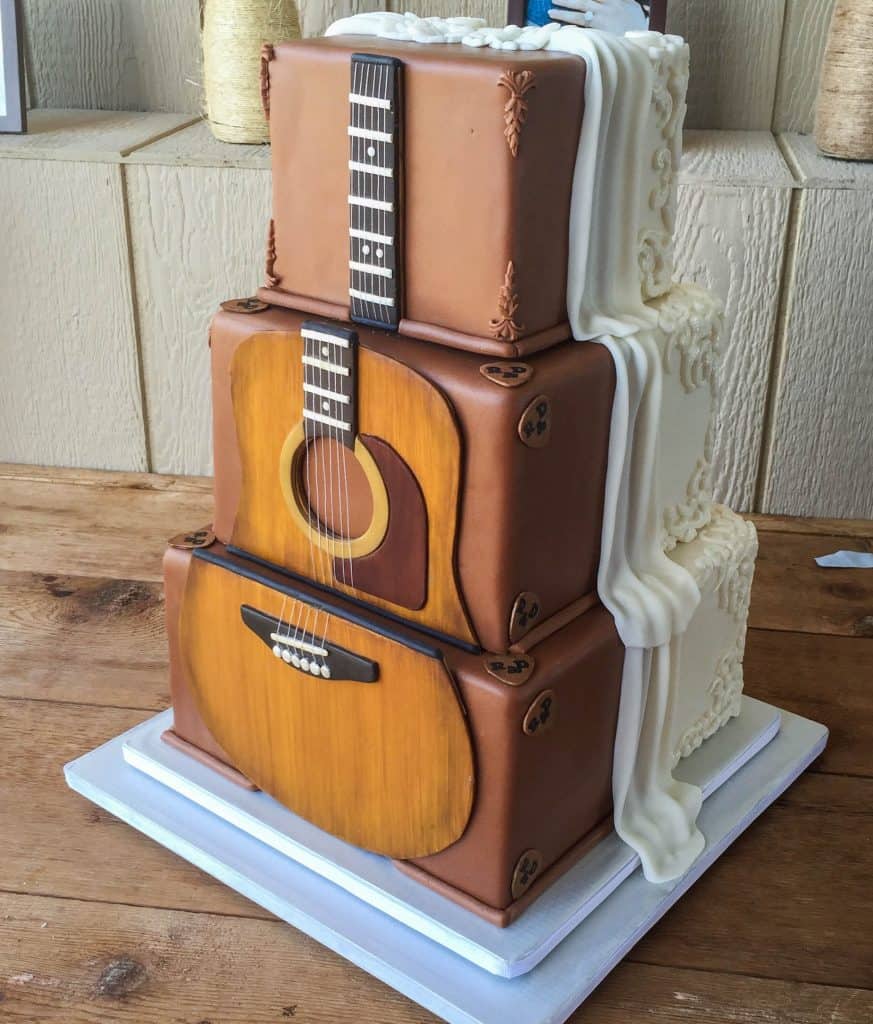
Back when I was actively taking cake orders, I got an order for a large wedding cake with tons of scroll-work on it.
I worked a full-time day job and I knew that there was no way I’d be able to mold that many scrolls AND actually get them on the cake in the time I had to do the job.
As an Amazon Associate, I earn from qualifying purchases.
This cake was a two-sided cake, so it was very involved, plus they had ordered cupcakes to go along with it. I needed a plan.
I knew I would have to pre-make most of the fondant items and I had to come up with a way to keep premade fondant decorations soft and pliable for later, because I wouldn’t be able to work with them if they were hardened. So I set out to do some experiments.
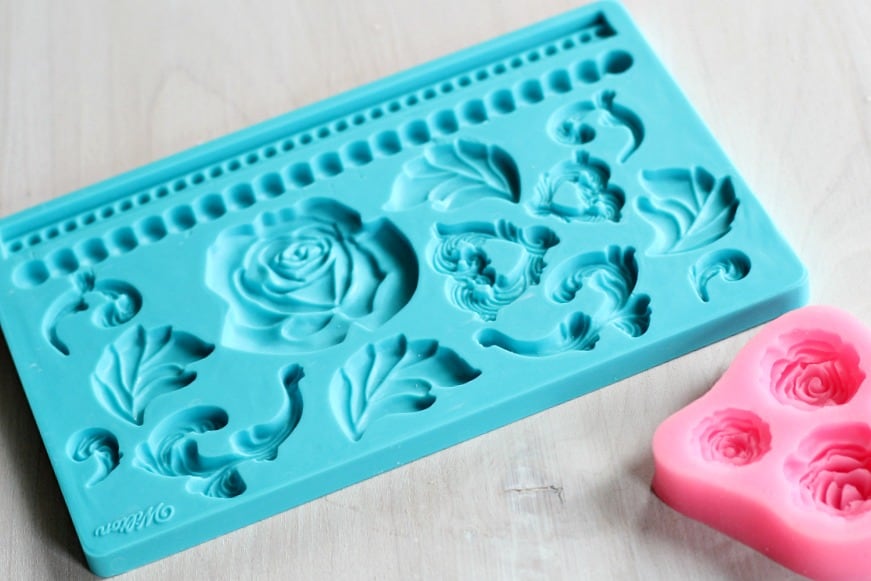
Below are the molds I used to make most of my scrolls and my small roses. You can find a similar scroll mold here. (The Wilton one I used has apparently been discontinued.) You can find the rose mold here.
The experiment:
I thought to use modeling chocolate because it doesn’t harden as much as fondant, but the color of the modeling chocolate was a bit whiter than my fondant and they needed to be the same color. Modeling chocolate also didn’t stay as pliable as I needed it to.
Next I tried creating some fondant scrolls and putting them in a plastic container layered between wax paper and then sealing the container. Well, that didn’t work…they still hardened up too much.
I even tried putting them into ziplock bags and then into a container and that STILL didn’t do the trick. I needed something that would totally seal out any air.
What worked:
Then I had a moment of clarity. My family knows I have a love affair with press-n-seal. I use it for practically everything…to wrapping my cake layers to freeze them, to covering bowls of icing or ganache, to just about anything.
In fact, my youngest step-son said the best thing he could think to get me for Christmas was an econo-sized box of Press-n-Seal.
By the way, you can get my tips for freezing cakes and cupcakes here. It’ll pretty much prove to you how much I love that stuff.
What finally worked was I pulled out a strip of press-n-seal and laid it on the table, sticky side up.

I made enough scrolls to cover half of the rectangle and set them on top of the press-n-seal. I made sure to leave space between each item and enough space at the edges of the press-n-seal.
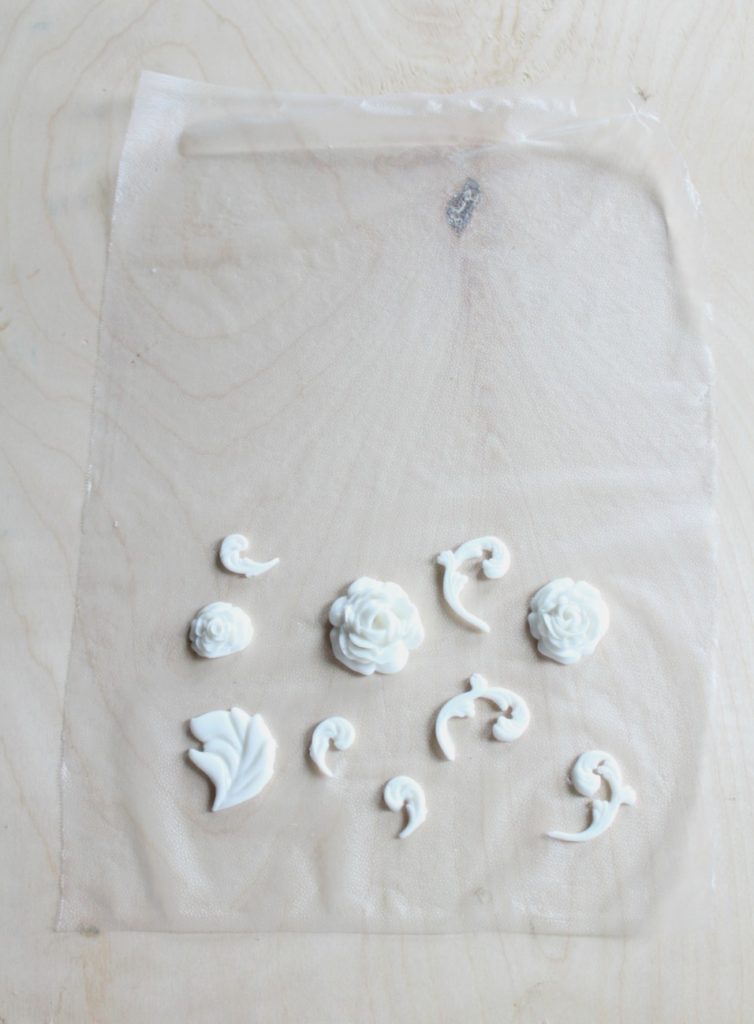
Then I took the other end of the rectangle and folded it over the fondant items.

I took my finger and pressed the top layer of press-n-seal into the bottom layer to stick them together. I did this first between all of the fondant items and then I sealed the edges.
This completely seals off any air from getting to the fondant pieces. You want to be careful not to smash them when you’re sealing around them. The press-n-seal forms a sort of bubble around each piece.

I picked up these little packets and laid them in layers into a plastic container. You can fill up your container with these (as long as they aren’t large, heavy pieces) and then snap a lid on it.
Keep these out of the sun and in a cool area of your house. I have a small closet I use to store my fondant in. You can even freeze them and they’ll be fine.

This totally worked for me! I made them weeks ahead of time and they stayed exactly the same as when I had put them into the container!
The day I put this cake together, all I had to do was pull apart the press-n-seal and attach the scrolls to the cake with a little water. It worked beautifully.

Oh and in case you want to see the back…here ya go…
Now, I won’t say this method is perfect for every situation, but it did work for me. If you have decorative items that aren’t textured, this may not work for you.
When you seal around each item, it sort of forms a little bubble around it to keep it safe, but if the press-n-seal gets a little wrinkled under it, you might get a little texture from the press-n-seal imprinted on your items.
If your items are textured and don’t need to be super smooth, it’ll work great for you.
The thing about this method is that it doesn’t just work for scroll work. It can work for a lot of different applications.
You might need to add a plaque to your cake, but you don’t want to make it on decorating day. If you’ve got a round cake, that plaque is going to have to be curved around it.
If it dries flat, well it just won’t look right when you attach it to the cake. You could just dry it on a foam cake dummy the same size of the cake you’ll be making, but what if you don’t have one handy?
This tip might be your best option. Make the plaque, seal it in a press-n-seal pocket to keep it pliable. If you need it to harden up, just slightly so it doesn’t get misshapen when you attach it to your cake, just let it sit out for a bit.
Now let’s go into some FAQs…

What are ways to keep fondant decorations soft?
- You can pre-make fondant decorations and then seal them in press-n-seal wrap as described above.
- Fondant decorations can also be stored in an air tight container to keep them soft, however smaller and thinner decorations may still harden up even in a container. (It’s best to seal them in plastic wrap first as described earlier.)
- You can also store fondant decor in the freezer. It will become firm when frozen, but will soften once it’s defrosted.
How do I keep fondant decorations from drying out?
- Make absolutely sure that you don’t leave them out to air-dry. That is what causes your fondant to dry out and become hard.
- You must keep your decorations in an airtight container.
How do you soften fondant decorations if they’ve gone hard?
You can try microwaving the fondant at 50% and then kneading it between microwaving intervals, but there really is no fail-proof way to soften it back up.
It may never be super smooth after it’s hardened. Just know that if you’re trying to soften small fondant decorations you made, it’s risky to microwave them as fondant melts very quickly and could ruin your design.
Can I freeze fondant decorations to keep them soft?
You absolutely can freeze fondant decorations. You want to make sure that they are well sealed and in an airtight container and you can freeze them for several months.
You can even add your decor to freezer bags and freeze them flat if you have the space. Once they defrost, they’ll be soft and pliable as long as you didn’t let the fondant harden before you froze the decorations.
Also note that when you defrost the fondant decorations, there will be some amount of condensation. So, if you have very intricate designs that are darkly colored, you could potentially have some discoloration.
The most important thing is that you do not touch the decorations while the have condensation on them. That will mess up the texture.
The most important tip:
If you’re making a cake for a very special occasion and you can’t afford for anything to go wrong, then you really want to test out a few of the options above and see what works.
If you want to go with the freezing method, then go ahead and make a small test fondant decoration, freeze it and then defrost it to see how it goes. If it works, then you know what you can do.
If it doesn’t work, then you know that you’ll need to do a little more experimenting, but it sure beats figuring out something didn’t work right when you’re in the middle of decorating a cake.
I really hope these tips help you out in a future project and that you’ll be able to do things in advance. I LOVE saving myself stress and I hope these tips save you stress as well.
Other posts you might like:
- Tips for Making Your First Fondant Cake
- How to Store a Cake
- Common Cake Decorating Terms and What they Mean
Don’t Forget to Pin it for Later!

Rose | Rose Bakes
That cake is gorgeous Kara! And I’m sorry to hear about the loss of your Dad. Prayers absolutely work and I’m so glad God gave you the wisdom and answers that you needed to get your cake done. I’ve never used Press N Seal, but when I had a huge 4 tiered wedding cake covered in lace appliques, I knew I wouldn’t have time to do them all on the day of the delivery so I actually made them and layer them between sheets of paper towels, then froze them in Ziploc bags weeks ahead. When I pulled them out, they were completely soft and pliable.
Kara Jane
Oh wow! That’s a great tip! Thanks for the comment 🙂
Jagjit Kaur
Thank you Kara for this tip. I have few cupcakes with baby theme for Thursday, which i know I won’t be able to complete and deliver if done in one day so i am gonna use press and seal method for fondant accessories and make them by Monday itself.
Kara Jane
Oh you’re so welcome! I’m glad it was helpful and I hope your cupcakes turn out beautifully! 🙂
Marcia
Gorgeous cake. Thanks for sharing your tips. And my condolences on the passing of your dad.
Kara Jane
Thanks so much, Marcia 🙂
Katrina
Im sorry to hear about the loss of your dad. This cake is gorgeous! I would love to see how you did the guitar!
Kara Jane
Thank you Katrina for your sweet comment!
Rubeena Akhtar
Hey Kara,
New subscriber here! LOVE your blog – so educational. Just wanted to ask, can I paint my fondant decoration and THEN seal in press n seal?… Will they dry off inside the press n seal?… My fondant decorations have to be gold… Please help!
Kara Jane
So glad you love the blog! So I really haven’t tried this method out with painted fondant that I can remember. I think it would be okay, but you may have to do some touching up because I have a feeling if the press-n-seal rubs against any of the painted fondant, that it may rub away some of the paint. That might happen when you’re trying to get the fondant pieces out of the press-n-seal. What I would do is just get a small piece of fondant, paint it and then store it like you think you’d store the others for several days then see how it responds. I’m big on testing things out first, so that’s what I would do. It would at least give you peace of mind that either you know it will work or know that it won’t work. Hope that helped!
Brenda
Thank you so much for sharing your new found tip Kara! I’m so sorry to hear about your dad. I also believe God is interested in our every day life and every detail of our life. I’m with you that He revealed just what you needed at that time…. no matter how small!
Kara Jane
Thanks so much for that sweet comment. I’m so glad to know there are others who agree He’s in the small stuff with us 🙂
Karen
Kara, I do believe that God is in everything, even cake. I can’t tell you many times He has given me insight on my cakes. The cake looks amazing! Thank you for sharing, I need this as I also work a 9-5.
Kara Jane
Thanks so much for your sweet comment! Working a 9 to 5 PLUS doing cakes is very challenging. I think most people don’t understand how much time has to go into a project. You definitely learn to become resourceful 😉
Saeeda Zaidi
“May your father’s new journey be enlightened and God bless you with courage and strength ”
Our loved ones live in our hearts and they are always there
Thanks for sharing these tips.
Kara Jane
Thank you so much for your thoughtful comment. I really appreciate it!
Pamela
Dear Kara, thank you so much for your press not seal tip. It’s the same solution I’ve been looking for, for the same reason as you. You are a Blessing. God Bless,
Pamela , Pittsburgh , Pa.
Kara Jane
You’re wonderful for saying that…and you’re welcome 😉
Pamela
That’s press n seal. Sorry LOL
Kara Jane
haha! knew what you meant 😉
Brenda
Thanks for these great tips. Your cakes are beautiful.
Kara Jane
Oh you’re so welcome! 😉
Robert Hosler
Of course I want to know how you made this awesome cake! I’m just a home baker so don’t leave out anything, please.
Kara Jane
Oh thanks! Hopefully I’ll be able to get to that tutorial some time in the near future!
Holly B
I needed to come back to this page to say thank you for helping me save a cake! Because of your Glad Press n’Seal trick, I was able to complete a cake on time despite a really challenging week. I worked overnights Monday and Tuesday, had a wind storm and a tree fall on our barn on Wednesday, and lost power for nearly 24 hours Wednesday evening into mid-day Thursday (cake due on Friday). Because I was able to create my decorations before tragedy struck, I was able to keep them soft, and had a lot less to do on my cake the morning it was due. If it weren’t for your trick, my cake wouldn’t have been done on time. THANK YOU! I had never used Press n’Seal before, but now it’s my favorite new toy!
Kara Jane
I’m so sorry about the wind storm…that sounds so stressful! I hope you’ll be able to get it all repaired soon. That’s wonderful that the post helped though and you were able to get the cake finished! I’m glad to know someone else who shares my love of press n seal. 😉
Aisha
Thanks for this! Does this also work for gumpaste?
Kara Jane
You’re so welcome! I haven’t actually tried it with gumpaste. I usually just use gumpaste when I need something to get really hard, but it’s worth experimenting and trying it out though. 🙂
Patricia
Your work is amazing! And I am so sorry about your dad passing. It is a great loss…i know, they are greatly missed. May the Lord ease your pain. Thank you for the great help of your ideas with fondant decorations.
Kara Jane
Hi Patricia, thanks so much for your wonderful words. It is definitely a great loss as you said. I’m glad the fondant tips were helpful! 🙂
Amy
Hi! Your cake is so gorgeous! This is my 1st time making fondant decorations for my kiddos birthday! Since I am new I know I will need more time to make the cupcake toppers. I am making little ninjago heads, basically an embossed circle with a small cutout for eye area, and a small piece of another color fondant underneath for the eye area. My question is, will it be weird to make them ahead with the smaller layer underneath the larger layer? Will there be a weird dent as the circle sinks around the smaller rectangle piece underneath? Will the 2 pieces easily stay put when i try to remove them from the press n seal and place cupcakes? Thanks so much for your great tips!!!
Kara Jane
Hi Amy! I like that name because my sister’s name is Amy. Anyway back to your question… Are you making the cupcake toppers like round disks where they’ll be flat and set on top of the iced cupcake? If so, you don’t need to keep those pliable, you’d actually want those to harden up, so they stay firm on top of the cupcakes. You wouldn’t need to cover them with the press-n-seal…just leave them out to dry and harden up. You can make them months ahead if you wanted to. Once they’re dry and firm, it takes a long time for them to go bad. If you’re worried about the small area of fondant that will be under the larger circle of fondant, you could just make that small area of fondant really thin, or you could just make it thin and let it cover the whole disc, then add on the other color of fondant over it and then you wouldn’t have any settling going on. I hope that made sense. If I’ve misunderstood your question, just let me know!
Christina
Making cupcake toppers for my nephew’s first birthday party in two weeks. They will be the round flat disk style that you set on top of an iced cupcake. I plan on using marshmallow fondant. What would be the best way to store them until I need them?
Kara Jane
Since you’re making the round discs, those usually need to harden up and get firm. In that case, what I usually do is just get those large rectangle cake boards, sprinkle with cornstarch and just set the cupcake toppers on top. I let them dry (open to the air) for a day or two and then lay some plastic wrap or press-n-seal wrap over them and place in a dark dry area of the house. Don’t wrap them up really tight though. These you want to dry out so they’ll keep their shape. I don’t transfer them to containers because I’ve found with marshmallow fondant, even when you think they’ve completely dried out and firmed up, they somehow still have enough moisture in them to eventually bend or take on the curves of the container, or if they’re stacked they could get dents etc. I found that out the hard way. Hope this helps!
Arlette Payne
Hello Kara,
Thank you so much for this awesome tip!! Just what I needed, since I am making a baby shower cake for my step daughter’s shower in a month and a half. I wanted to make a fondant quilted baby blanket that needs to stay pliable to lay or the wdge of the cake. I also have to transport my fondant elements
across Ontario by plane, so your method will make that easier too! Thanks for your help and faith. It is amazing how God cares for even these little ‘needs’.
I know it’s been a while since your original post, so I hope your heart is less sad from losing your dad. I know how that feels. I lost my dear mom in November of 2017, and my dad seven years before that. I still have a good cry about it once in a awhile, but I do believe they still pray for me from heaven. 🙂
God bless you and thanks again!
With love, Arlette
Kara Jane
Hi Arlette, I’m so glad the tip will come in handy! I hope the cake turns out beautifully. And thanks for the kind words about my Dad. You know how things go…the sadness lessens, but yeah I know about having a good cry every now and then…that’s so true.