These are the biggest cake mistakes you definitely don’t want to make when baking cakes. There are some super easy tweaks that you can make and tips to help prevent cake mishaps, so you bake perfect cakes every time.
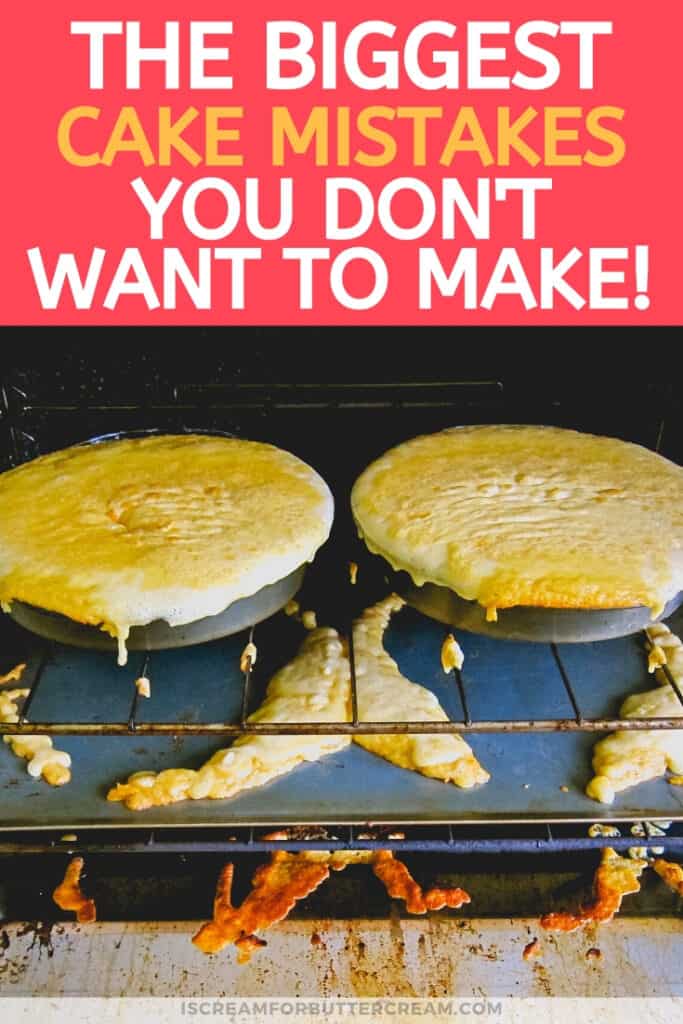
In this post, I’ve tried to list out all the mistakes I could think of that are most commonly made when baking scratch cakes.
Now, I’m not really talking about baking cakes from a mix, because those are generally more forgiving. I’m really just talking about baking cakes from scratch because those can be a bit persnickety.
Ok, let’s get started.
As an Amazon Associate, I earn from qualifying purchases.

Oh and one quick note…these aren’t in any particular order really. They’re all super important.
Ok, onto the mistakes.
NOT GIVING YOURSELF ENOUGH TIME:

Trying to bake a cake from scratch when you’re short on time and in a big hurry just isn’t a good idea. There are many reasons why. You might need to have certain ingredients room temp, like butter.
If you’re in a hurry, you might think of popping butter into the microwave, but that’s not a good idea (we’ll get to that later on).
Regardless, you want to leave yourself enough time to measure your ingredients properly, have them at the appropriate temperature and mix the batter for the proper length of time.
NOT SETTING OUT BUTTER OR OTHER INGREDIENTS AHEAD OF TIME:
If the recipe calls for room temperature butter, it’s really important to actually set it out and let it come to room temperature on its own and that means not microwaving it.
Why? Because the microwave will not warm it up evenly and you don’t want warm butter…just room temp. or slightly cooler than room temp.
The reason you want your butter (and other ingredients) closer to room temperature is because they will emulsify better (mix together better) and your batter won’t seize and get weird lumps in it.
Now, sometimes you don’t think about setting everything out and honestly, I don’t think you have to. I’ve used cold milk a ton of times and the cake comes out fine.
I think the two most important ingredients to set out ahead of time are the butter and the eggs. I find that adding really cold eggs will seize up your batter super quick.
Essentially you want to follow the directions of the cake recipe you’re using. If it says to melt the butter, then do that, but it’s really important to follow the directions because it’s written in a way that the ingredients will mix together best.
Oh and one quick tip about getting the butter to come to room temperature sooner: You can cut up your butter sticks into chunks and let it sit and room temperature.
I find that it usually takes about an hour in a room that’s about 73 degrees for it to get to the point of being slightly cooler than room temp (which is perfect for the reverse creaming method, which we’ll talk about later).
USING THE WRONG FLOUR:
The type of flour really matters. I mean there really is a difference between cake flour, all purpose flour, self rising flour etc. They have different amounts of protein and they will give you different results.
They don’t substitute equally. It’s best to use the flour that’s called for in the recipe, but if you don’t have it, or can’t get it, then you’ll need to do some adjusting.
I’ve written an entire post all about the different types of flour for making cakes and how to substitute them if you need to. You can find that post here: Types of Flour for Baking Cakes
SUBSTITUTING INGREDIENTS:

When I talk about substituting ingredients, I’m talking about things like baking soda, baking powder, unsweetened cocoa powder to dutch cocoa powder, liquids etc. Please don’t do that!
Ok, I know that was dramatic, but most of the time it’s really a bad idea to sub out ingredients because there is a reason those specific ingredients were in that recipe.
First, substituting for a different flour could give you unintended results. (Make sure to see the tip above to get the link to the substituting flour post.)
Second, substituting other ingredients like baking powder and baking soda could just be disastrous. Those are not the same thing and you can’t sub out one for the other. I go into greater detail about that in this post: What’s the difference between baking soda and baking powder when baking cakes?
It’s the same thing with cocoa powder. There are different types and you definitely want to use what’s called for in the recipe. You can read about the differences and why here: Which cocoa powder do I use? (What’s the difference?)
ADDING OR LOWERING INGREDIENTS:
When you add or lower ingredients, it can cause a ripple affect in your cake batter. Small changes in baking, can cause big issues.
Ingredients like sugar and liquids help with the moistness in the cake. You might think that lowering sugar only lessons the sweetness, but it doesn’t. It actually affects the moisture as well.
And if you were to add in more liquid thinking it would just make it more moist, that isn’t necessarily true. It could throw off the ingredient ratios and seriously affect the texture of the cake and even cause it to be too dense, or not even rise properly.
Baking is all about ratios and adding or lowering ingredients can totally throw that off.
USING OLD BAKING SODA OR BAKING POWDER:
Ok, I know you probably know this, but sometimes we just forget how long we’ve had our baking soda and baking powder.
If you’re having trouble and your cakes are coming out really dense, or just not rising properly, this could be the problem.
I try to write down the date on the top of my container when I open a new baking soda or baking powder. That way I can keep track of how long it’s been opened.
Also, don’t store them in the fridge because they need to be in a dry environment and the fridge can be a moist environment. If you want to have baking soda in your fridge that’s fine…just don’t use that one to bake with.
I like to use my baking soda within 6 months, then get a new one…even if I haven’t used the whole box up. It won’t do you any good to keep the old one for baking. You can either throw it out or pop it in the fridge to help keep your fridge fresh.
I like to use my baking powder within 6 months as well, but I think it will actually last a few months more than that. It’s just easier for me to replace both the baking soda and baking powder at the same time.
NOT MEASURING PROPERLY:

This is a biggie. You may not even be aware that you’re measuring the wrong way. Looking back when I was young and baking cakes, I measured the wrong way for a long while before I realized it really does have an effect on your final product.
The biggest thing is that you do not want to pack down your flour when measuring it. That means, don’t dig your measuring cup into your flour bag and measure it out that way. Spoon it into your measuring cup.
By scooping your flour, you’re essentially packing it down into the measuring cup and you’re actually adding too much flour to your cake batter.
I’ve got an entire post all about how to measure properly and it goes through everything including a video on how to and how not to measure correctly. You can see it here: Measuring Ingredients for Baking Cakes

Grab these fun beautiful rose gold measuring spoons in the shop!
NOT FOLLOWING THE MIXING INSTRUCTIONS:
Ok, we’re all busy and sometimes we just want to get that cake in the oven, but you don’t want to ignore the mixing instructions in the cake recipe.
I’m saying this because I’ve made all of these mistakes myself. I used to think, what’s the big deal? Why do I have to mix this thing up a certain way? But I’m here to say that it really does make a difference.
There are different mixing methods that are used and depending on which mixing method is called for you essentially mix cake batter a certain way in order to incorporate air to help it rise or to keep from over-developing the gluten (which helps to keep the cake soft) and so on.
So there are definitely good reasons why you want to follow the mixing method and it will vary depending on the ingredients in the cake recipe. You may not think it’s a big deal, but if you ever have trouble with your cakes just not turning out as good as you’d hoped, or maybe they’re too dense, have air tunnels in them, or even gluey streaks in them, then following the mixing method might solve that.
I’ve actually got a couple posts that may help with that. First is my post about Different Types of Flour for Cakes and Mixing Methods. That post goes through the different types of flour used for baking cakes and the common mixing methods and why they’re used.
The second post that might help you is my post on How to Mix Cake Batter. Many people over-mix cake batter. That’s the number one problem I see and this post goes through exactly how to mix it and for how long including a real time video.
OVER MIXING CAKE BATTER:

Ok, we just talked about this a little bit, but this is the number one problem I see when cakes don’t turn out.
It’s ingrained in us to keep on mixing, mixing, mixing until every tiny speck or tiny lump is pulverized. If you think about it, it makes sense. We figure it’s actually better if you mix it really well, but that’s actually not the case.
When you mix cake batter too long, you overdevelop the gluten in the flour and that can cause your cake to be too dense, not rise properly, or have a weird texture to it.
Now don’t get me wrong, if a recipe is using the regular creaming method where you whip up the butter and sugar together first for a few minutes…that’s actually ok to mix for several minutes. Why? Well it’s because you haven’t yet added in any flour or liquid to it. And at this point, you’re trying to incorporate as much air as possible into the butter and sugar to help lift the cake.
Once you add in any flour or liquid though…all bets are off and you have to really watch your mixing time.
There is a lot to explain on that and the easiest way to see exactly how long to mix with different mixing methods, is to go to my post on How to Mix Cake Batter and watch the real time video.
NOT PREPARING THE PANS:
There’s not much that’s more aggravating then spending time mixing up the perfect cake batter, watching it rise in the oven, getting so excited about eating it, then you go to get it out of the pan and it’s totally wrecked.
Yeah that’s frustrating, but that is an easy problem to prevent.
Now, people have different methods that help them, but I personally like the pan release recipe, or just simply greasing the pan with vegetable shortening and then coating with flour.
Sometimes really moist and delicate cakes need a little extra help and in that case I normally use the vegetable shortening and flour coating.
I do know that many people swear by using parchment paper and that’s also an option if you don’t want to use any extra shortening or spray.
I’ve got an entire post on how to prepare your pans and the different methods you might find helpful here: Tips for Getting Your Cakes to Release from their Pans
NOT USING THE RIGHT SIZED PANS:

If you use a different sized pan than what’s called for in the recipe, you could have a disaster on your hands.
Now, if it’s just slightly different, then it might not make a huge difference, but if you’re using a pan that’s way bigger or way smaller, it’s gonna be an issue.
Obviously you know what’ll happen if you use a pan that’s smaller. You’ll have cake batter going everywhere. If you use a pan that’s way bigger, it also won’t bake properly and could get really dark and crispy and may also not rise properly.
If you used your batter to fill multiple smaller pans, or made cupcakes from a cake recipe, you’ll have to watch your baking time because things in a smaller pan will need to bake for less time.
NOT PRE-HEATING THE OVEN:
When I was baking cakes as a kid, I just disregarding pretty much anything the recipe said that I didn’t think I had time to do and that included preheating the oven.
When I’d pull my cake out and realize it just didn’t rise like I wanted it to, or it was too dense, I just couldn’t undertand why.
Well pre-heating the oven is why and it’s a must. You need to get that oven temp up before you ever put in your cake. Set your oven temp before you even mix up your cake batter and it should be ready when you’re done mixing.
Pre-heating is important for the cake to rise. If you don’t do it, you’ll get a flatter cake that’s going to be too dense.
Also, it’s really great to have an oven thermometer. You just hang it in your oven and that way you’ll know exactly what temperature your oven is.
And another quick note, when you put your cake in, make sure it’s on a middle rack…not too high up and not too low.
NOT ADJUSTING THE TEMP IF YOU’RE USING DARK PANS:
If you’re using those really dark coated pans, you might need to lower the temp a bit because they tend to over-brown cakes.
If the recipe says to bake it at 350 and I’m having to use a really dark coated pan, then I normally lower the temp to about 325. You’ll end up having to bake it longer, but at least it won’t get too brown or crunchy on the outside!
OPENING AND CLOSING THE OVEN DOOR:
Three words: Don’t do this. You really don’t want to open and close the oven door a ton of times while your cake is baking. The reason is that every time you do that, heat is leaving the oven and it’s changing the temperature. You don’t want big fluxes in temperature when you’re baking a cake.
I’m not saying you can’t open and close the oven at all, but try not to do that until you get close to the end of your baking time. And really be careful not to slam the oven door because you don’t want to jostle the cake. You’ll pop all the tiny little air bubbles that are helping the cake rise and the whole thing could fall.
Now, if you have kids that smell things baking and always want to open the oven door and then slam it shut (ask me how I know), just pop a sign on the oven door that says DO NOT OPEN OR YOU’LL GET NONE OF IT! Yeah I was kinda mean like that. 😉
PULLING OUT THE CAKE TOO SOON (OR TOO LATE):

Ok, obviously you know what’ll happen if you pull the cake out of the oven too late…duh…it’s overcooked, dry or burned. But did you know it can actually be just as bad if you pull it out a little too soon?
Pulling the cake out of the oven too soon could cause the whole thing to collapse. If the cake isn’t baked all the way through and you pull it out of the oven, well the middle is going to sink in.
It’s a sticky situation…you have to know when the right time is. When you test your cake for doneness, you don’t want to pull it out of the oven to do that. That jostles it too much and there’s too much of a temperature flux.
I have an entire post on how to tell when a cake is done that goes through how to check for doneness and it’s not just your normal toothpick test (which I have a different take on and don’t totally agree with anyway). You can find that post here: How to Tell When a Cake is Done Baking
NOT COOLING IT PROPERLY:
This always seems to be confusing. A lot of people either take their cakes out of the oven and let them cool completely in the pans, or they try to take them out of the pans immediately.
I don’t do either of those things and here’s why: I don’t leave them in the pans to cool completely because I don’t want them to soak up anymore heat than necessary and the pans stay hot for while. The cake layers also tend to cool quicker when they’re out of their pans and onto racks.
I also don’t want to take the cakes out immediately because the cakes are still too delicate at that point and it usually results in a disaster if you do that and the cake crumbles and falls apart on you. Really the layers are just too hot to handle at that point.
What has worked for me (and hopefully will work for you too) is that I’ll take the cakes out of the oven and set the pans on cooling racks. I don’t take them out of the pans yet…I just set the cake layers, pans and all on the cooling racks and set the timer for about 10 minutes for layer cakes and 15 – 20 for bundt cakes.
When the timer goes off, I invert the cakes out of the pans and onto the racks to cool completely. You can see my whole process here.
NOT USING THE RIGHT RECIPES:
There are a gazillion cake recipes out there and if you’ve tried and tried a certain recipe and it just doesn’t work for you, just try another one.
I get a lot of questions from people saying they’ve been trying to use a recipe they’ve had for years and it just doesn’t turn out right and what could they do to add or take out or substitute etc to make it work.
Now, I don’t mind helping, but if you have to do a ton of tweaking on a recipe just to get it to do right and even then it’s not exactly what you’re looking for, then try another one. Don’t stay stuck on a certain recipe. It’s okay to try others. Different recipes work for different people, it’s kind of weird, but it’s the truth.
I’m going to add several of my basic cake recipes below and you can see my entire cake recipe list here. But, if you ever have trouble with any of those, I’m here to help and if you keep having trouble no matter what you do, you can certainly try out another recipe…even from another source! It’s okay! You’ve gotta do what works for you!
Basic Cake Recipes:
- Vanilla Bean Cake Recipe
- Moist White Cake Recipe
- Classic Yellow Cake Recipe
- Chocolate Butter Cake Recipe
Well I really hope this post was helpful and remember you can always ask me any question you have…I’m here to help.
If you want to check out my entire category of cake baking tips, you can check them all out here.
Don’t forget to pin it below!

Leave a Reply