
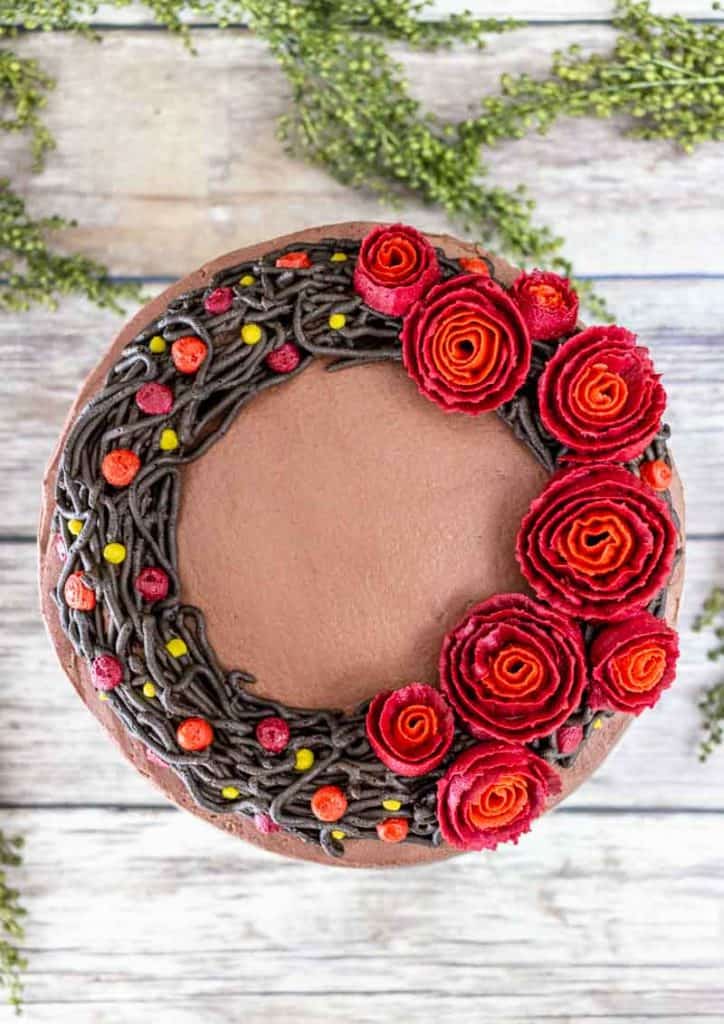
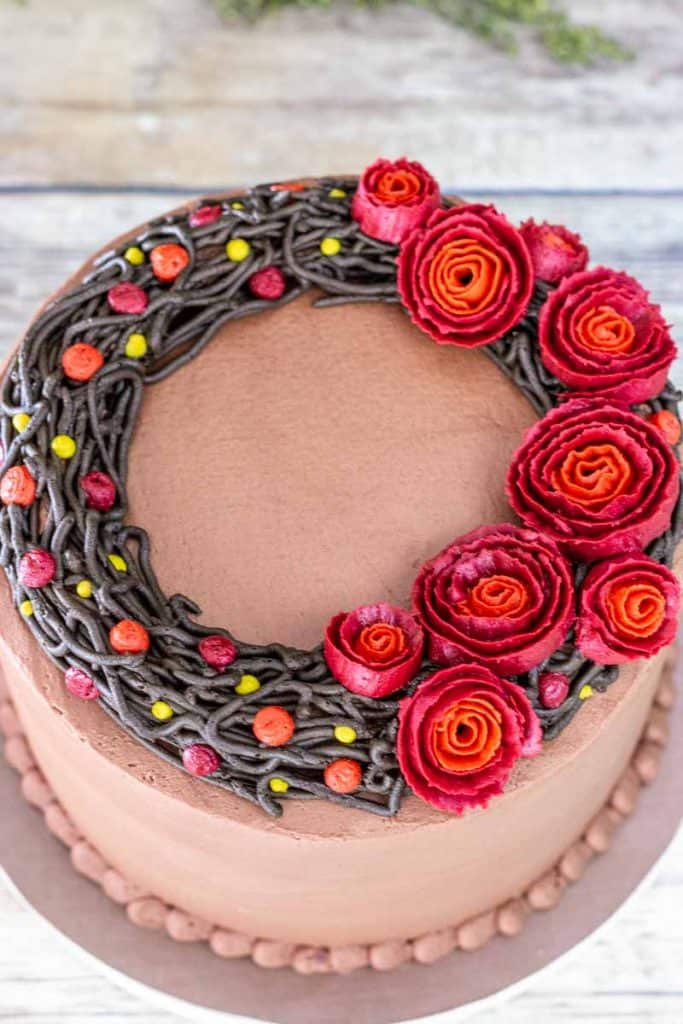
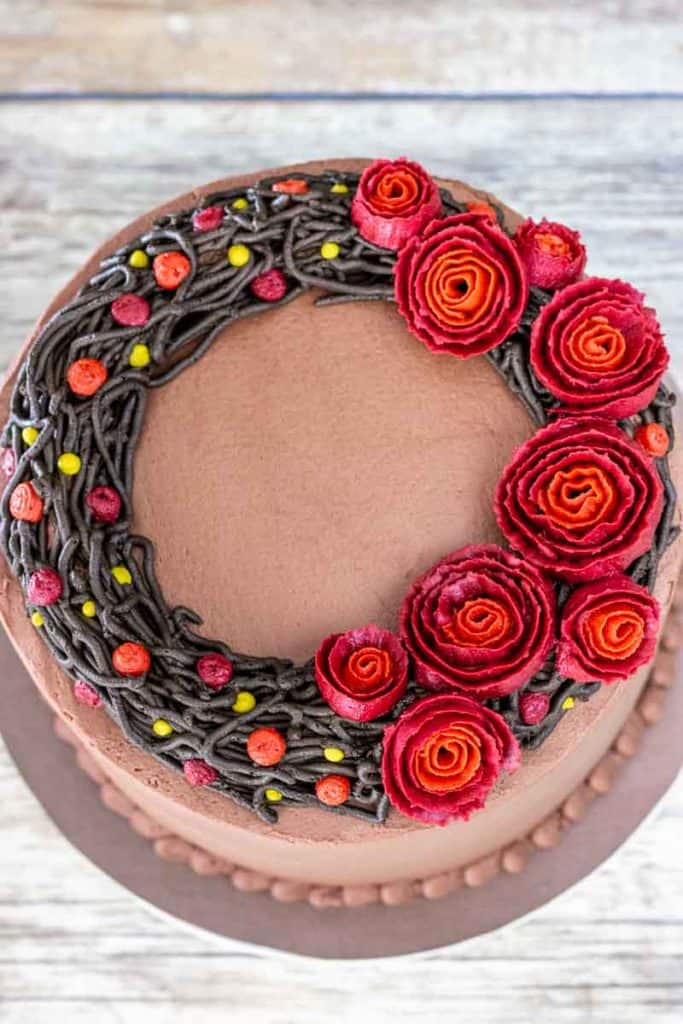
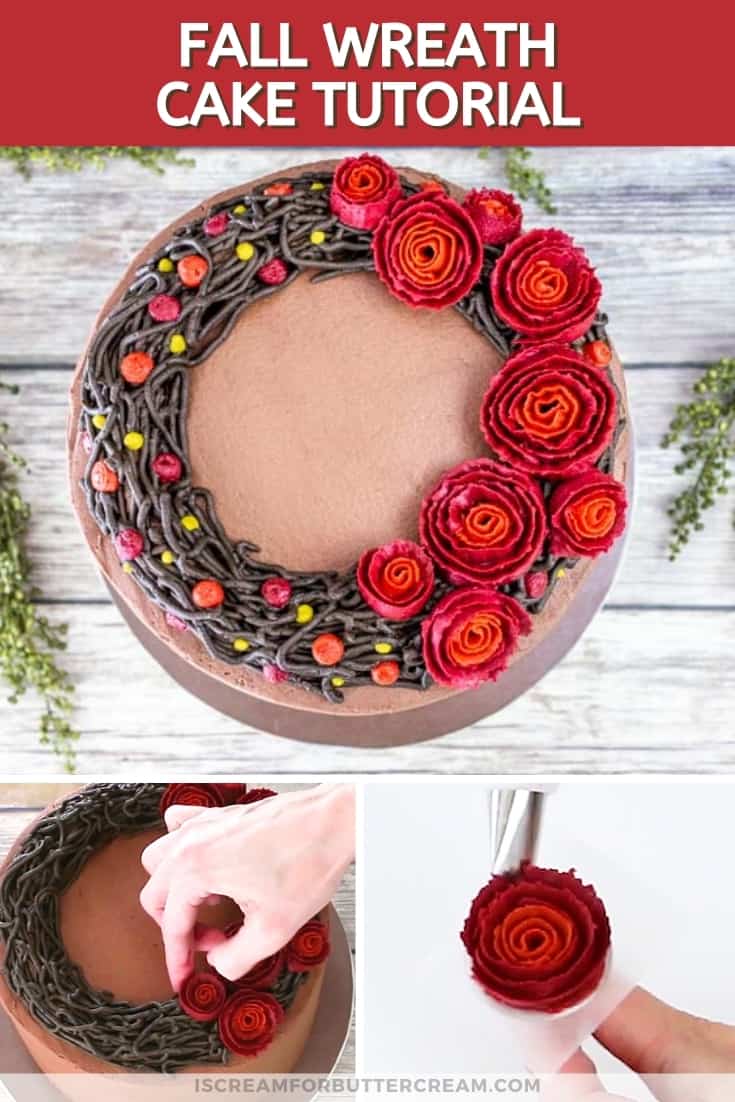
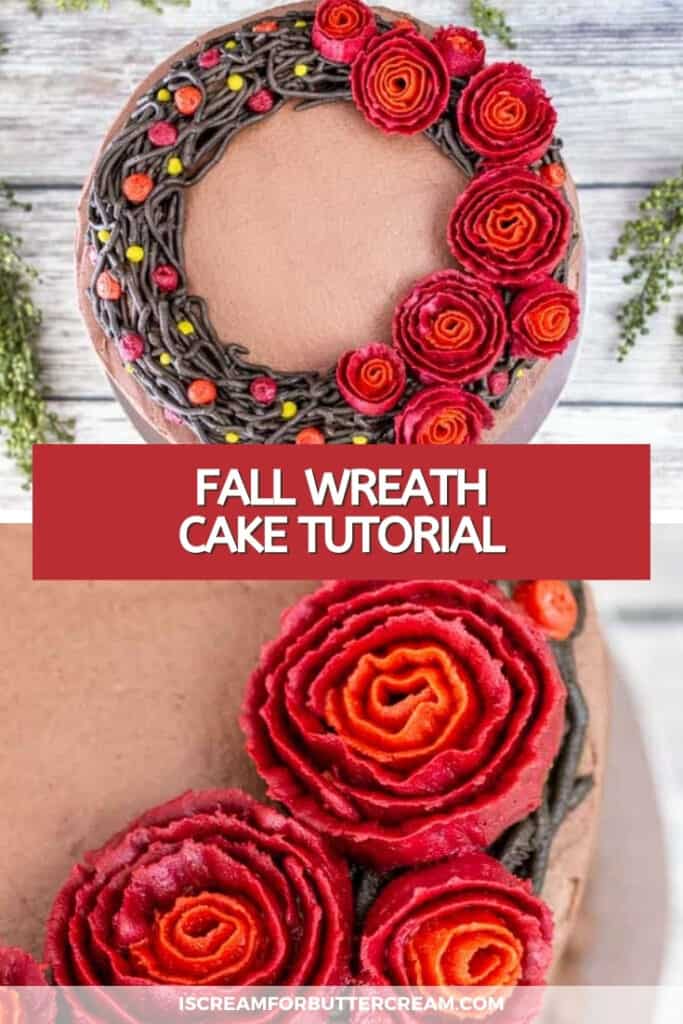
This easy to follow cake tutorial will help you make the perfect cake for fall. It’s an easy flower wreath cake to make and you don’t need a ton of cake decorating experience either.. With the right tips, the buttercream ribbon roses are much easier to pipe than they look.
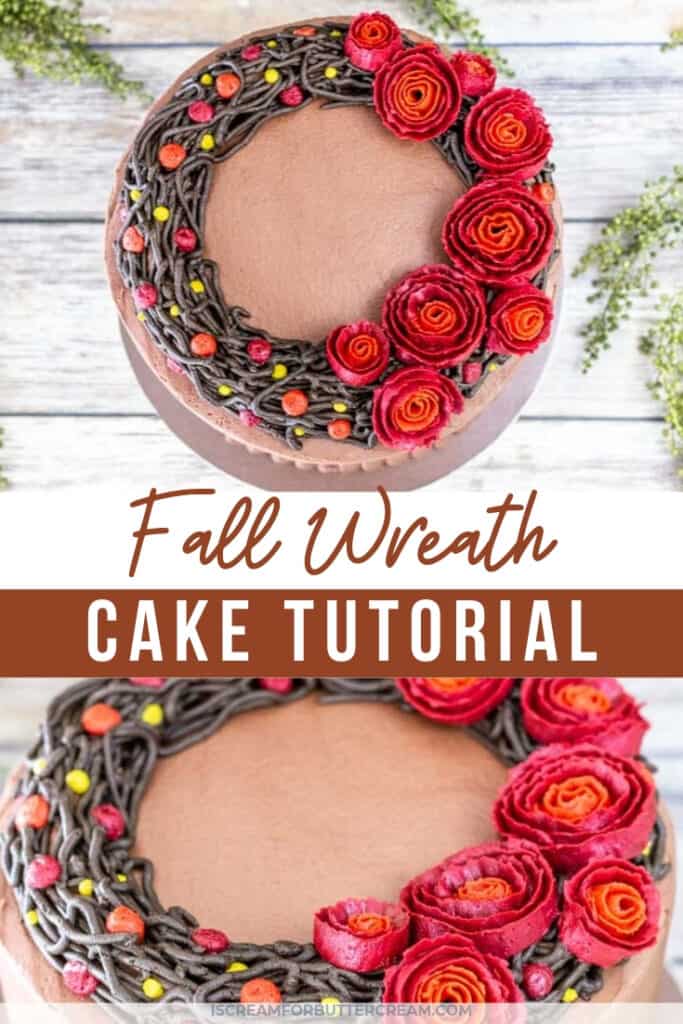
I love fall. Yeah I know everybody says that. I do love it though and I love decorating for fall. I’ve been meaning to make myself a nice wreath for my front door, but I made this fall wreath cake instead. I mean hey, you can actually eat a wreath cake. 😉
Psst…this post will show screenshots of each individual steps, but don’t forget there is a video close to the end of this post that shows how everything is done.
I was searching online for fall ideas and I found a tutorial for a really cute fall wreath. I LOVED the simplicity of it and I just loved the colors. I had a moment of inspiration and knew I HAD to make my own version of this wreath into a cake.
By the way, to see the wreath that was my inspiration, check out Crafting Mom’s tutorial here: Fall Wreath with Felt Rosettes
When designing this tutorial, I didn’t want to do your average buttercream roses. A lot of people have trouble with those, they take a lot of practice and frankly if you’re making this cake for Thanksgiving, or some other fall activity, you probably don’t want to spend a ton of time practicing your buttercream rose technique.
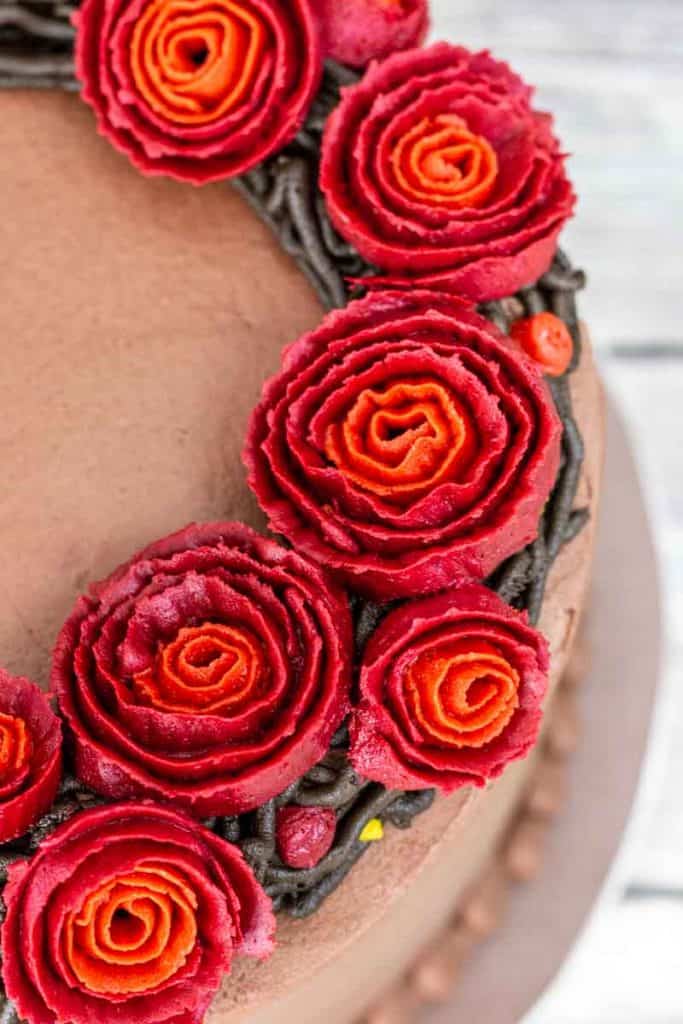
I decided I’d go for buttercream ribbon roses. They are much easier to create and I really like the look. They also resemble the inspiration wreath better than traditional buttercream roses would.
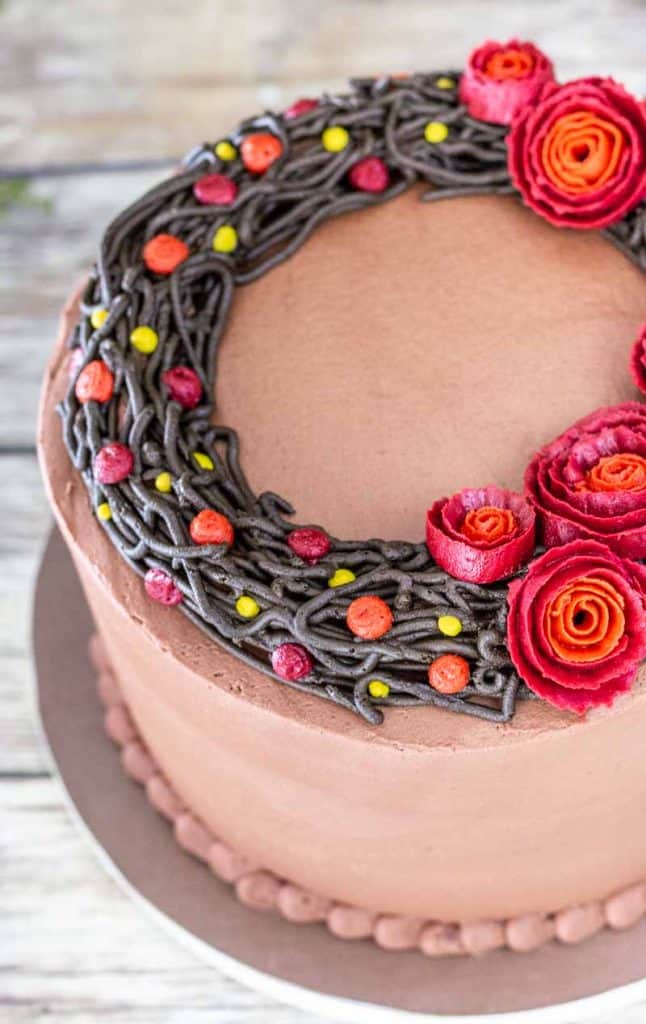
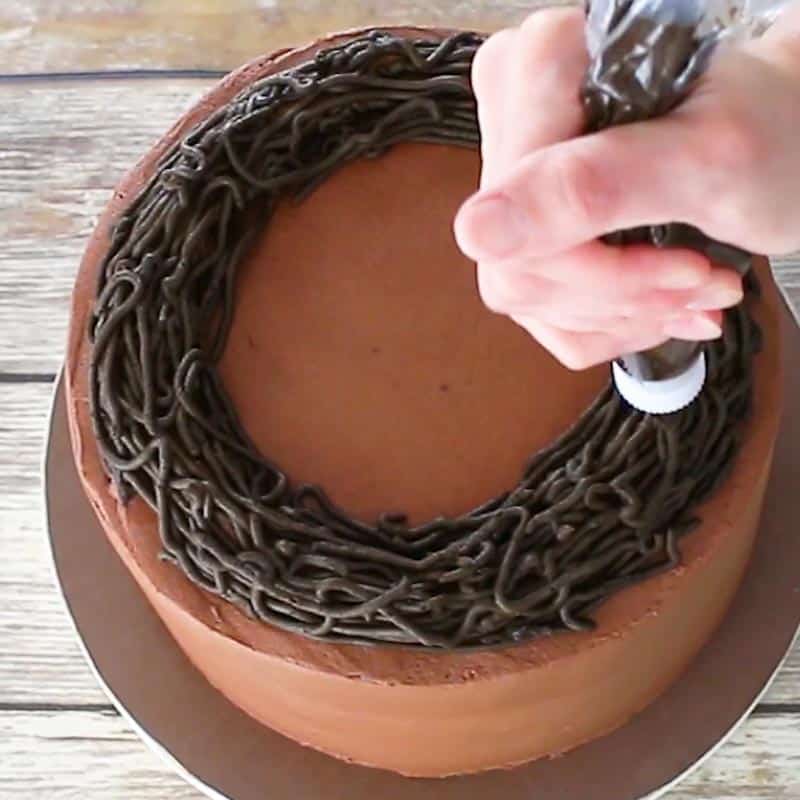
There are no super complicated piping techniques that you have to learn for this tutorial. The grapevine wreath is simply a round tip and actually the messier you get with it, the better it looks.
Then you’ve got the berries, which just uses a larger round tip. (You could even go with m&m’s if you don’t want to pipe them).
And of course the ribbon roses aren’t hard either, once you get the technique down. You’ll be surprised at how easy you can make them. For those, you’ll just be using two different sizes of petal tips, which I’ve linked in the supply list below.
One thing to note: I decided to go with darker fall colors for my wreath, but of course you can change it up into any color you’d like…it’s your choice.
I’ve included screenshots below with detailed explanations, but I’ve also got a video close to the end of this post as well.
As an Amazon Associate, I earn from qualifying purchases.
Supplies Needed for this Cake:
- Cake Base (I used several cardboard cake rounds, taped them together and covered in scrapbook paper and then clear contact paper.) If you’d like to see more ideas on cake bases, you’ll want to check out this post: Tips for Cake Boards
- Cardboard Cake Round (This will go directly under your cake layers.)
- Three Baked 8″ Cake Layers (I used chocolate.) Here are a couple options: Easy Double Chocolate Sour Cream Cake (a doctored cake mix recipe) or Chocolate Butter Cake a scratch cake recipe
- Chocolate Buttercream: Here’s my recipe: Double Chocolate Buttercream
- Buttercream in dark brown, dark red (burgundy), dark orange and yellow – Here are some good buttercream recipes on the blog: Vanilla Bean Buttercream (an all butter buttercream) and Heat Stable Pipeable Buttercream (a shortening based buttercream). The all butter buttercream will firm up better in the fridge, but the shortening based buttercream will pipe better. You may want to go with half butter and half shortening to split the difference.
- Small Icing Spatula
- Large Icing Spatula
- Cake Decorating Turntable
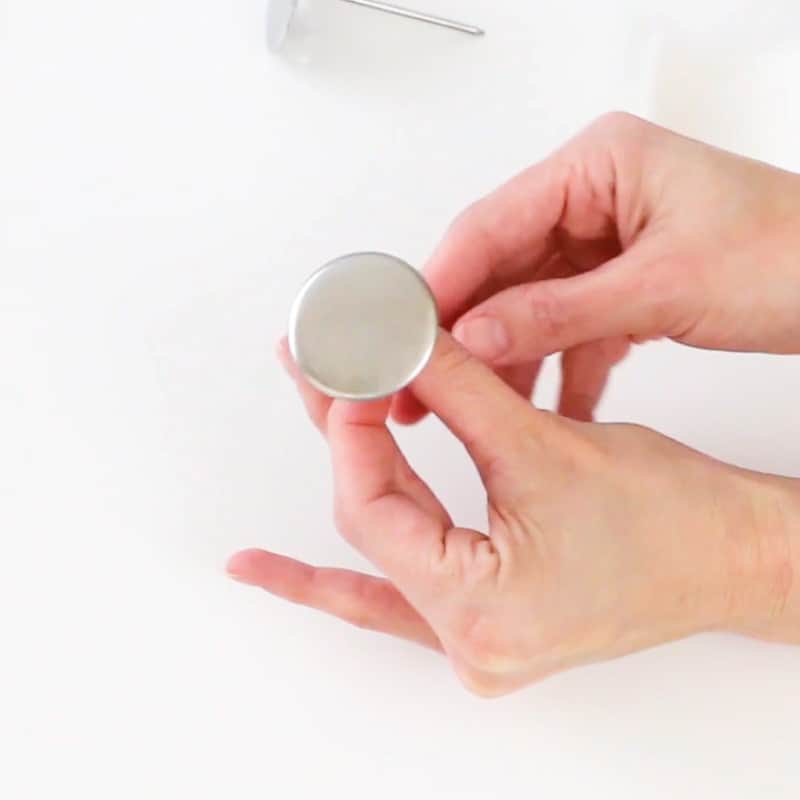
- 2 Inch Flower Nail and Regular Size Flower Nail
- It’s helpful to have some styrofoam handy so you can stick your flower nail into it while you grab the other piping bag, but it’s not an absolute must.
- Parchment paper or wax paper squares
- 103 Petal Tip (which I used for the dark orange)
- 104 Petal Tip (which I used for the dark red)
- Icing couplers – These are handy to have because you can switch the icing tips out quickly and you don’t have to add buttercream to another icing bag.
- Round Tip #5 (for the grapevine wreath and the yellow berries)
- Round Icing Tip #12 – for the orange and dark red berries and also for the bottom cake border.
- Piping Bags
Making the Fall Wreath Cake:
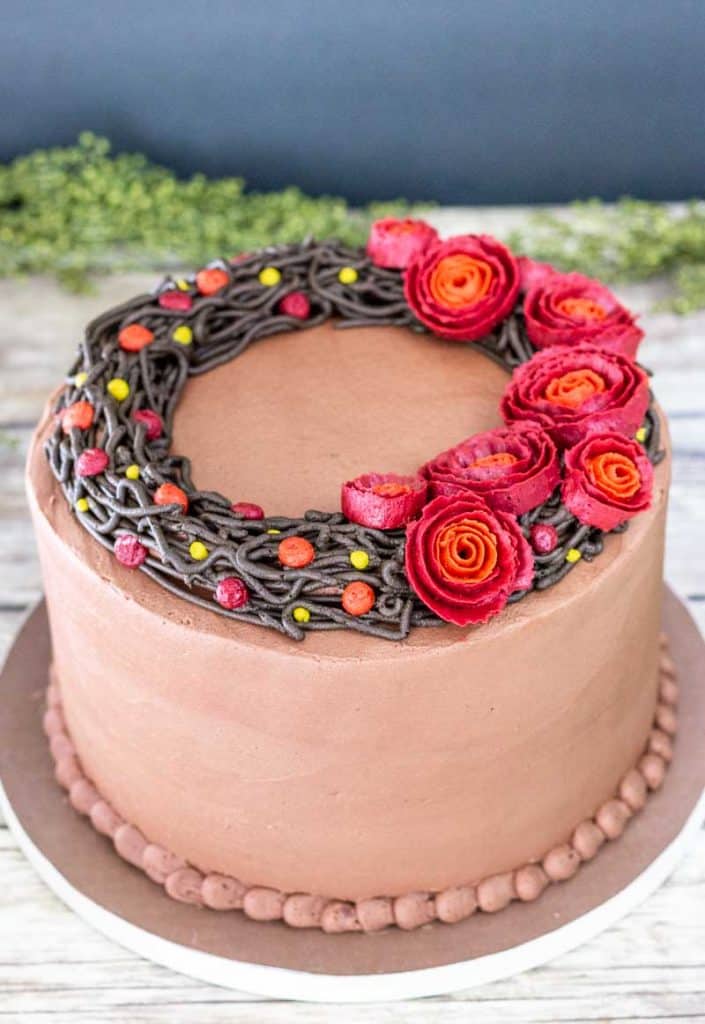
First thing you want to do is to ‘build’ your cake. I used three 8″ cake layers and two layers of filling.
You want to do a thin layer of buttercream once your layers are all stacked and then add another thicker outside layer of buttercream.
Make sure to let your cake settle between icing it the first and second time, so that you won’t get any icing ridges on your cake.
Once your cake is covered in buttercream, just set it to the side to work on your roses.
You’ll need a small and large flower nail. The large one is about 2 inches and the small one is about an inch to an inch and a half.

You’ll also want to cut up some parchment paper or wax paper squares. You can buy these squares, but really? I’m cheap, so I just cut my own and I usually have wax paper or parchment paper laying around.
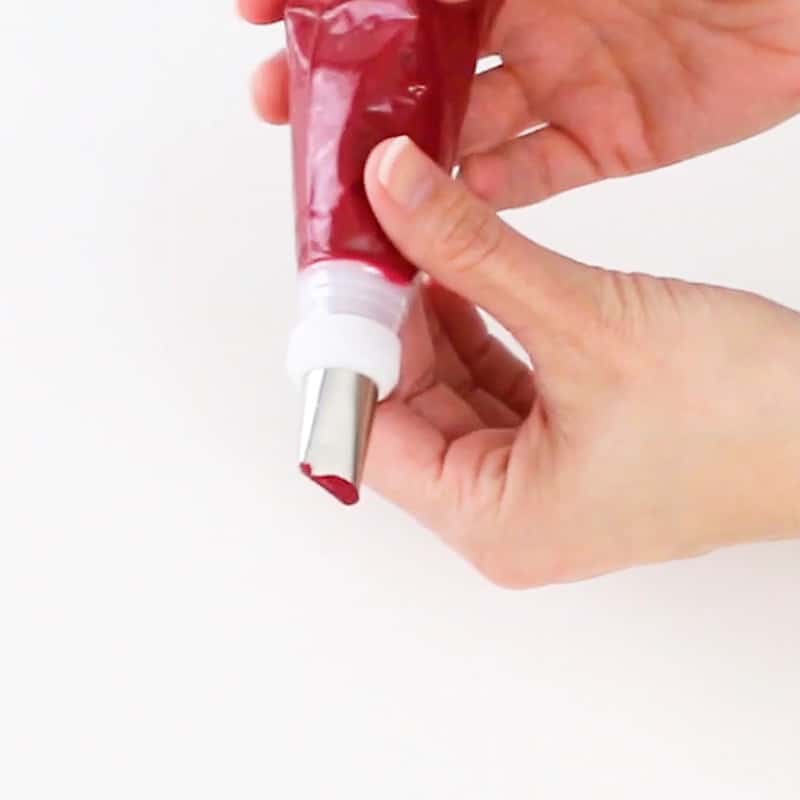
Now you’ll need to fill your icing bags. You’ll use the dark orange and the dark red for the ribbon roses. If you have icing couplers, use those because that way you’ll be able to change the icing tips out for the round tips later when you have to pipe the berries.
For the dark orange, I used tip 103.
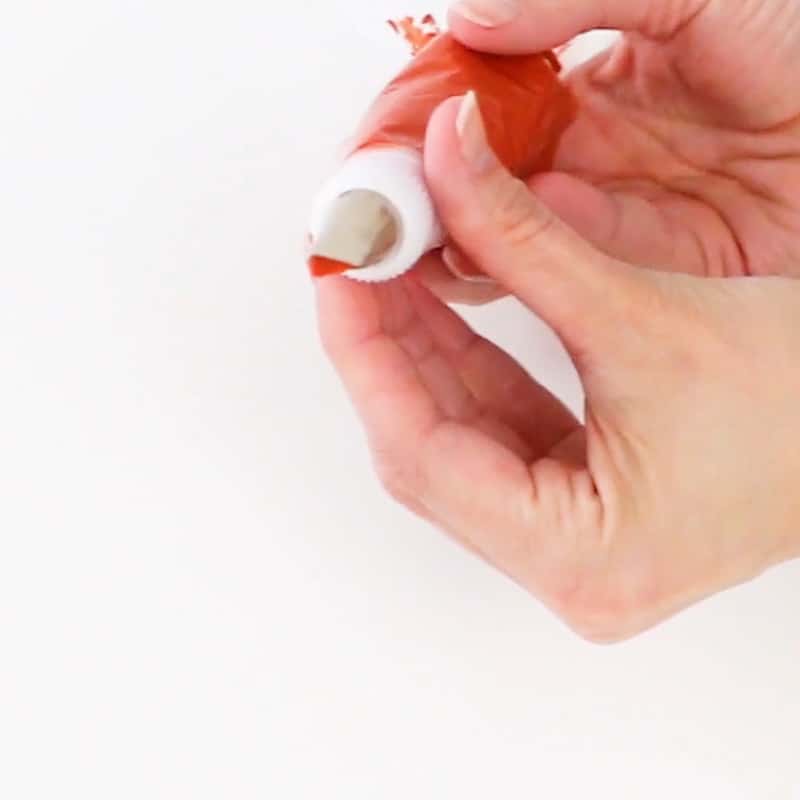
For the dark red (burgundy) I used a 104 tip.
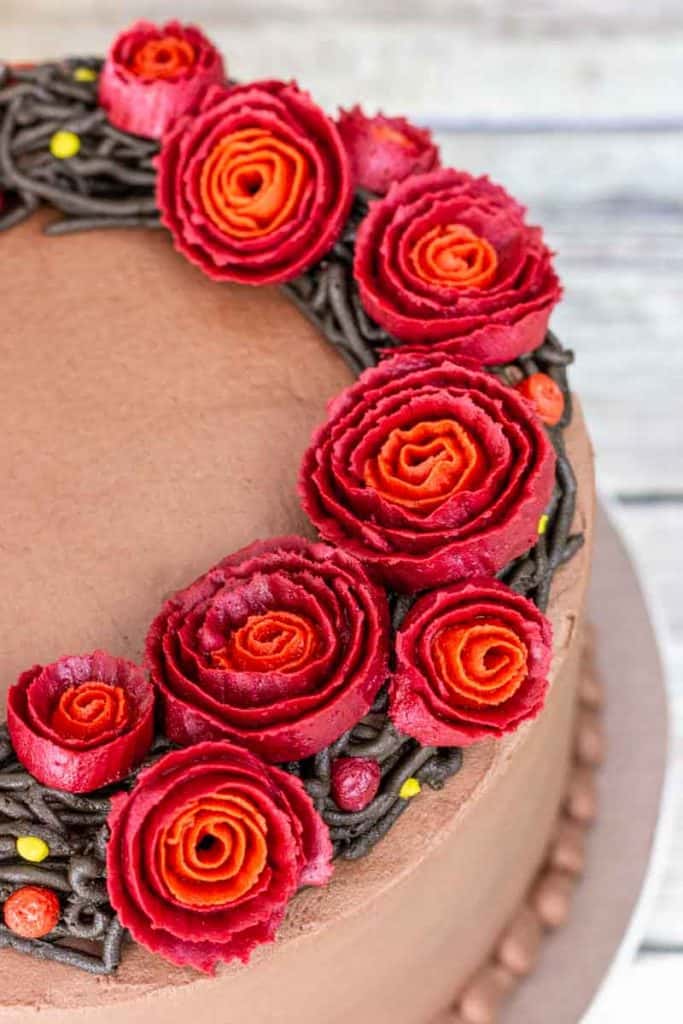
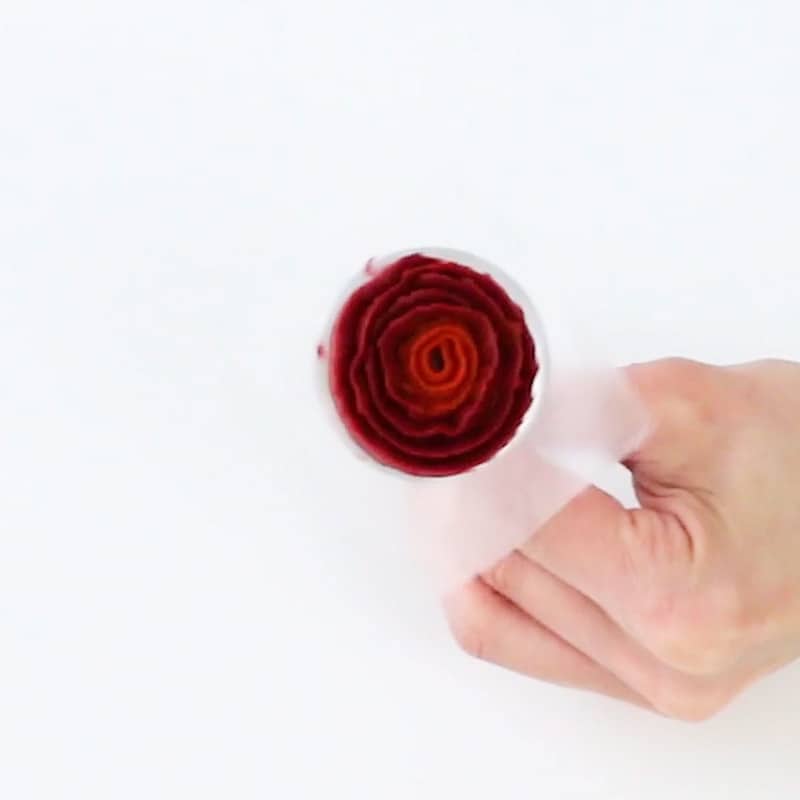
Now here’s the trick: You’ll be holding your flower nail between your thumb and forefinger and you’ll need to twirl it as you pipe. You want your ‘petals’ to go as far as you can without stopping, so you’ll want to roll the flower nail all the way back as far as you can, so you can then twirl it up as far as you can. (That makes more sense in the video.)
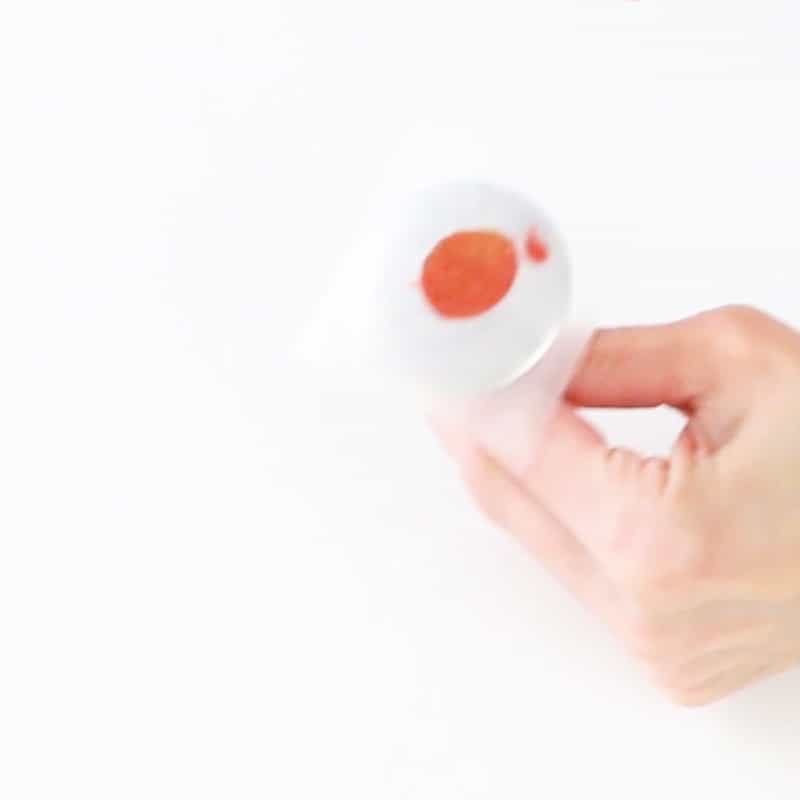
Now you’ll just add a little buttercream to the top of your flower nail. It doesn’t matter which color, but I just used the dark orange, since that’s the color of the inside of the rose.
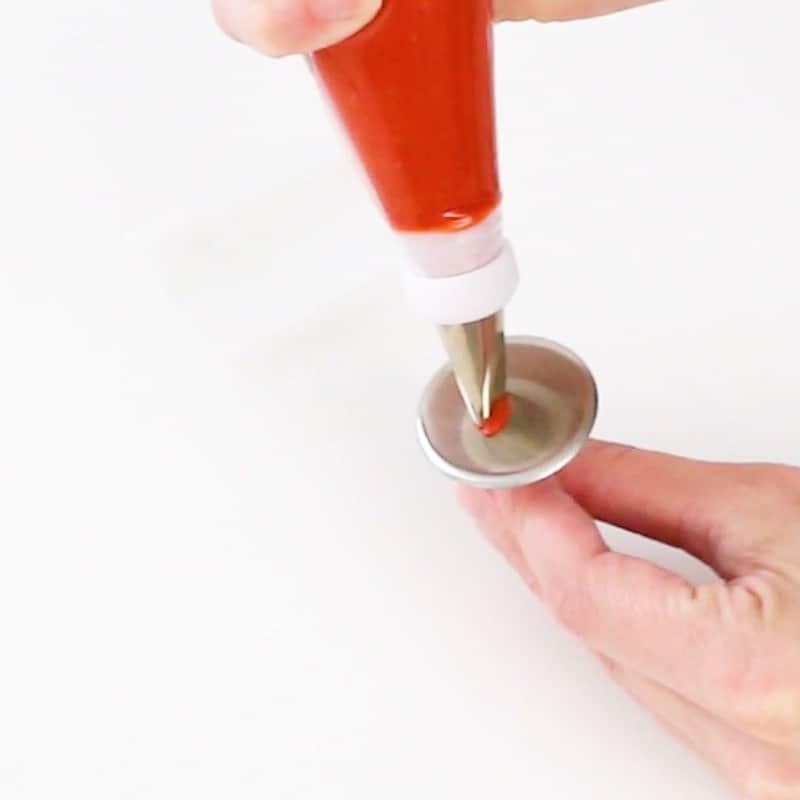
Now just turn it upside down onto a square of parchment or wax paper and make sure it’s good and attached.
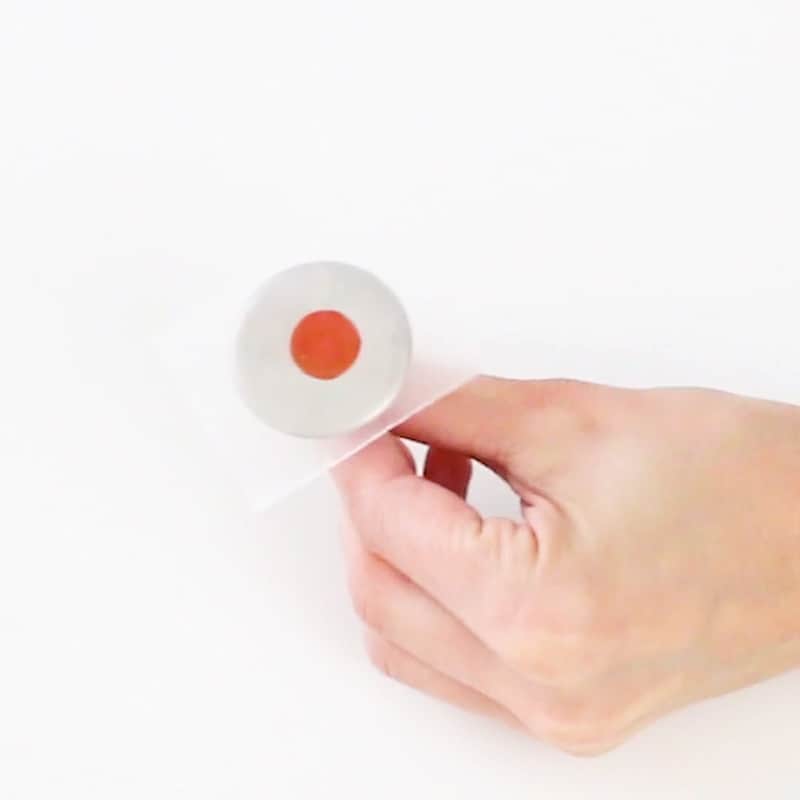
When you pipe your roses, the skinny end of the petal tip needs to face up.
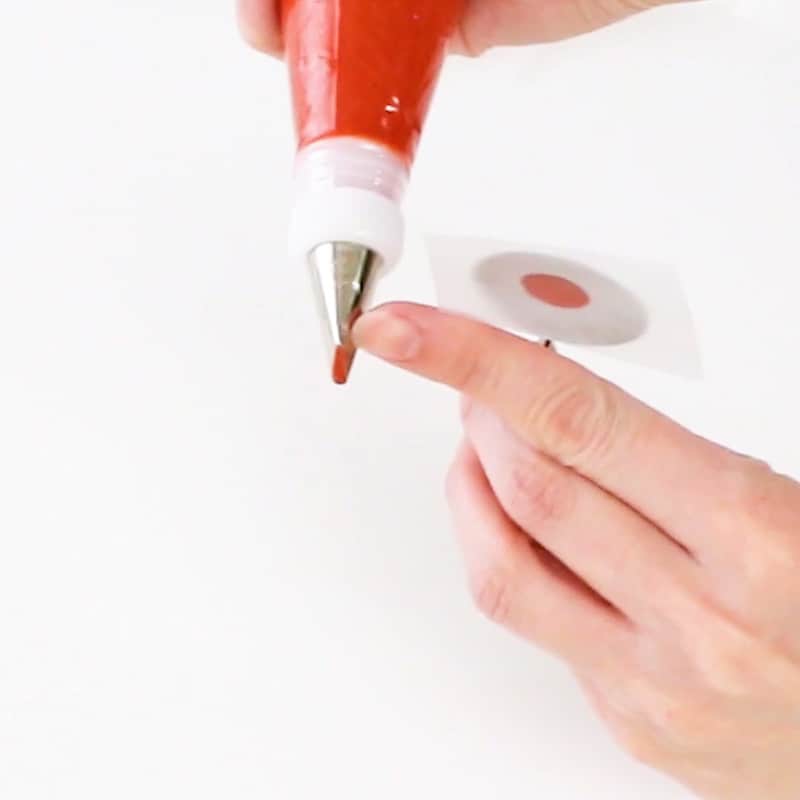
You’ll start in the middle of the flower nail and just hold your piping tip straight up and down but with a slight tilt to the inside and pipe a swirl. If you go too slow, it doesn’t seem to work well. Just commit and go for it. Pipe the swirl as you’re twirling the flower nail.
You may have to do this a couple times to get the hang of it, but it’ll come to you quickly.
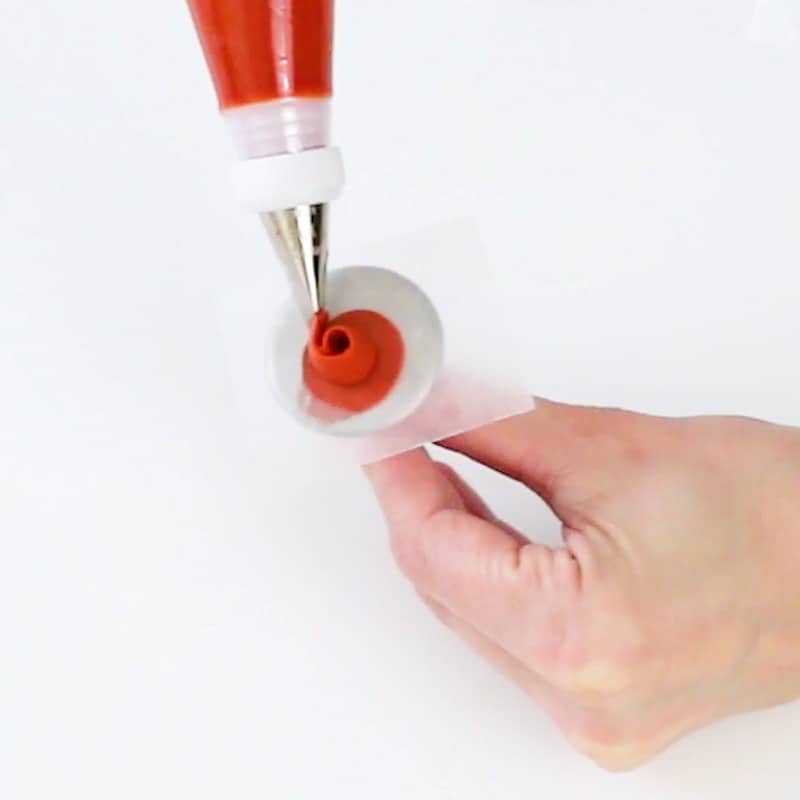
Now twirl the nail back to it’s starting point and do another swirl of dark orange buttercream. Pipe and twirl until you can the flower nail is as far as you can twirl it in with your fingers.
You’ll want to do one or two twirls of the orange and then move to the dark red for the outside petals.
You’ll do the same thing with the dark red. Just twirl your flower nail in your fingers back to it’s starting point and the pipe on the red swirl.
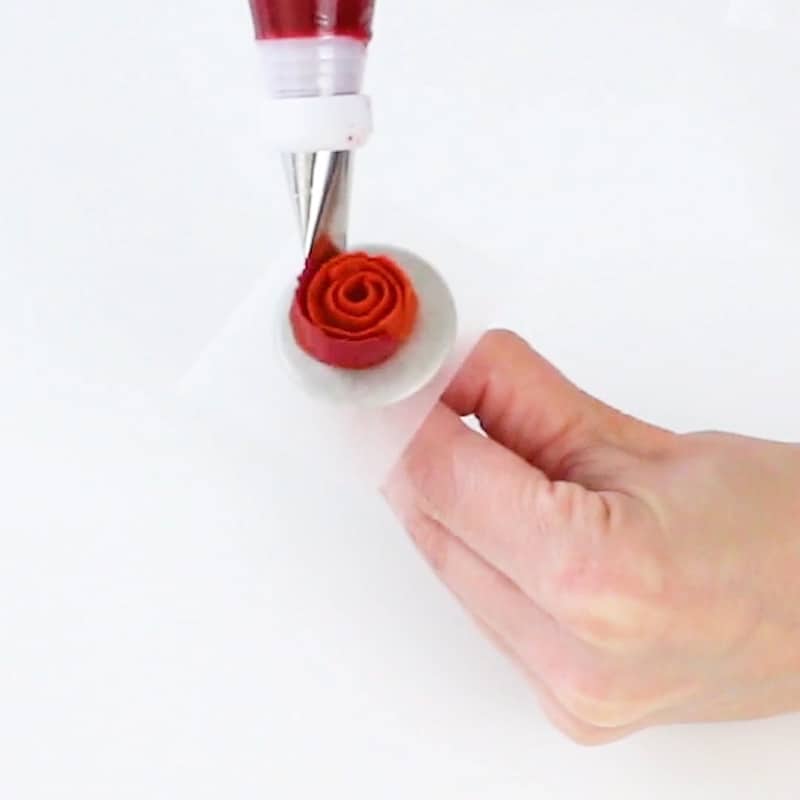
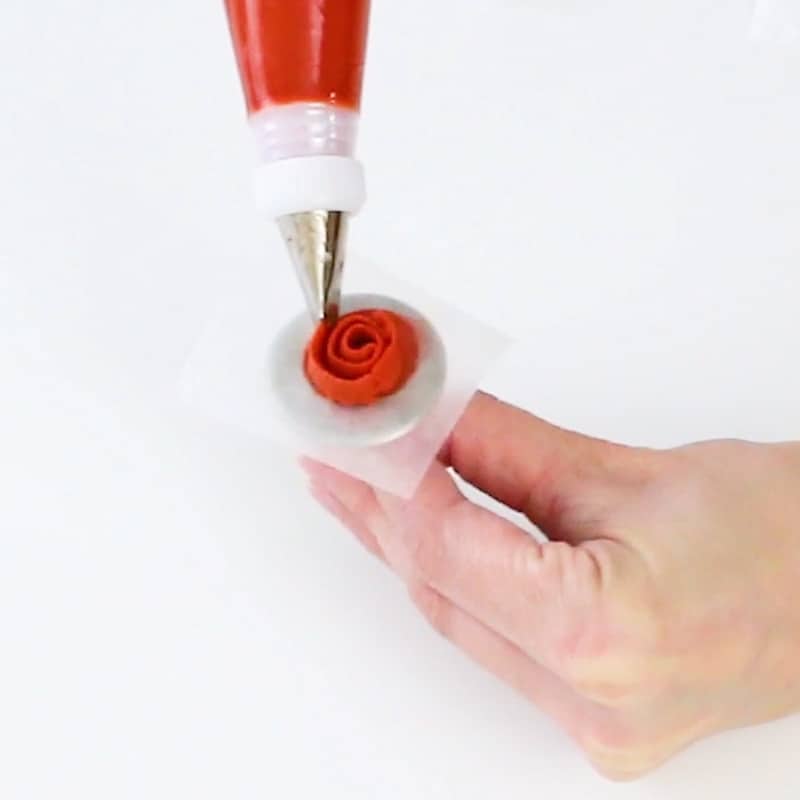
Move the flower nail back to the starting point again and then add another swirl of buttercream.
You’ll do maybe two or three rounds of the outside color depending on how big you want your roses.
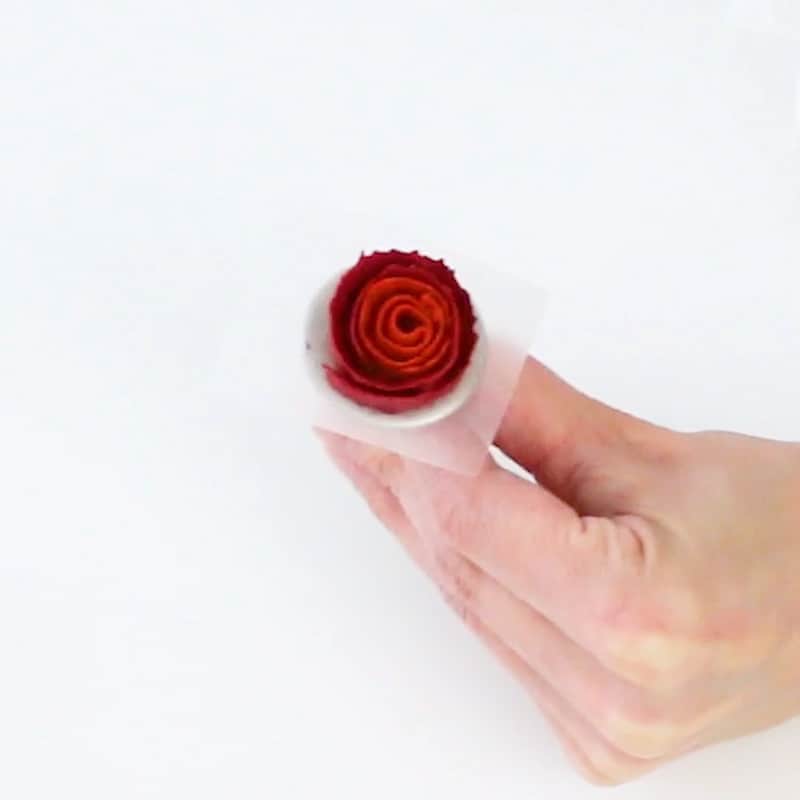
Once you’ve piped your rose, grab the wax paper square, slide it off the flower nail and set it on a tray or cake board. You’ll chill these once you’ve made all of them.
You’ll want to do some smaller ones as well as medium sized roses, so you have a good selection to choose from.
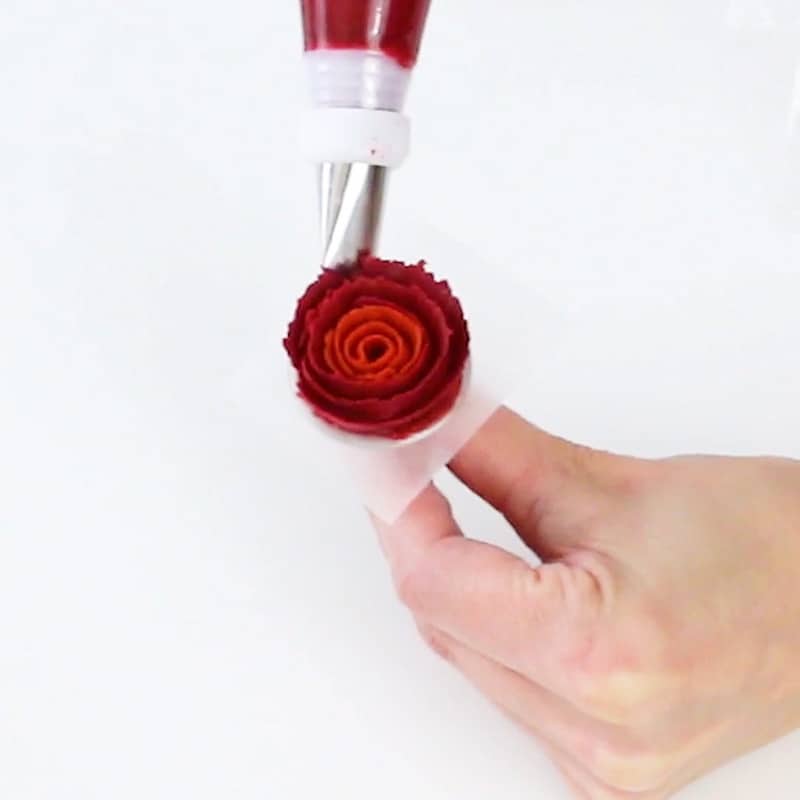
Once you’ve got a couple small ones and medium sized ones done, you’ll move to the larger flower nail and make some large ones.
This is the same process, you’ll just be adding more rows of the outside color.
Once you’ve got them all finished, pop them in the fridge to firm up while you work on the wreath part of your cake.
For this, I just used the chocolate buttercream in a piping bag fitted with just a coupler, but it doesn’t really need a coupler. You’ll just pipe a ring around the top of the cake. Don’t go too close to the edge though.
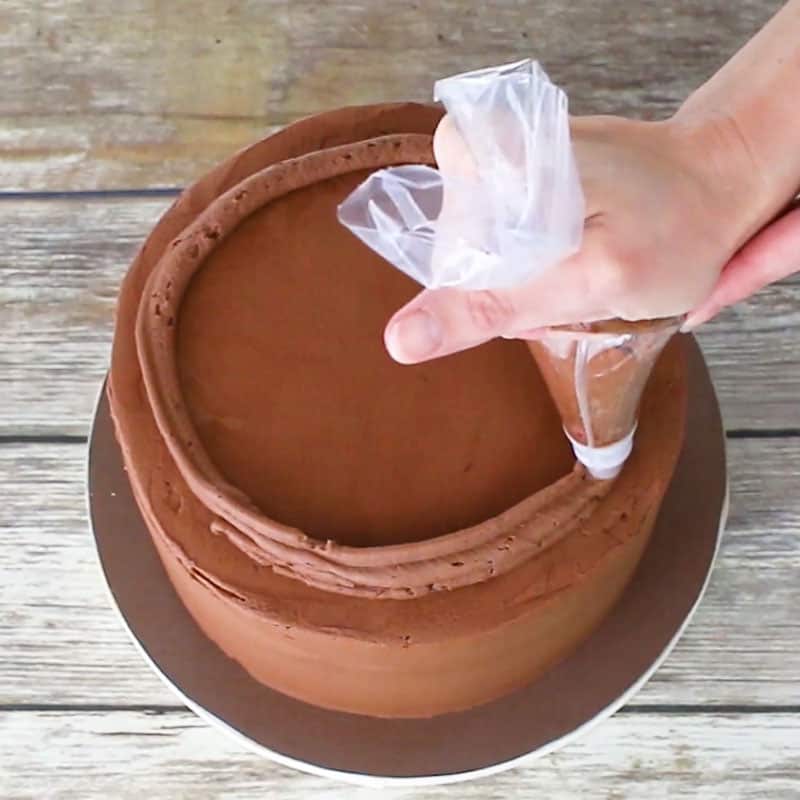
Once you’ve got the ring pipe, go along and sort of smoosh it down a bit. I don’t think ‘smoosh’ is an actual word because spell check keeps making it red, but I’m gonna use it anyway.
Now just take your dark brown buttercream and add it to a bag fitted with a round tip #5.
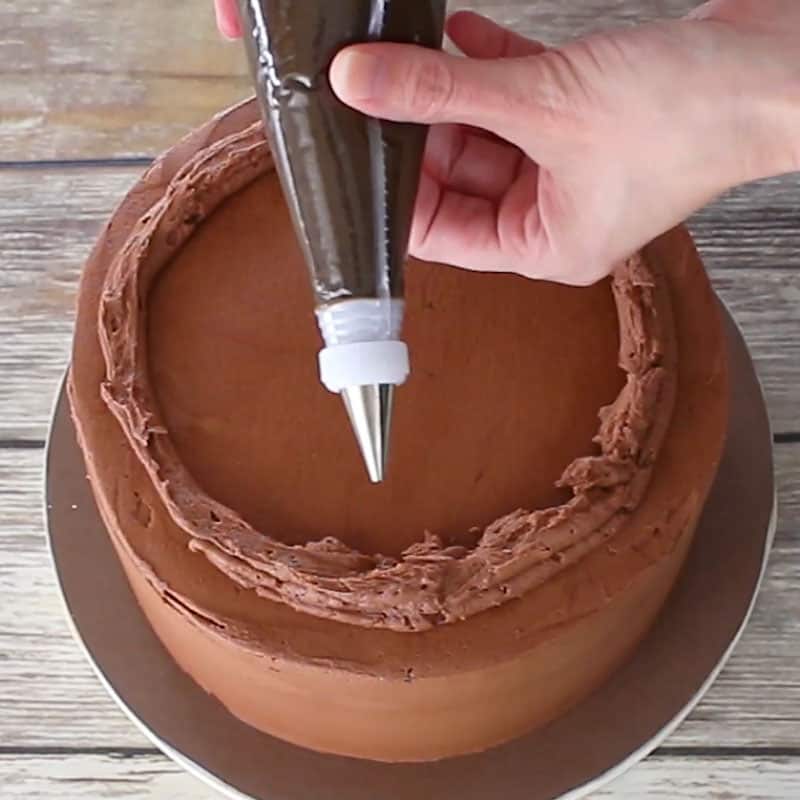
Now you’ll just pipe lines all around the icing ridge that’s on your cake.
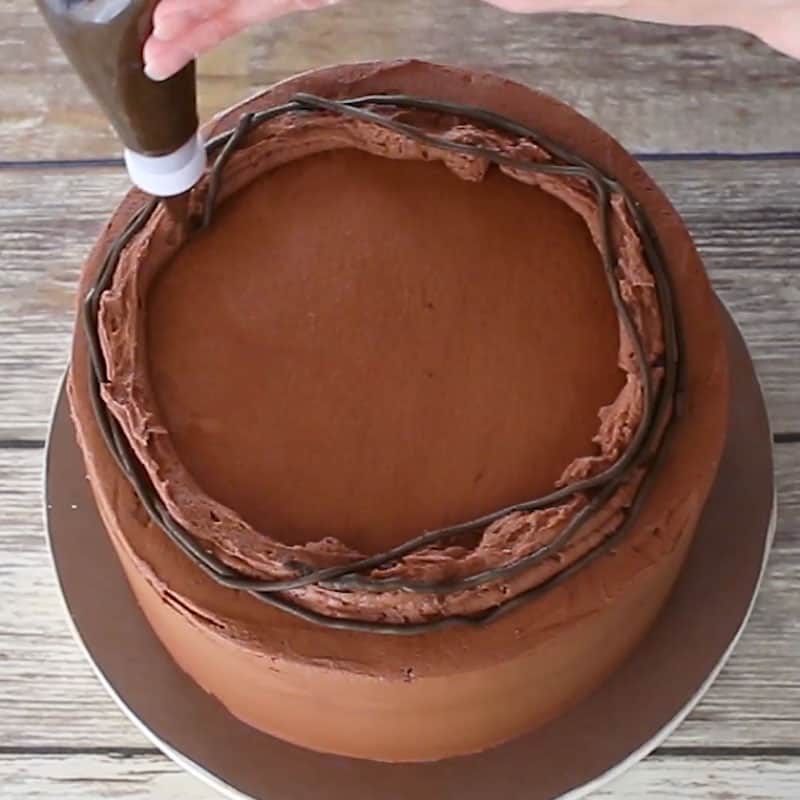
Just keep piping to cover up that ridge. You’ll want to pipe some on the inside and the outside of the ridge.
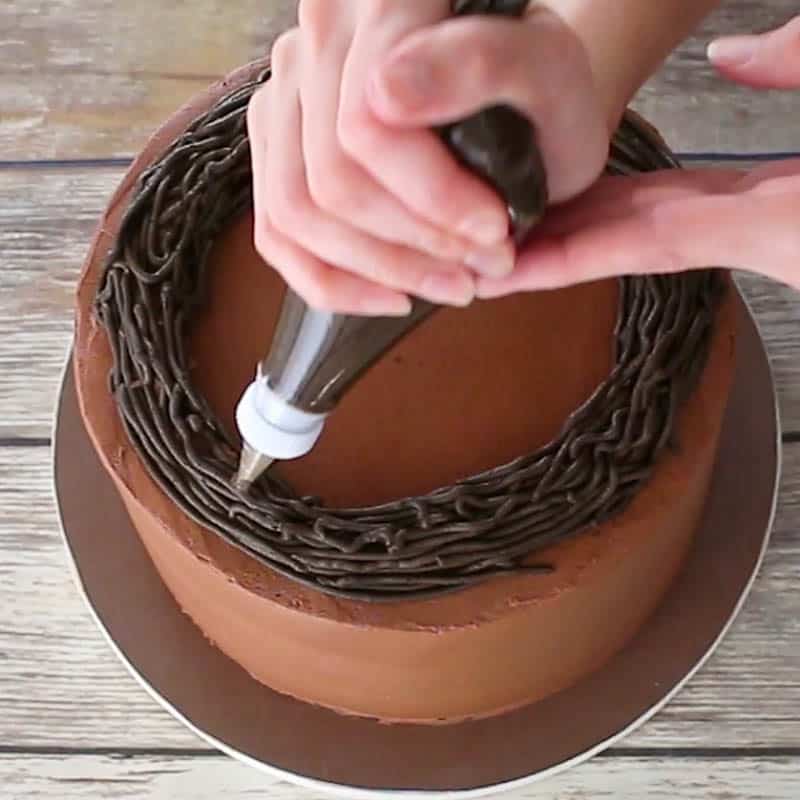
Once the ridge is covered, you’ll pipe some squiggly lines here and there.
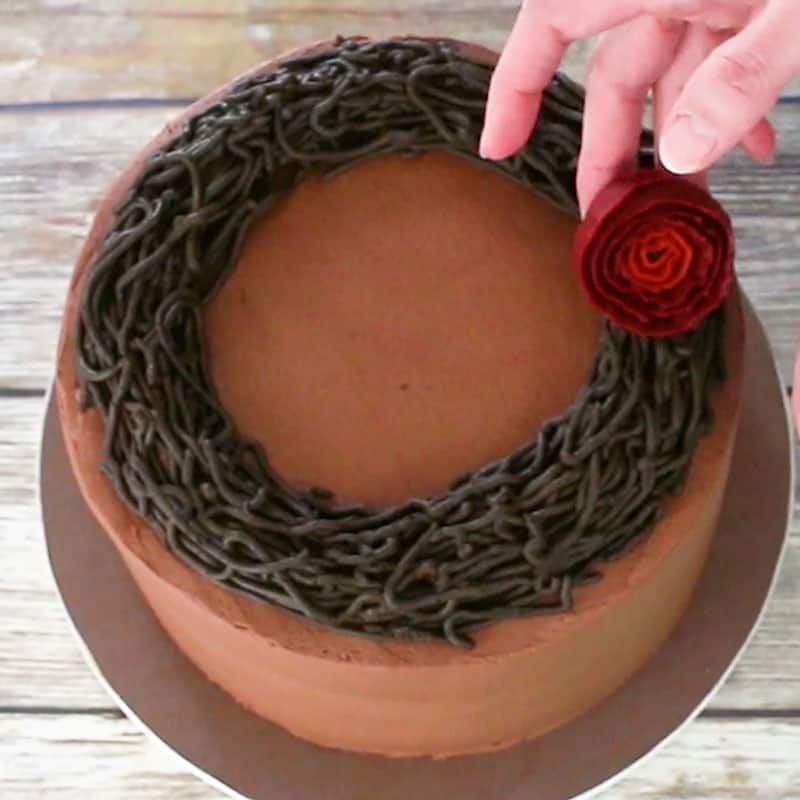
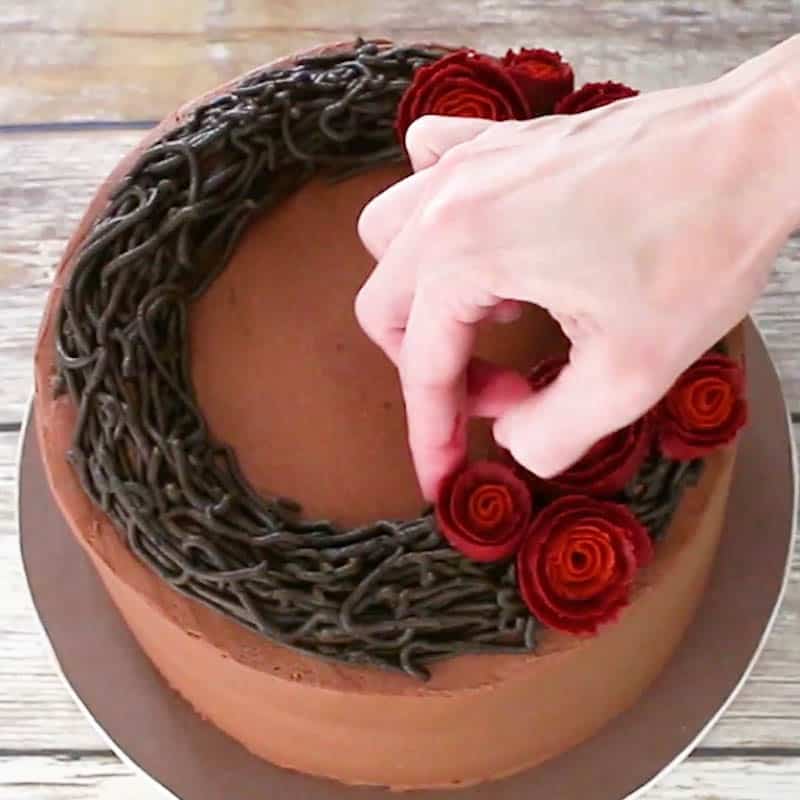
Okay now we’re on the home stretch. Take your roses out of the fridge, peel off the wax paper and add them to the cake. I just added mine to one section of the wreath, but you can add yours any way you like.
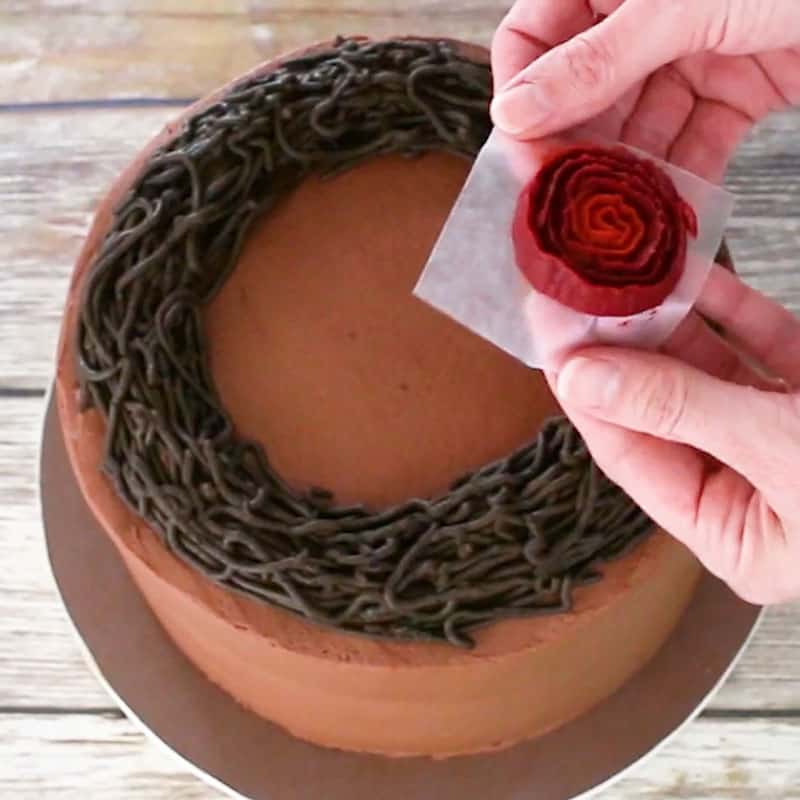
If your roses are softening up on you while you’re adding them, just pop them back into the fridge to chill a bit more.
Now, you could perhaps use one of those scissors specifically for placing buttercream flowers onto cakes, but I don’t like those, because I can’t work them and it messes up everything around and underneath where I’m placing the flowers. It’s your choice though.
Keep adding the roses on until you like what you see.
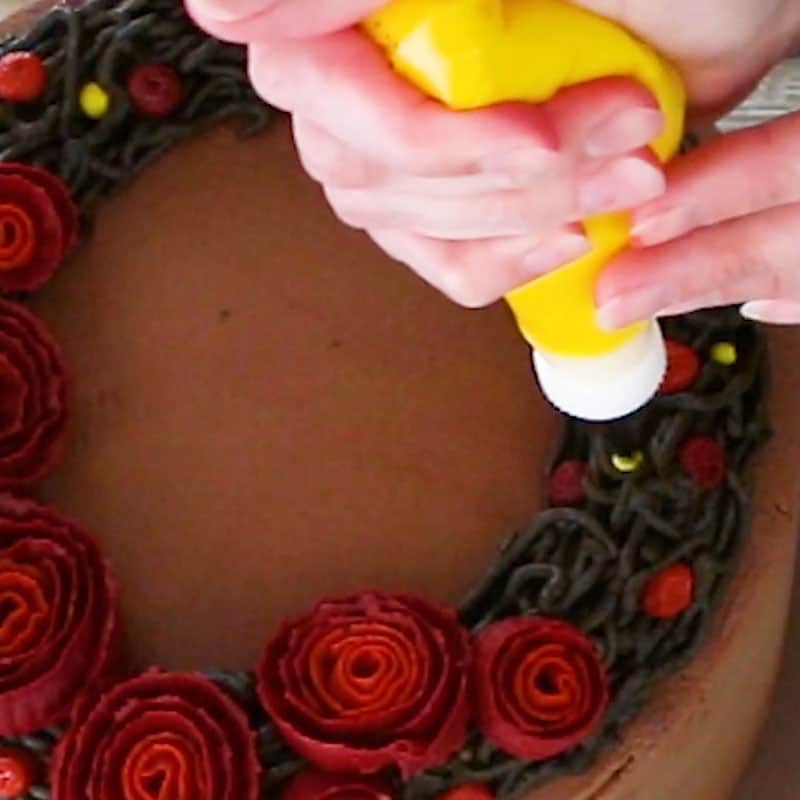
Once they’re all on, you can add your berries. I piped dark orange and dark red berries randomly with a #12 round piping tip.
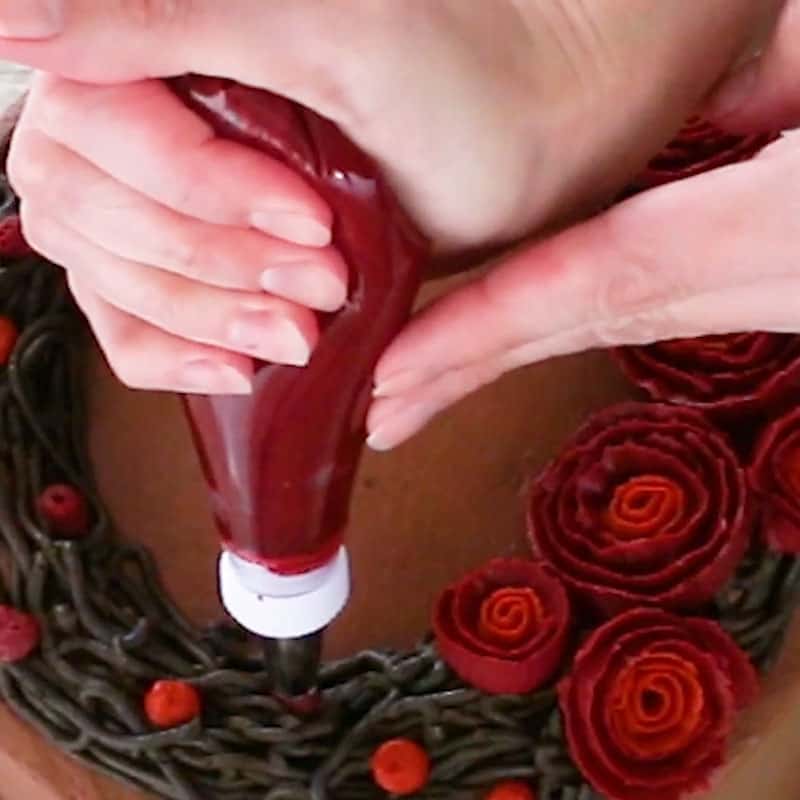
Then pipe on the yellow berries with a #5 round tip. I have no idea whether yellow berries actually occur naturally, but I like yellow and I wanted to add in a little color variation.
Last, you’ll just pipe on a border at the bottom. I just used a round tip #12.
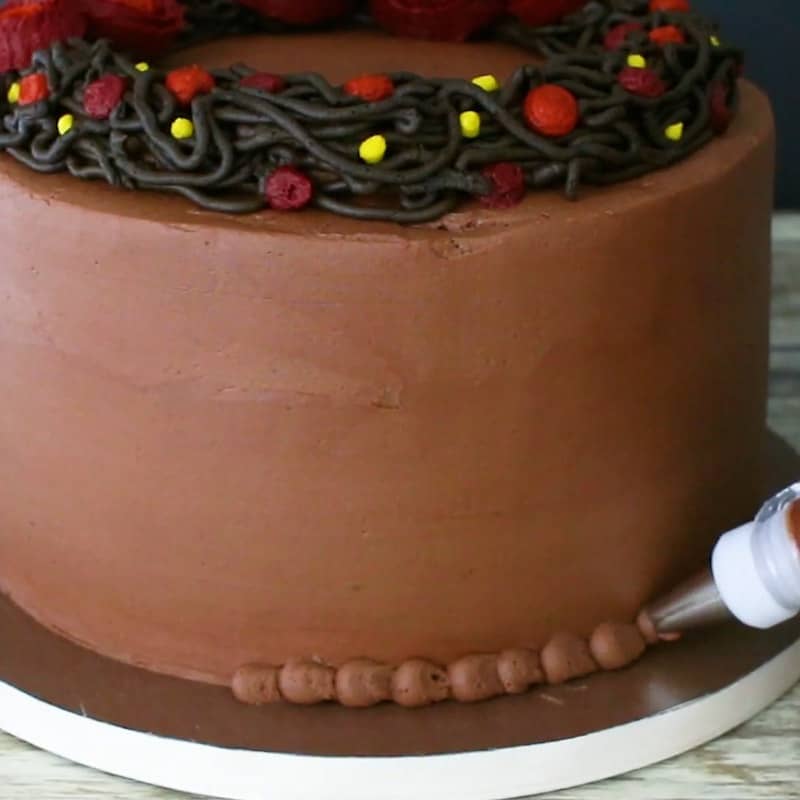
Ok…good job! You’re done! You now have a centerpiece for your fall or Thanksgiving gathering that’s all buttercream…no fondant in sight.
So what variation will you try?
Video on How to Make the Fall Wreath Cake:
Other fall cake tutorials you might like:
Don’t Forget to Pin it for Later!
Anthony Pizzella
What type of filling on the fall wreath cake did you use?
Kara Jane
I just used chocolate buttercream. Here’s my recipe if you’d like to check it out: https://iscreamforbuttercream.com/double-chocolate-buttercream-recipe/